

Want to start deploying on Kubernetes? But don't know where to start? Deploy a simple pod and understand the significance of the Manifest file to do this!
Manifest Files
When creating any resource on Kubernetes, or maybe even modifying or deleting any resource, we create a specific file called the Manifest file. It's no rocket science. It's just a plain simple text file that is written in YAML or JSON format.
In manifest file is a way to make Kubernetes understand what resources you desire to create (or update/delete). For this, all you have to do is write the file in a particular format that's acceptable by Kubernetes, and apply it! We'll tell you how.
For now (and for this series), we're going to use our local systems for playing around with. So make sure you have a minikube cluster running in your local system. (See our last post on setting up minikube, to begin with).
P.S We really hope you got your basics right about the Kubernetes Pod Concept. No? Then our post dedicated to Pods from our Kubernetes 101 series is the right choice for you!
YAML
Before we start. Let's talk about YAML. If you're already familiar, feel free to skip this section. But we're putting this in. Just to be sure...
All you need to know in YAML are two terms: Maps and Lists. A Map is a key-value pair and a List is...well a list of items.
Now a few pointers:
- A simple key-value pair is written as "key: value".
- List items are prepended with a "-" symbol.
- To denote nested structures use spaces (2 or 4)
- And "- - -" will mean a new YAML file.
key1: value1
key2: value2

listKey:
- item1
- item2

nestedOuterKey:
  nestedInnerKey: value
If you translate this into JSON then you get:
{
  "key1": "value1",
  "key2": "value2",
  "listKey": [
    "item1",
    "item2"
  ],
  "nestedOuterKey": {
    "nestedInnerKey": "value"
  }
}
Simple eh? Now to our main concern:
Behind the Scenes
You write a manifest file and hand it over to Kubernetes to create your required resources. But what happens behind the scenes?
The file is accepted first by the API server. Because hey, the Kubernetes API server is the client-facing component in Kubernetes. (See our post on Kubernetes Compnents you'll know).
Once this is done, the resources are created accordingly. So, for example, if you want a Pod. Then a node is selected by the kube-scheduler for the pod to run on. The specification is handed over to the node's kubelet which creates and monitors the pod.
Wait. Kubelet? Kube-scheduler? Again, if you're a bit confused about these things then quickly read through our post on Kubernetes Components
Anatomy of a Manifest File
Ok, so the manifest file is basically just a YAML file. But how exactly do you write it so that Kubernetes can comprehend it? Let's see how.
Divide the manifest file into three sections or you have three major keys under which you are going to have more objects (key-value pairs). Like a nested object.
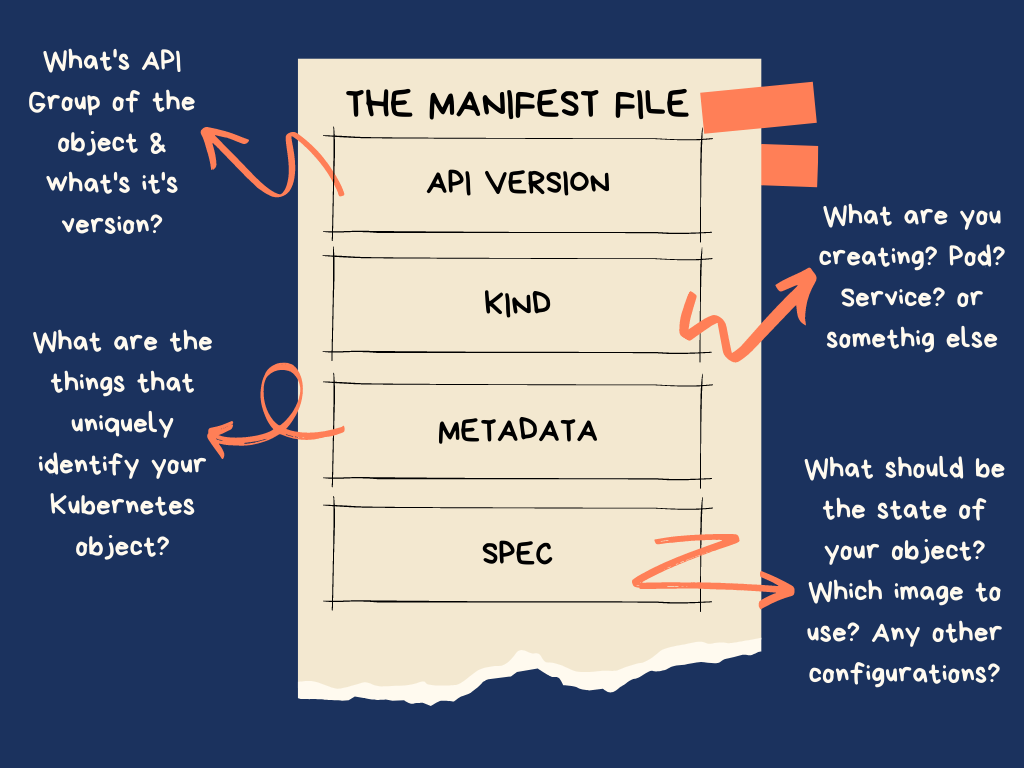
API Version
This will determine the version of the Kubernetes Object. Mind you, I am saying a Kubernetes object. Meaning any resource you are creating on Kubernetes. So how does this work? See, each resource will belong to a particular API group. For example, a Pod belongs to the API group /api/v1 , A deployment belongs to apps API group and so on...A few common API groups are:
"/api",
"/api/v1",
"/apis",
"/apis/admissionregistration.k8s.io",
"/apis/apiextensions.k8s.io",
"/apis/apiregistration.k8s.io",
"/apis/apps",
"/apis/authentication.k8s.io",
"/apis/authorization.k8s.io",
"/apis/autoscaling",
"/apis/rbac.authorization.k8s.io",
"/apis/storage.k8s.io",
It's the version of this API group that you provide within the API Version section. Usually, you either use a stable version or a beta version. The beta version implies that it is in active development and there are high chances that it'll be released as a stable version in the near future
Kind
What resource are you creating? Pod? Service? Or maybe a Job? Specify within the "Kind" section.
You can create a lot of resources like pod, service, ingress, config map, daemon, job, cronjob, secret...the list goes on. We'll try our hand at the "pod" resource kind first.
Metadata
Look at this as some external data that is required so that you can uniquely identify your resource. You can have a lot of pods running on your cluster but which one was created by you? Give your pod a name and you'll know. Also maybe provide a namespace. The name and the namespace are examples of metadata that you can easily provide!
Spec
This is the longest of all. The spec describes what state your resource should be in. Like for example,
what image do you want to pull?
How many replicas do you want of your object?
Are there any specific ports, maybe environment variables or command arguments required?
Writing a Pod's Manifest
Enough talk! Let's get down to writing a manifest for once! For now, we have a simple Go program that runs an infinite loop printing "Go Chronicles is Awesome" every 10 seconds:
package main

import (
	"fmt"
	"time"
)

func main() {
	for {
		fmt.Println("Go Chronicles is Awesome")
		time.Sleep(10 * time.Second)
	}
}
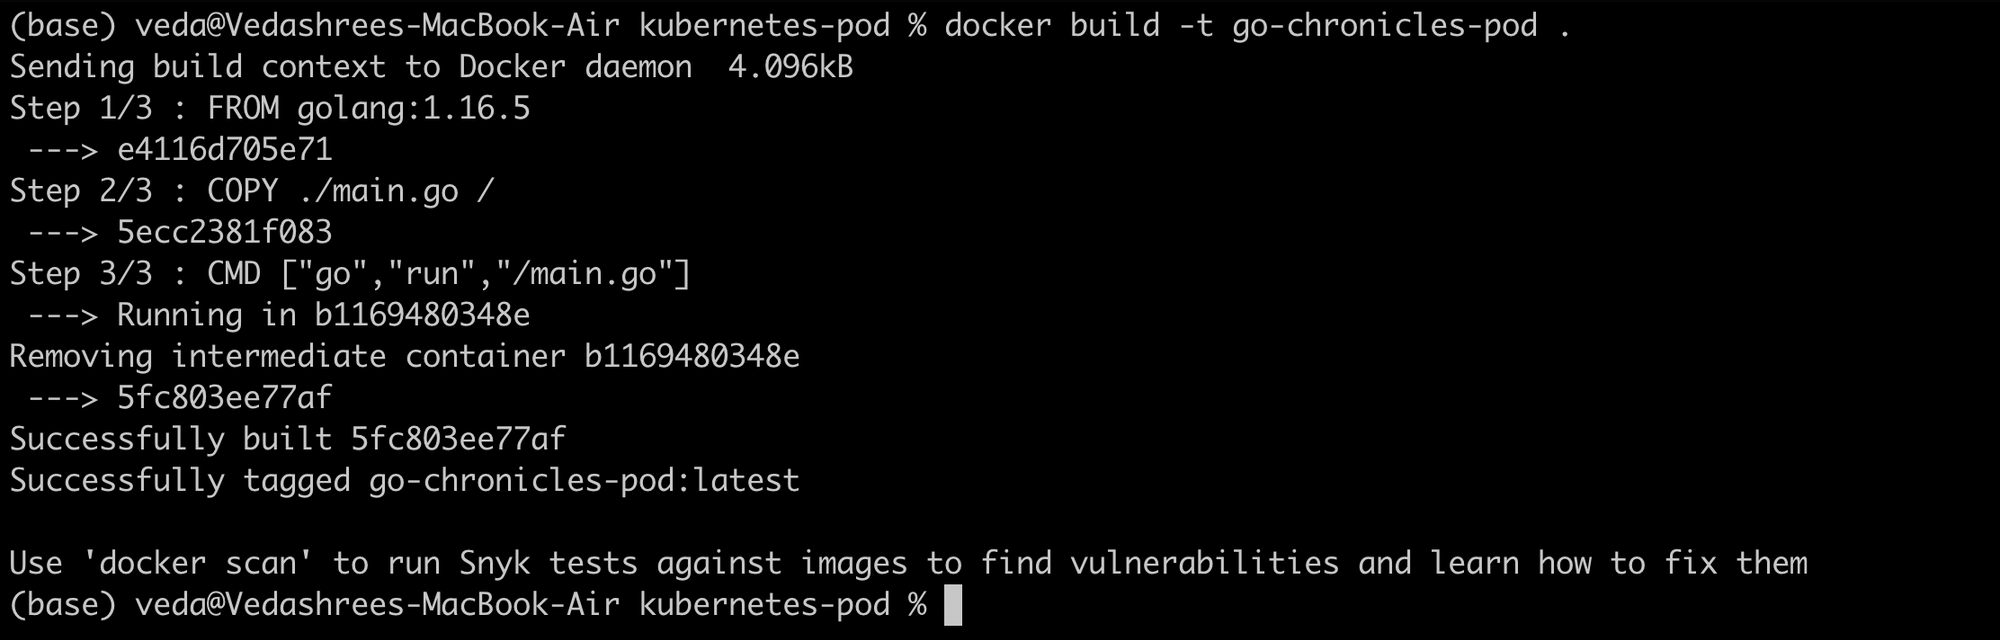
And we have created a Docker image from this using our Dockerfile
FROM golang:1.16.5
COPY ./main.go /
CMD ["go","run","main.go"]First, we start our minikube cluster:
minikube startAnd then, we run the docker build command from our working directory where we've saved the main.go file
Since we are using minikube, we need to build the image using minikube's docker daemon. Mostly because we are going to use this image locally and not going to push it to a repository. That's why before you run the docker command, make sure to run this command:
`eval $(minikube docker-env)`
Note: This has to be executed in every new terminal window you create.
docker build -t go-chronicles-pod .Once, this is done, let's start with the manifest file. The first three sections i.e. API version, kind, and metadata are pretty easy to fill out. We want a pod called "my-pod" in a namespace called "my-namespace".
- API Version = v1
- Kind = Pod
- Metadata
name = "my-pod"
namespace = "my-namespace"
Coming to the spec, we need to provide information on the container image that the pod will use. Like:
- Our container image is going to be "go-chronicles-pod". The one we built earlier
- We also need a name for the container. We'll call this "my-pod-container".
Finally, we set the "imagePullPolicy". What this tells you is how the container image should be pulled. This can be either of these options:
- Always: Pull the image every time the pod is created
- Never: Never pull the image *
- IfNotPresent: Only pull the image if it's not found locally.
* We are using the Never option because we have built the image locally and we need to use the local image. Generally, Kubernetes will try to pull an image from a container repository like DockerHub. The Never option will prevent this.
All in all, our manifest file will look like this:
Apply to Deploy!
Once the file is in place. Time to deploy! (Locally) Make sure you have kubectl installed and configured for minikube.
Remember how to work with kubectl? A quick recap before we go. Here's the format of any generic kubectl command:
kubectl <what action do you want to do> <on which resource> -n <your namespace><other options> <name of the resource>
Step 1: Create the namespace
action = create
resource = namespace
name of the resource = my-namespace.
Your command will be:
kubectl create namespace my-namespace
Step 2: Apply the Manifest file
action = apply
file path = my-pod.yml
options = -f
kubectl apply -f my-pod.ymlOn successful creation, you'll see a message
pod/my-pod createdYou can quickly check if the pod is created by running
Step 3: Verify Deployment
kubectl get pods -n my-namespaceThis is what we get as our output:

The "STATUS" tab shows you if the pod is running smoothly or not.
- If it's in the Running state, that means the pod is executing current.
- If the status is "Completed", then it means the pod is done executing.
- Any other status, like "CrashLoopBackOff", "ErrImagePull", will imply that an error has occurred.
- While the "ContainerCreating" status means the container is yet to start.
Step 4: Check the Logs
You can easily check the logs of the pod to verify if you have the desired results:
kubectl logs <name of the pod> -n <namespace>We run :
kubectl logs my-pod -n my-namespaceAnd we see our string being printed out:

If you want to see the pod's complete specification in yaml format simply run
kubectl get pod my-pod -o yaml -n my-namespace
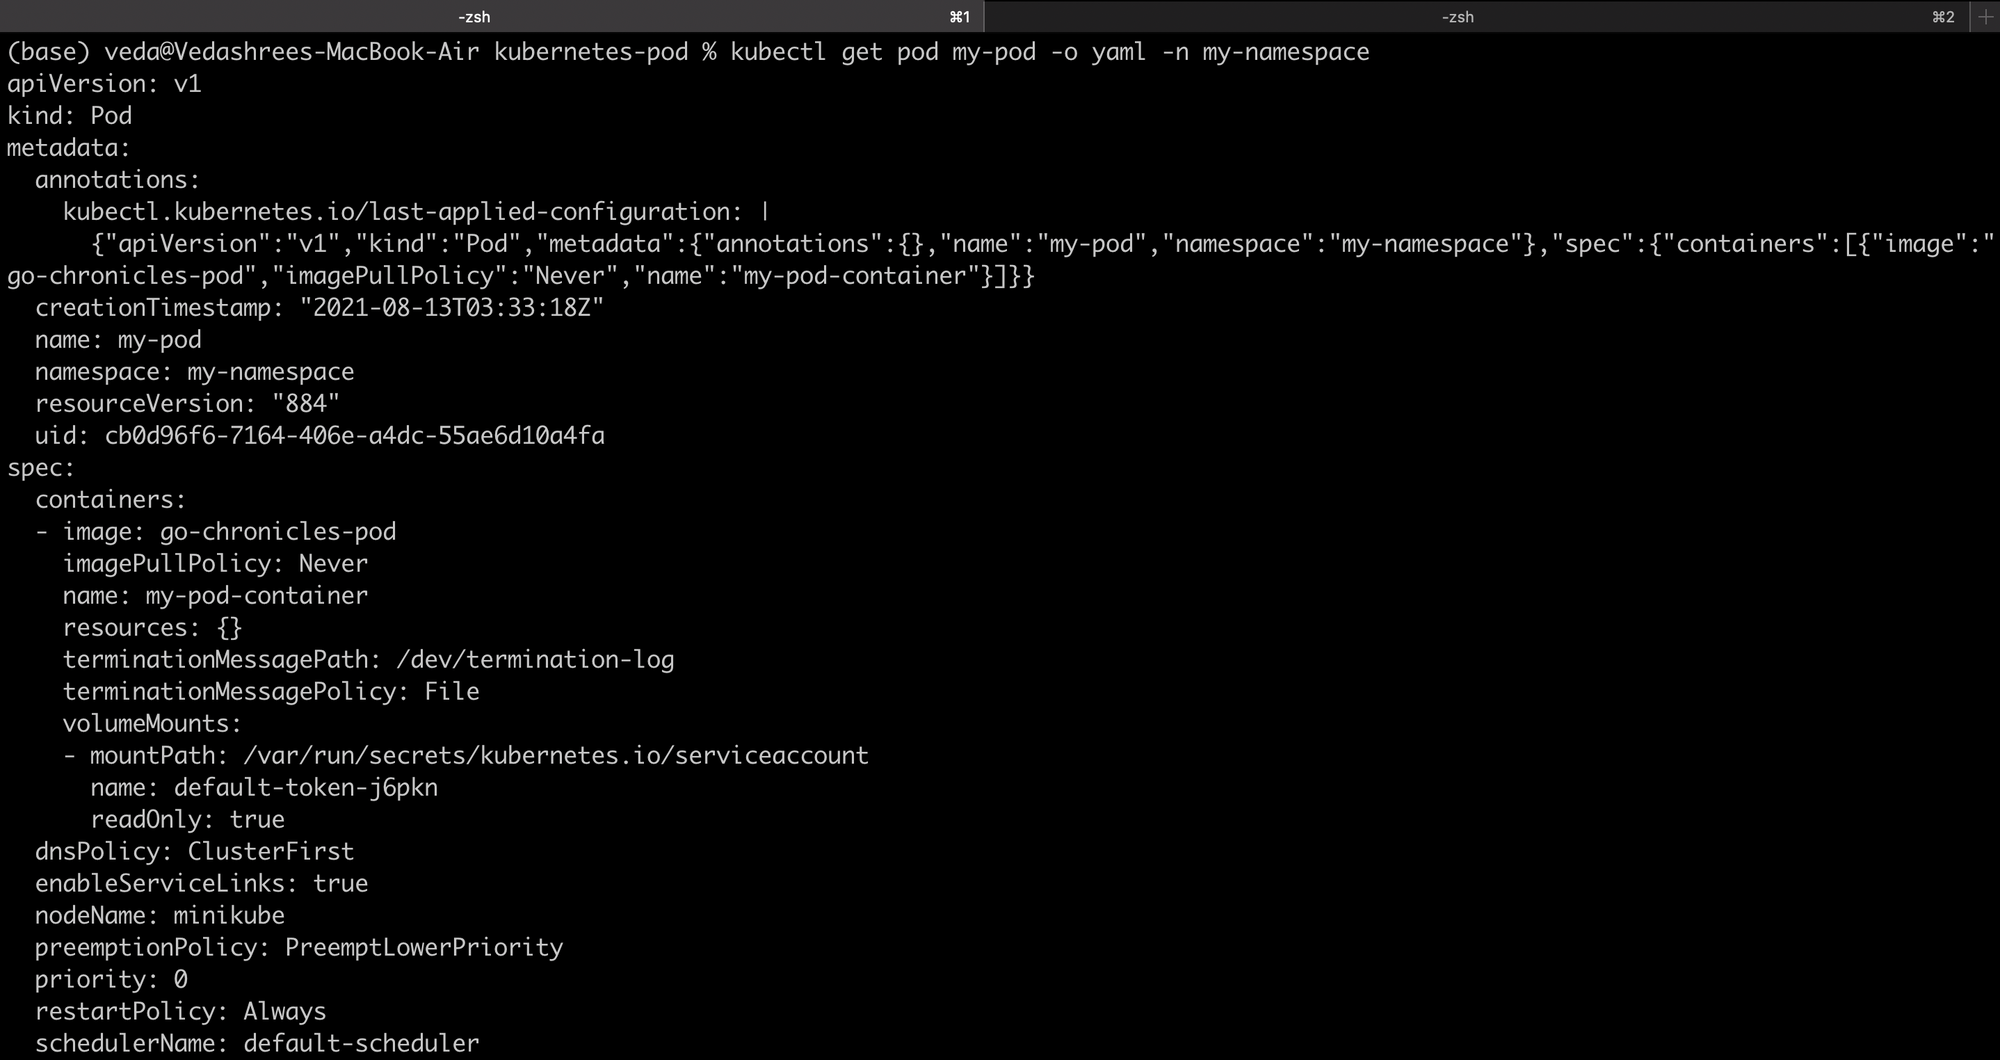
It's somewhat similar to what we defined. But Kubernetes had added many more values to it.
A little more to the Manifest file
We do a slight change to our code. Instead of a fixed string, we want it to be read from an environment variable called "MY_ENV_VAR"
package main

import (
	"fmt"
	"os"
	"time"
)

func main() {
	for {
		envString := os.Getenv("MY_ENV_VAR")
		fmt.Println("This comes from the environment variable:")
		fmt.Println(envString)
		time.Sleep(10 * time.Second)
	}
}
Now, accordingly, we need to specify this environment variable in our manifest. Edit the spec section for this. You simply need to create a new key called "env" and you can pass a list of environment variables and their values underneath it:
 env:
   - name: MY_ENV_VAR
     value: "Go Chronicles is Awesome"
Your final spec file will look like this:
Now repeat all the steps we've given above.
- Build a new Image
eval $(minikube docker-env)

docker build -t go-chronicles-pod .
- Apply & verify
kubectl apply -f my-pod.yml

kubectl get pods -n my-namespace

- Get the logs:
kubectl logs my-pod -n my-namespace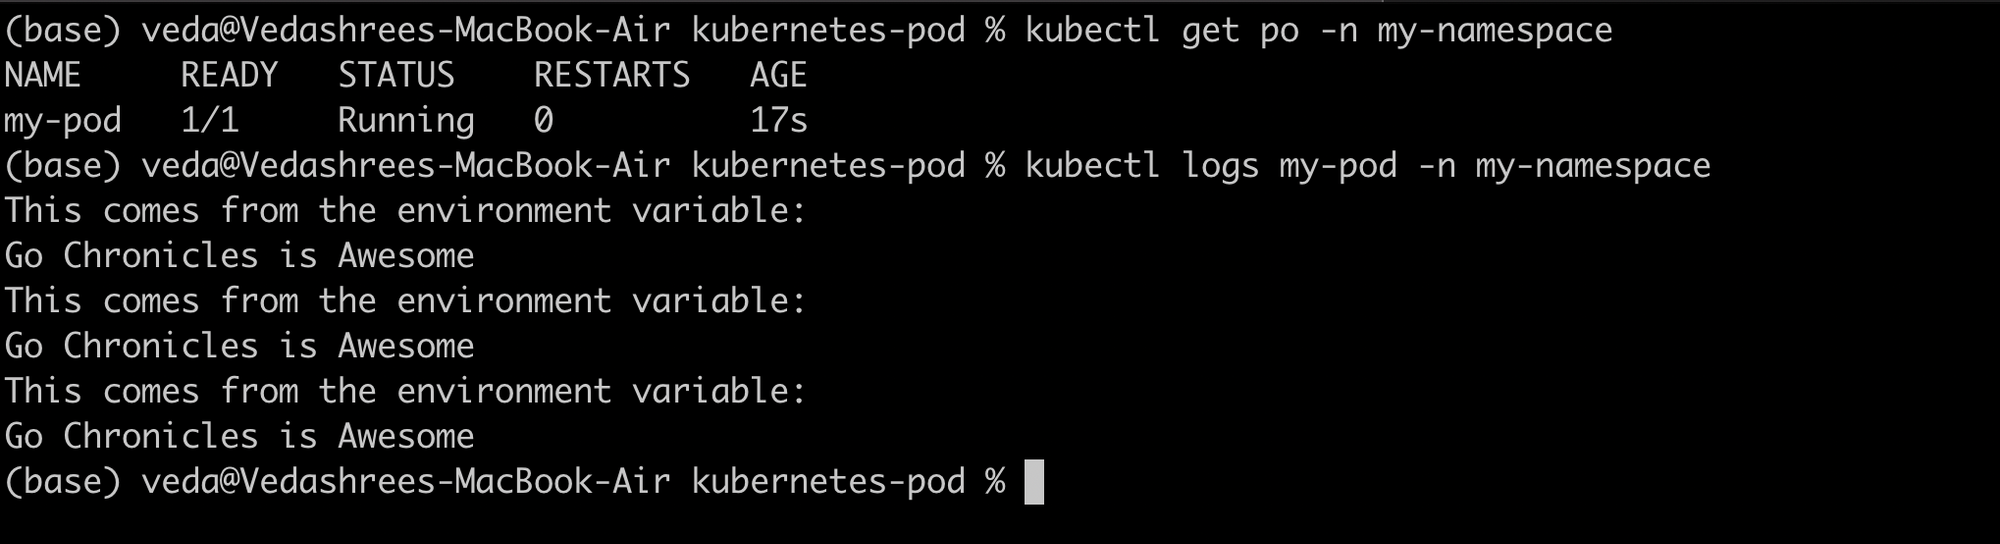
See? Our pod is showing the updated logs!
Delete the Pods
In case you want to delete a pod. That can be done with kubectl too
action = delete
resource = pod
resource name = my-pod
namespace = my-namespace
Your command is going to be
kubectl delete pod my-pod -n my-namespace
Optionally, if you don't want your minikube cluster. The run:
minikube deleteDone! we are all clean now.
What's Next?
Congratulations you just created and deployed your first pod on Kubernetes. Wasn't it simple? We wanted it to be! In reality, you can add a lot of things to the manifest file. Do a lot of customizations. It all depends on what your requirements are.
But we believe in going one step at a time. So we start small. In the upcoming blogs, we'll tell you how to create literally everything in Kubernetes. Yes, it's just one pod right now. But hold on! Things are going to get interesting from here. See you in our next post!
References


Join the conversation