
The sound of minikube resonates across the Kubernetes world. But why?
Welcome to the first part of our brand new series! Yes, yes, we already have a series called Kubernetes 101. It's a great one to get your concepts and basics in place and we would recommend you to first have a look at it. But in this series titled "Practical Kubernetes", we are going to deploy and code! In this series we'll be putting all the concepts we saw in Kubernetes 101 into practice.
We'll first start off with local Kubernetes deployments using minikube. But for that, you need a little bit of setup in place. This is exactly what we're doing in this post.
Enter Minikube!
If you're getting started with Kubernetes, then you'll know that a usual Kubernetes setup consists of a cluster of multiple nodes that include the Master & Worker nodes. Master & Worker nodes have their own separate responsibilities. Now, a cluster can either be a set of physical or virtual machines.
But you really can't afford to have such a setup just to play around with Kubernetes, can you?
If you really want to understand the concepts behind Kubernetes in detail do visit our blog series Kubernetes 101: Series Introduction and the loopback here.

Kubernetes but a mini version of it. That's minikube. Minikube is a tool that lets you run Kubernetes locally. What it does is spin up a Kubernetes cluster for you with a single node. No matter what the OS is! Thereby making it easy to learn & develop for Kubernetes.
In this series, we are going to first use minikube to go through each and every concept in Kubernetes before we move on to the big guns (That's right cloud-based clusters coming up!).
But before that, let's install minikube in our local systems first.
But First, Let's talk about Kubectl...
Now when using any sort of a platform/framework, you always have some interface to interact with it. Like APIs, CLI, or client libraries. Kubernetes too has all of these. And the most commonly used interface is the CLI.
That's Kubectl for you!
Yes, kubectl is a CLI. And it's so intuitive that you can get the hang of it in minutes. Behind the scenes, all it does is send requests to the Kubernetes API after parsing the command given to it. (By the way, we tend to call kubectl, "Kyu-buh-cuh-tull". Don't know if that's right? What would you prefer?)
If you're wondering how to use kubectl, then you probably shouldn't. Because believe me, you'll be doing a lot of "kubectl" ing in this series.
The kubeconfig file and Contexts
There might be high chances that you'll have to deal with multiple clusters spread across various environments. But to connect to them, you have only one local machine. Fortunately, kubectl is capable of doing this.
This is done via the "kubeconfig" file. What's that? It's just a simple yaml file that helps you configure access to various clusters.
A little heads up here. There's no file called "kubeconfig.yml" on your system. It's just a term. Like, say, If you have a file called "some-random-file.yml" which configures access to a cluster called "some-random-cluster", then that's a kubeconfig
Usually, the default location for a kubeconfig file is ~/.kube/config (MacOS/Linux) and kubectl often uses this file to access clusters. But if you have a custom file then
use thekubectl --kubeconfig <path to config>option with kubectl
or set an environment calledKUBECONFIG=<path to config>
Next comes the concept of a context for accessing different clusters. A context is a combination of a cluster, user, and namespace in the kubeconfig file.
For example, if you work on two clusters: a local (minikube cluster) and a dev environment cluster on some cloud. On the dev cluster, you work only on the "my-namespace" namespace, and on the local cluster, you use the default namespace. Then you can have two contexts called "local" and "dev"
Local Context = You (user) + minikube (cluster) + default (namespace)
Dev Context = You (user) + dev (cluster) + my-namespace (namespace)
Kubectl will by default use the current context and you can always switch contexts to access different clusters with kubectl config use-context <context-name>. For example:
kubectl config use-context devwill switch your current context to dev.
Installation
Now that you know how minikube and kubectl are going to help. Let's get these two things up and running on our system.
What you'll need
This is what the official website lists as pre-requisites to run minikube on a local system:
- 2 or more CPUs
- 2 GB memory at least
- 20GB or more of disk space
You'll also need a container manager. Docker or Podman will do. (we'll stick to Docker for now)
Optionally, check if for virtualization on your system. For MacOS:
sysctl -a | grep -E --color 'machdep.cpu.features|VMX'For Linux:
grep -E --color 'vmx|svm' /proc/cpuinfoSetup Kubectl
Next up, install kubectl.
Installing on MacOS (Homebrew):
brew install kubectlInstalling on Linux:
curl -LO "https://dl.k8s.io/release/$(curl -L -s https://dl.k8s.io/release/stable.txt)/bin/linux/amd64/kubectl"sudo install -o root -g root -m 0755 kubectl /usr/local/bin/kubectlInstalling on Windows:
curl -LO https://dl.k8s.io/release/v1.21.0/bin/windows/amd64/kubectl.exe(Don't forget to add the binary to your PATH variable after this.)
Verify the installation using:
kubectl version --clientInstall Minikube
Install on MacOS with Homebrew
brew install minikubeYou can even install without Homebrew by using a binary download depending on your architecture. Like for x86-64 architecture, run:
curl -LO https://storage.googleapis.com/minikube/releases/latest/minikube-darwin-amd64
sudo install minikube-darwin-amd64 /usr/local/bin/minikube
If you have an ARM64 architecture (Apple M1 chips), run :
curl -LO https://storage.googleapis.com/minikube/releases/latest/minikube-darwin-arm64
sudo install minikube-darwin-arm64 /usr/local/bin/minikube
Install on Linux
For x86-64 architecture, you can use these commands
curl -LO https://storage.googleapis.com/minikube/releases/latest/minikube-linux-amd64
sudo install minikube-linux-amd64 /usr/local/bin/minikube
But in case you have another Linux architecture like ARM64 or ARMv7, you can simply replace "amd64" with "arm64" for ARM64 and "arm" for ARMv7 in the above commands.
Verify your installation:
minikube versionAnd you should see an output like this (of course, the commit id and version may be different)
minikube version: v1.22.0
commit: a03fbcf166e6f74ef224d4a63be4277d017bb62e
Note: On a Mac system, try runningwhich minikube.
If the command fails, then it may mean that you have an older installation of minikube on your system. To solve this runbrew unlink minikube
and then runbrew link minikube
Get Started with Minikube and Kubectl
Once kubectl & minikube are installed & verified, you can now easily play around. Just enter minikube in your terminal and you'll see a list of commands and options available to you.

Start your Cluster
Simply start a new cluster by using the minikube start command. Hold on for some time and let minikube do its job.

Get a Hang of Kubectl
Okay once your minikube cluster is up, you can start interacting with it using kubectl.
One simple way of using kubectl is to get used to the command format. We've simplified this for you:
kubectl <what action do you want to do> <on which resource> -n <your namespace> <other options> <name of the resource>
- what action do you want to do:
Do you create a resource, get a resource's details, edit it or maybe update it. - on which resource
What resource do you want? pod? namespace? deployment? configmap?
Let's look at some examples:
- If you want to create a namespace called "my-namespace"
action = create
resource = namespace
name of resource = "my-namespace"
command:kubectl create namespace my-namespace
- If you want to get all the pods in the "my-namespace" namespace
action = get
resource = pod
namespace = my-namespace
commandkubectl get pod -n my-namespace
If you don't provide a namespace, kubectl will directly use the "default" namespace for you.
But if you want to, say, get pods across all namespaces then,
kubectl get pods -AOur minikube output shows an output something like this:
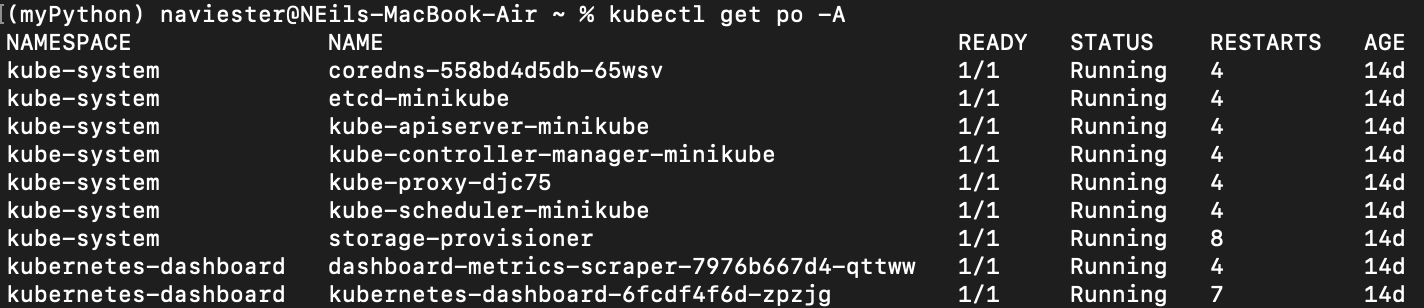
Of course, with all our upcoming blogs, you'll be seeing a lot of kubectl commands which will make you extremely comfortable with it. So don't worry too much about it.
In Summary
Are you all set with minikube and kubectl? In our upcoming blogs, we'll walk you through each and every concept in Kubernetes which we discuss in Kubernetes 101 series but in a practical way. And we'll use minikube to test everything out on our local systems first before heading over to the actual heavyweight clusters and setup. Stay tuned!.
References:


Join the conversation