

Podman, a platform which runs and manages rootless containers,adds an additional layer of security over Docker. In this post, we play around with the "docker alias" podman CLI to see if its really rootless.
Last post, we gave you a conceptual overview about rootless containers and Podman. Rootless containers allow non privileged users (non root) to create and run containers and Podman is a tool with which we can achieve this. And we are going to find out how in this post!
Get ready because we are going to use our beloved terminal window a lot because Podman is a CLI ! Just like Docker! In fact, all the CLI commands are exactly like Docker. You just replace "docker" with "podman" that's it! That's why the official site for Podman calls it :
alias docker = podman
Ready to try your hand at Podman? Let's Go!
A Quick Note Before you start
Podman only works on Linux systems. So if you are a Windows/ MacOS user, you'll probably need a VM.
What we like to do is spin up an Ubuntu server on a cloud account. We tend to use GCP, but you can use whatever account you like (AWS, Azure, Linode etc). Also, we are using Ubuntu 20.10 as our OS version. It doesn't work for versions below that, we already tried!
Get Started: Install Podman
Installation is a quick and simple process mainly using apt or yum depending on the Linux distribution. Once you have your Linux machine ready, you can install Podman on Debian/Ubuntu by running:
# Ubuntu 20.10 and newer
sudo apt-get -y update
sudo apt-get -y install podman

# optional
sudo apt install runcFor CentOS or RHEL systems, you can simply replace apt-get with yum. For other Linux distributions, a detailed guide is available here.
Do not forget to install the runc dependency if you don't already have it. We had to install this on our freshly created cloud instance.
You can easily check if the installation was successful by running either of these commands
podman version
podman info
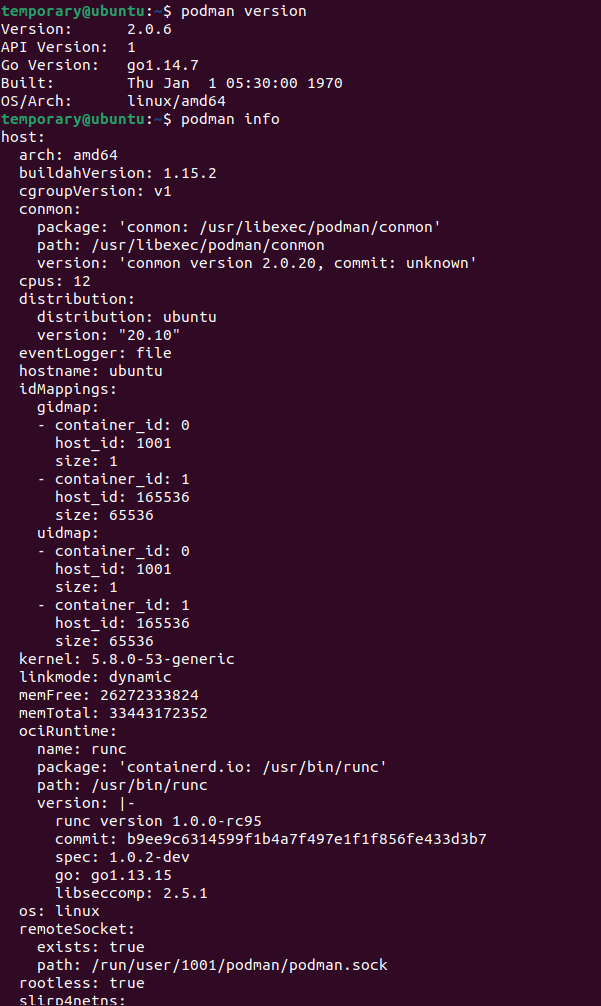
Notice the little rootless = true in the end for the podman info command ?
It's just so you know that podman commands are going to run as a non root.
But are you so sure about it? We are going to answer just that!
Experimenting with Podman
Yes! We saw the rootless = true flag in podman info . But we are not convinced! We want to verify this "rootless" behavior. So we're going experiment around a bit.
Here's our hypothesis;
Lets say, we have two directories on the host; root_dir is owned by the root user and non_root_dir by a non root user. We run a container and mount both of these directories via bind-mounts.
Now, if the container tries writing a file to both of these directories, can be two possible outcomes.
- The file will be written on both
- The file will be written on
non_root_dirbut not onroot_dir
We expect the first outcome in case of a Docker cotainer.
While Podman is going to show the second outcome.
That's what we are proposing. So are we correct in our assumptions? Let's find out:
Step 1: Pull Image
To start off with our experiment, we'll be working with the Ubuntu image.
Let's first pull the official Ubuntu image using both Podman and Docker.
docker pull ubuntuFor Podman, we'll first search for the appropriate repository for our image using the search command. You can even filter down the official images using the --filter option
podman search --filter=is-official ubuntu
Okay, we got options! But hey! What's docker.io doing there?
That's because Podman is capable of running containers from docker images! So that just includes all images you have on DockerHub!
We'll go with the first image: docker.io/library/ubuntu
podman pull docker.io/library/ubuntu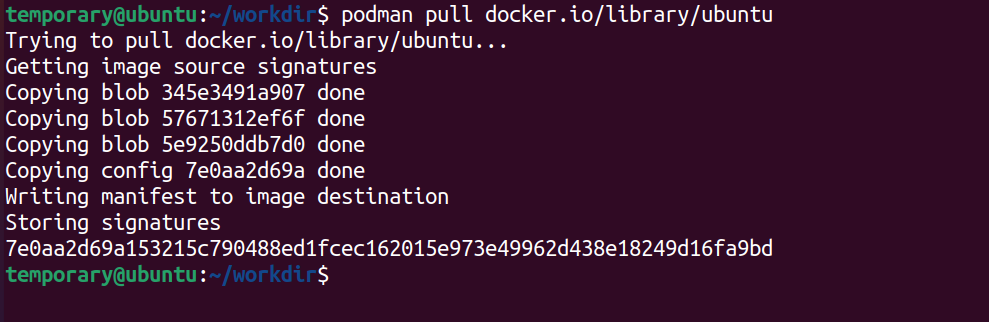
Do a quick check to see if you have the image. Just to be sure by
podman images
There it is! Let's move on to the next step now
Step 2: Create a Working Directory
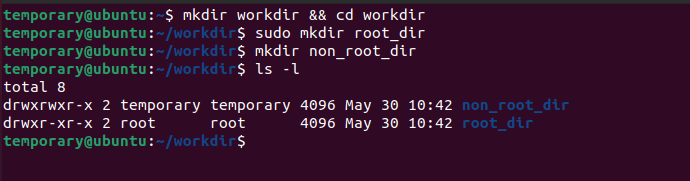
Now over to our hypothesis. To ascertain if our assumptions are right, we create a directory called workdir.
Next, within the workdir we create two sub directories, which we are going to call non_root_dir and root_dir . And as the name suggests, root_dir will belong the root user.
Just addsudobefore the command to create theroot_dirand the command will run as a superuser (root) command.
mkdir workdir && cd workdir

mkdir non_root_dir

sudo mkdir root_dir
If you do a ls -l within the workdir folder, you can easily see the details of the users who own the two sub folders. clearly root_dir belongs to the root!
Now over to our containers.
Step 3: Run the Container with Bind Mount
Once we have our folders in place, we run our containers using both Podman and Docker and enter it's bash shell.
Oh, and don't forget to mount the workdir folder as use it as your working directory within the container. Let's start with Docker first
How does Docker fare ?
Run the container using docker:
docker run -it -v $(pwd):/workdir --workdir /workdir ubuntu /bin/bashGood, you're now inside the container. Check the contents of the /workdir folder by quickly running the ls -l command.
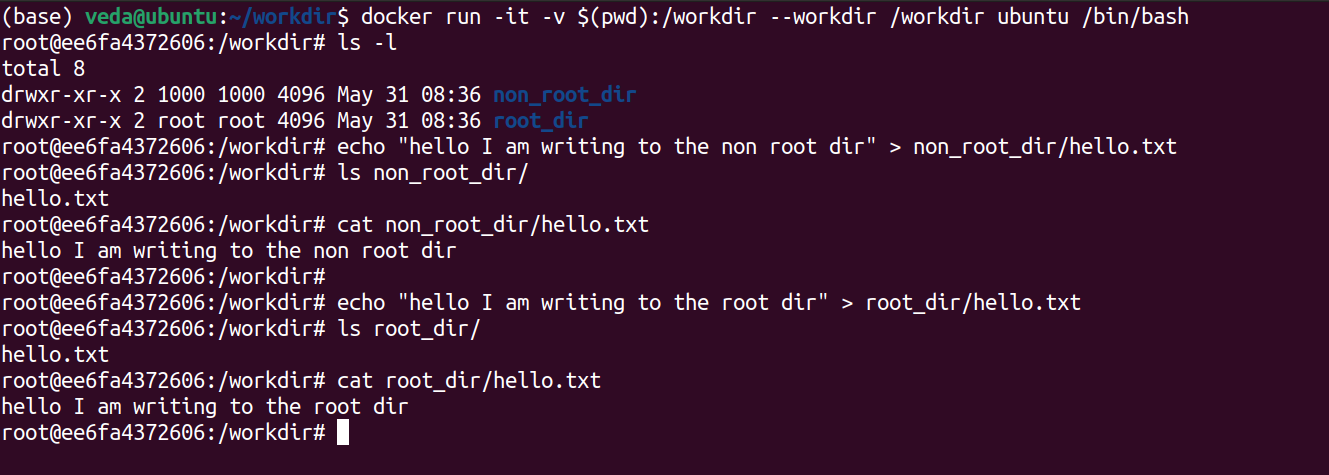
The next step is to write a file called hello.txt in both the root_dir and the non_root_dir. Try this:
Write to the non_root_dir.....
echo "hello I am writing to the non root dir" > non_root_dir/hello.txt
cat non_root_dir/hello.txt
And then to the root_dir:
echo "hello I am writing to the root dir" > root_dir/hello.txt
cat root_dir/hello.txt
Oops!
See the problem here ? The container we ran through Docker could easily write to the root_dir directory which actually had root access on the host system. This clearly highlights the "root issue" with Docker we have been talking along for so long in our previous posts. We don't really want such a situation in secure productions grade systems now, do we?
So...Will Podman work?
How will Podman behave in this case? One way to find out! Let's repeat the same steps for Podman
Start the container with Podman....
podman run -it -v $(pwd):/workdir --workdir /workdir ubuntu /bin/bash
Once you're inside the image, do als -lto check the contents of theworkdirfolder. Notice something ? Why is the user for thenon_root_dirshown as root ?
Remember you're inside the container. Do not do the mistake of assuming that the root user inside the container as the host's root users are the same.
The root user for the container will be some non privileged user on the host who has been mapped as the root within the user namespace for our container. (If you are confused about this, head to our previous post to know how user namespaces work! )
Write to the non_root_dir.
echo "hello I am writing to the non root dir" > non_root_dir/hello.txt
ls -l non_root_dir/
cat non_root_dir/hello.txt
We knew this would work...because the non_root_dir folder belongs to a non root user on the host. So no problems writing files in there!
The main aim here is to see if you are able to write to the root_dir folder.
echo "hello I am writing to the root dir" > root_dir/hello.txtAnd.....

Ha! We were right! Podman refused to write to the directory. It just threw a "Permission Denied" error back at us. Our experiment was a success!
What Happened?
Why did we get a Permission Denied?
Simple! Your container was running in a rootless manner. And since it didn't have root privileges, it could not write to the root_dir folder owned by the root user.
We just proved that Podman indeed was rootless!
Extra: Building Images
So far we have pulled an existing image and used it to run containers. But what if you want to build your own image?
Oh it must be a lot of effort ! I mean, its a totally different platform. I probably will have to recreate my build files and Dockerfiles I have written for Docker containers
If that's what you are thinking, then you're absolutely WRONG!
It's no effort at all! In fact, if you already have a Dockerfile for your application, you can easily build images using podman.
Like Docker, Podman too will search for a Dockerfile to build your image. And the podman build command can be used to build the image. For example, we built our petstore application from the micro-services series by using Podman. Since we already had a Dockerfile which we had created during our post on "Dockerising an Application", all we had to do was run the command
cd petstore
podman build -t petstore-podman .
Another option is to create a file called Containerfile which lists the steps required to build your image.
The Containerfile is exactly like a Dockerfile. (we actually renamed our Dockerfile to Containerfile just to test it out and it worked). The name Containerfile was coined just to signify that images can be built independent of the platform.
Usually, Podman is used to run and manage rootless containers while the build part is handled by either docker or alternative tools like Buildah. But we just wanted to show that this option was available with Podman too
In Summary
What do you think about Podman ? We agree that Docker is currently the most popular platform today. Its used by reputed organizations everywhere to package and ship their applications.
Compared to that, Podman (and even the "rootless container" concept) is still in its early stages. But we definitely know that the technology is a really promising one. And well! You never know...Rootless containers can be the next big thing for container technology!
Through these last two posts in our Container series, we wanted to show our readers that there are a lot of alternatives which we need to watch out for
And don't worry this is not the end! We'll be writing a lot more about such amazing tools and frameworks in all our upcoming series and posts.
Stay tuned and subscribed!


Join the conversation