

Shipping lightweight Docker images to production environments is the standard practice in the industry. But the task of trimming down the image size can be a daunting task. In this post, we find out how images can be trimmed down by using the builder pattern or multi-stage method.
It was smack mid-winter and like any tropical climate creature; I was very cold. So I decided to.... layer up! Ten layers on top of my skin and well...I was ten pounds heavier and a literal walking marshmallow. Stupid me! I could have just bought one of those fancy super warm jackets and I could have shed the weight off me. But no! Honestly people, do NOT be like me!
So why am I talking about all this? Wasn't I supposed to talk tech in all of these blogs? You'll see...
Layering Down
All that talk about "layering up" should have given you a clue. Yes, we are talking Docker layers! Every docker image is made up of "layers" corresponding to a particular action it performs during the build. In simple terms, every line that you write in your Dockerfile is going to be a layer.
When I "layered up", I was carrying that extra weight of those layers of clothes on me. It's the same for a Docker image. The more layers you have, the "heavier" your docker image is going to be. As in the size of the image is going to blow up!
You don't want to do that. Especially if you want to ship your images to production. You gotta keep 'em lean!
And we're here to tell you how.
Reality Check
In Part II of our "Containerisation" series, we created a Docker image. But we never bothered looking at our image size. And one fine day it came back to bite us bad.
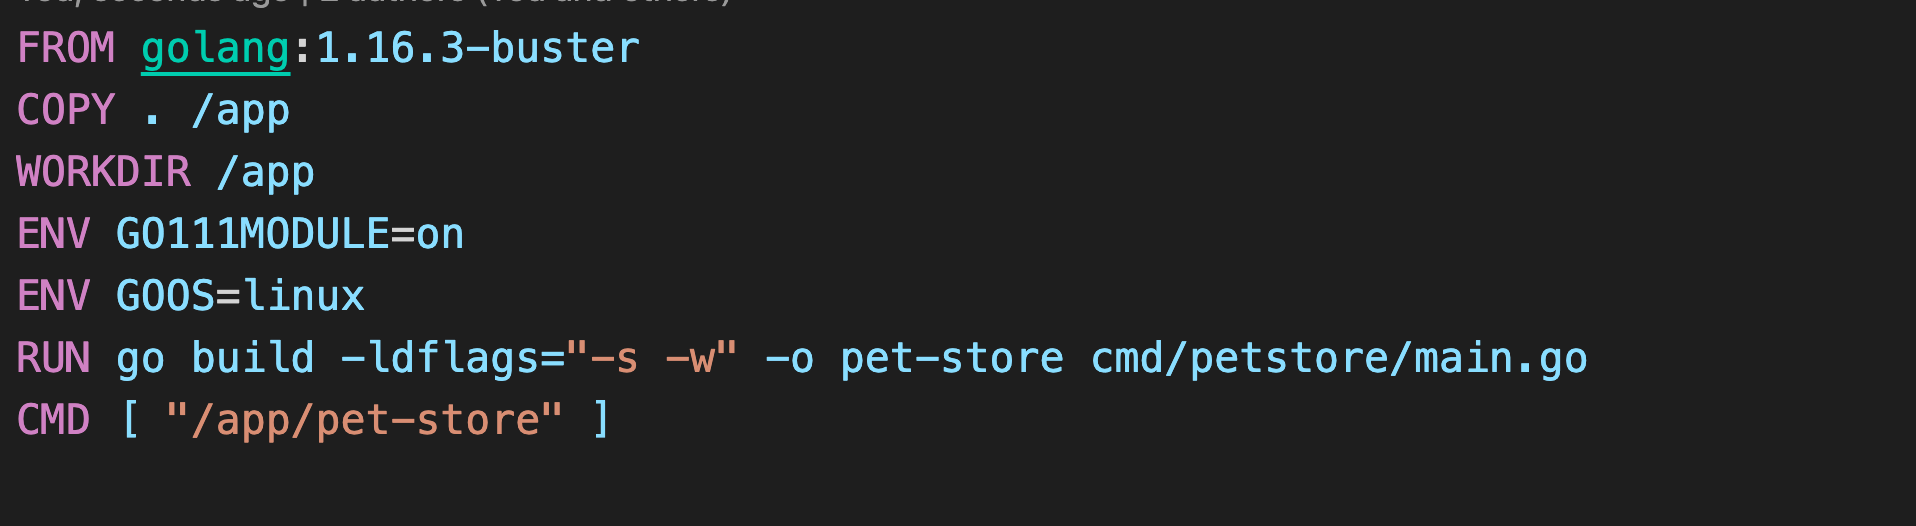
Our base here is "Golang buster". Let's look at the size of our image and our base image.
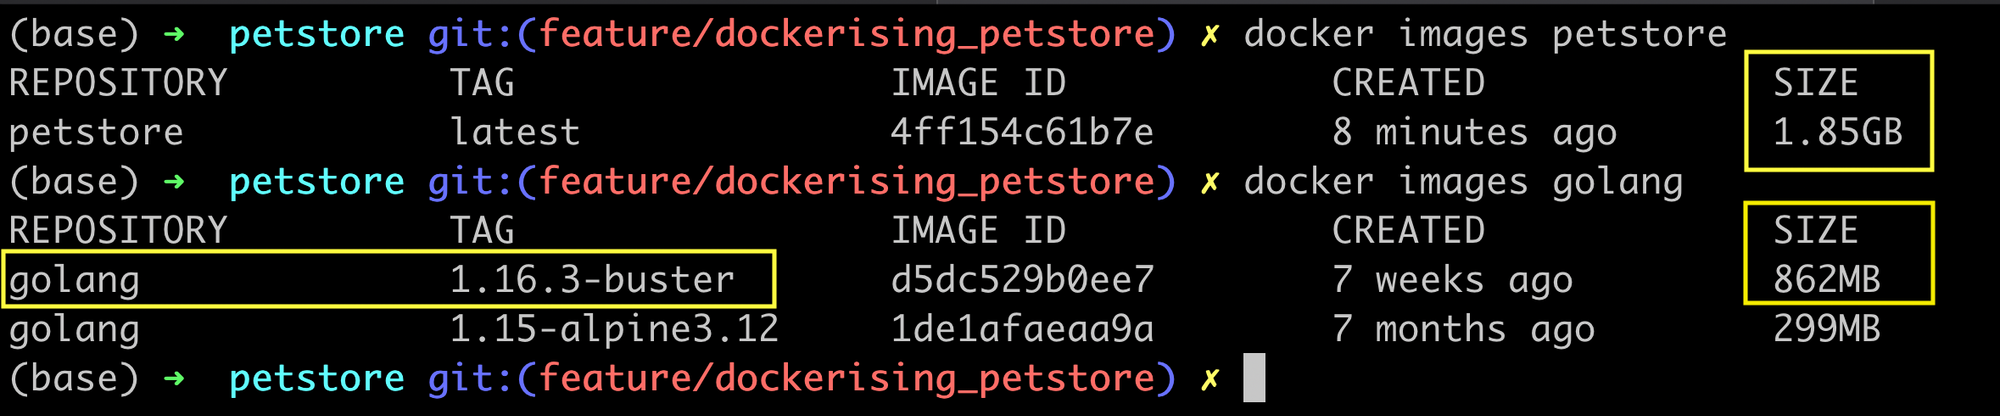
Wait? What !? Almost 2 GB! And look! More than half of it is our base image! We had to do something about it. Here's how it went down
The "Quick" Slim Down
No one wants a heavy docker image! And when we realized our image was almost 2GB large, a lot of eyebrows we raised. That's when we went on the "Mission Trim Down". These were a few things that we did in the beginning:
- Change the Base Image
Someone asked us a very simple question: Do you really need an image with a full-fledged OS to run your application? (We were using the buster version of Golang which was based on Debian OS.)
Well, we didn't...
The usual tactic here is to switch to the alpine version which offers a bare bones OS structure and install only the required OS dependancies on it for the application
- Remove unwanted dependencies
We realized, that during development, we had installed so many libraries and packages just to test things out and they had sort of trickled down from our development environment into our image.
Doing away with external dependancies which are not required by the application anymore helps in trimming down the image. This includes dependancies that are only needed during compilation and not during runtime.
- Collapse Commands
Another handy trick was to collate multiple commands into one. For example, ff there are two commands that look like this:
RUN apt-get update -y
RUN apt-get install -y my_package_name
Replace them with a single like this.
RUN apt-get update -y && apt-get install -y my_package_nameThat's one line lesser which means your image just lost one layer!
Collapsing commands using '&&' reduces the number of layers in the Docker image
For our image, we switched to the "golang-alpine" version as our base image and removed our source code files after building the binary.

We managed to save around 600 MB. But that's not enough! The image was still over 1 GB and that was bad!
The Dockerfile Dissection
The "quick" trim didn't make a significant difference. We had to cut down further. But how? For that, we took a closer look at our Dockerfile
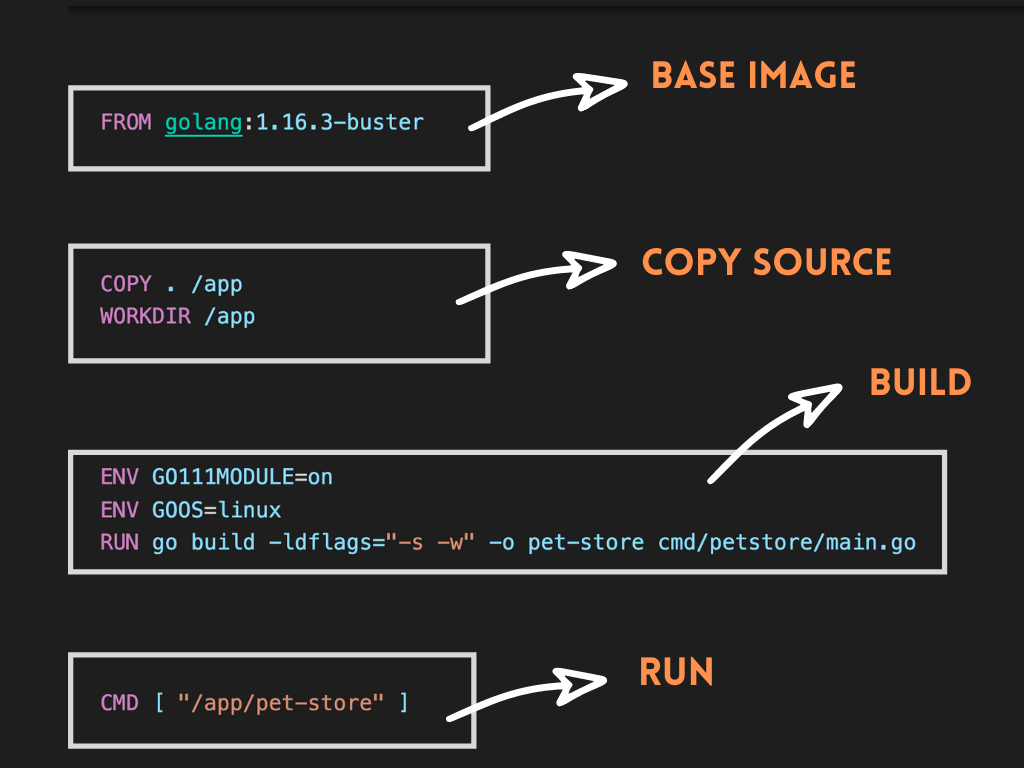
We realized our Dockerfile could be divided into four steps or "stages" based on the action it was performing:
- First, we were declaring the base image using the FROM directive
- Then we were copying our source code to the image
- Next, we were building our Go binary using
go build - And finally, we were running the binary
The "Dissection of the Dockerfile" proved to be a good exercise. We had a few interesting observations:
Our main aim behind creating an image always had been to get the application running. And to do that, we just needed the compiled Go binary. Nothing else!
Look closely at the Dockerfile. Especially at the last two steps. The last step is just running the binary which is created from the previous step.
What if we already had the binary beforehand? Then, we could just pack the binary in an image and ship it off, couldn't we?
And that's the basic funda behind the concept of the Builder Pattern and Multi-Stage builds.
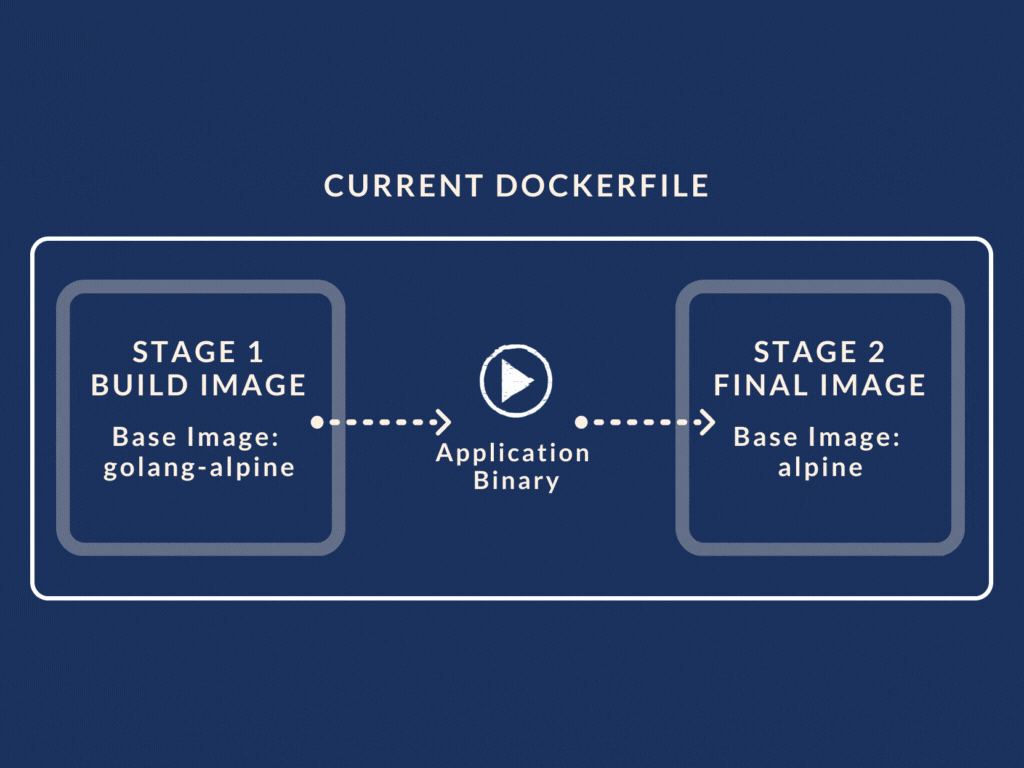
The Builder Pattern
Most applications have one Dockerfile which finally builds into a single image that is shipped for use. We too were doing that. But then the Builder Pattern came in which says :
Use two Docker files . Create two images.
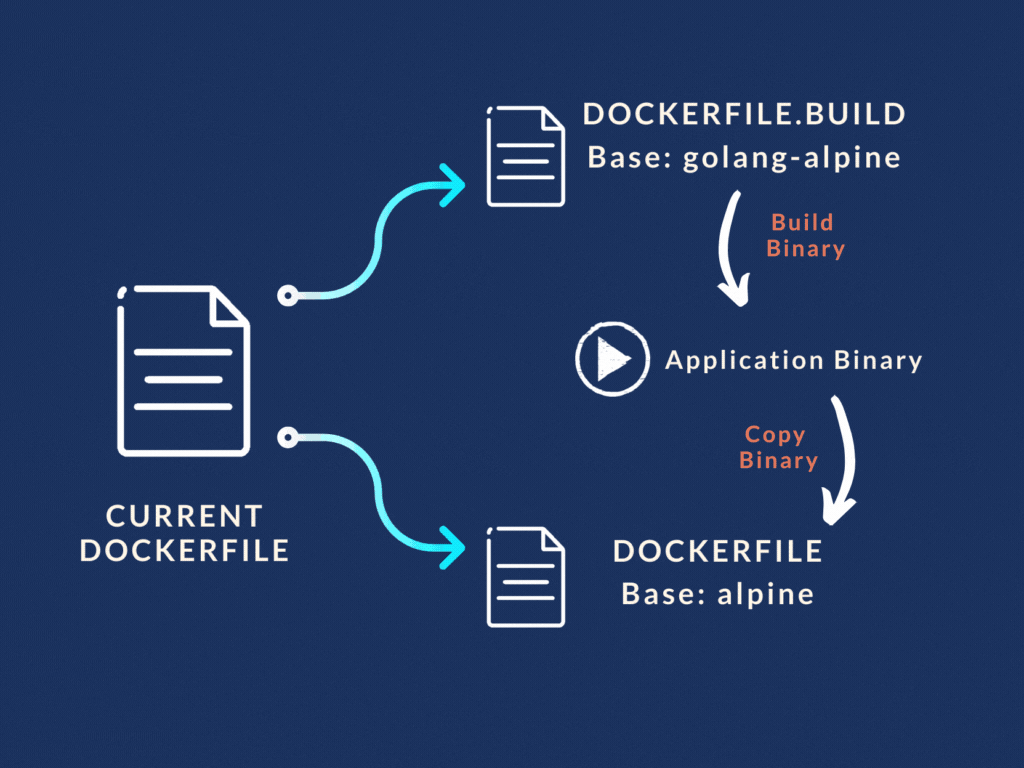
So that's what we did. We split our Docker file into two separate files:
Dockerfile.build and Dockerfile
- "Dockerfile.build" did the heavy lifting of building the Go binary from the source code. Basically the first three stages in our original Dockerfile. It copied the source code, installed the dependencies, and finally spit out the Go binary.
- While the main "Dockerfile" was stripped down to only use the binary file from the build Dockerfile and run the application from it.
Usually, a lot of dependencies installed on the image are only used during compilation and are then left as extra baggage for the image. Get rid of these!
In code, our build Dockerfile looked like this:
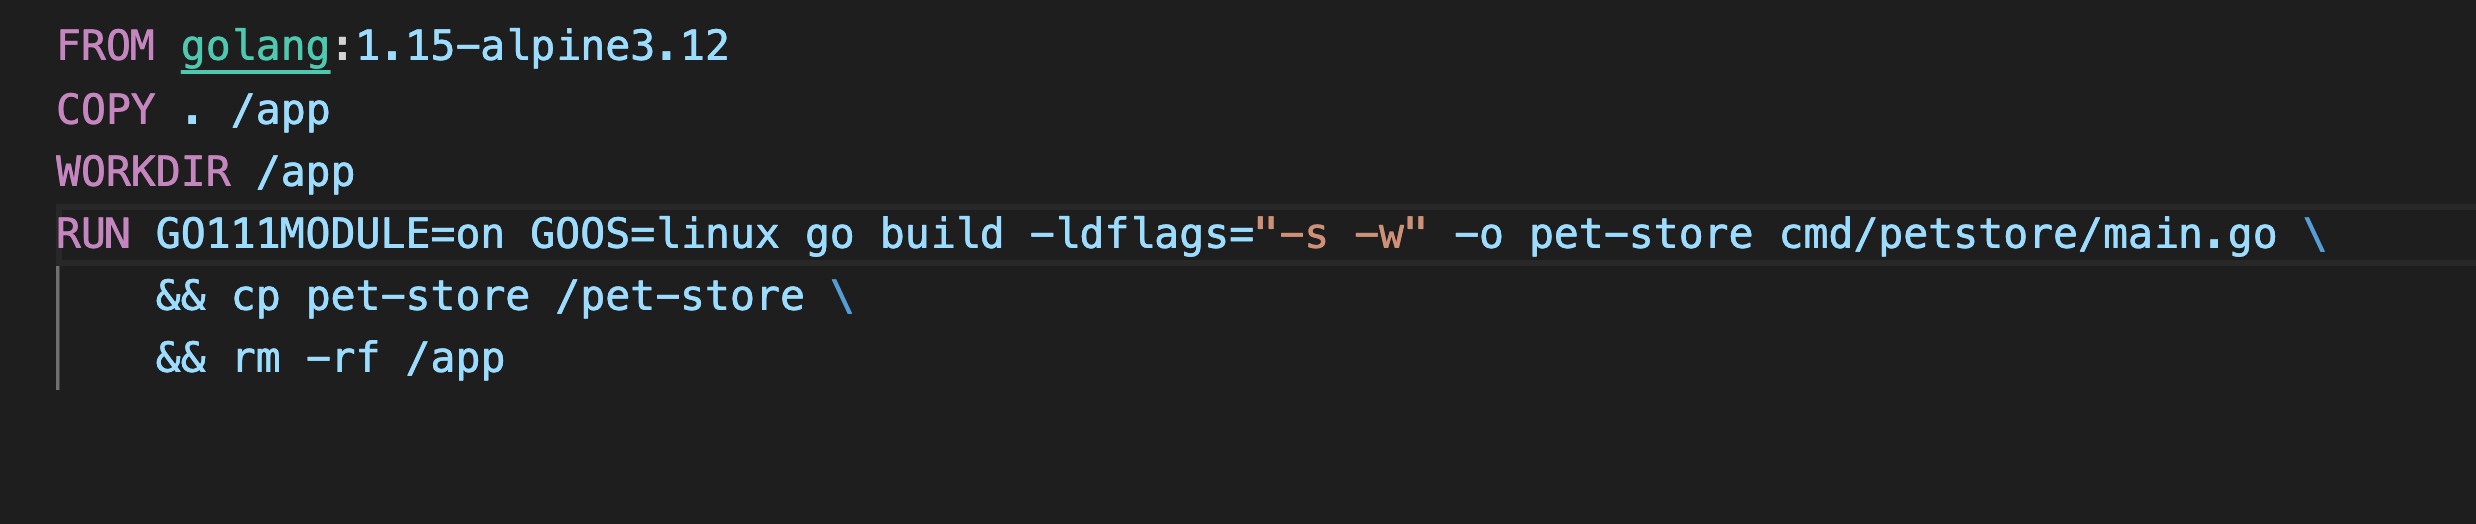
We continued with the golang-alpine image as our choice for our base image because it pretty much had all the dependencies installed in it. Next, we copied our source code to the /app folder inside the image used it as our working directory
COPY . /app
WORKDIR /app
Then using && we chained three commands which built the binary, copied it to the root folder, and removed the source code folder /app
# build the binary
go build -ldflags="-s -w" -o pet-store cmd/petstore/main.go
# copy the binary file the root directory
cp pet-store /pet-store
# remove source code folder
rm -rf /app
We built the image and started a container that created the binary file for us
docker build -t petstore:build . -f Dockerfile.build
docker create --name petstore-builder petstore:build
Finally, we just copied the binary file from the container to our host system and got rid of the container
docker cp petstore-builder:/pet-store ./pet-store
docker rm -f petstore-builder
Binary in place, we moved over to our main Dockerfile.
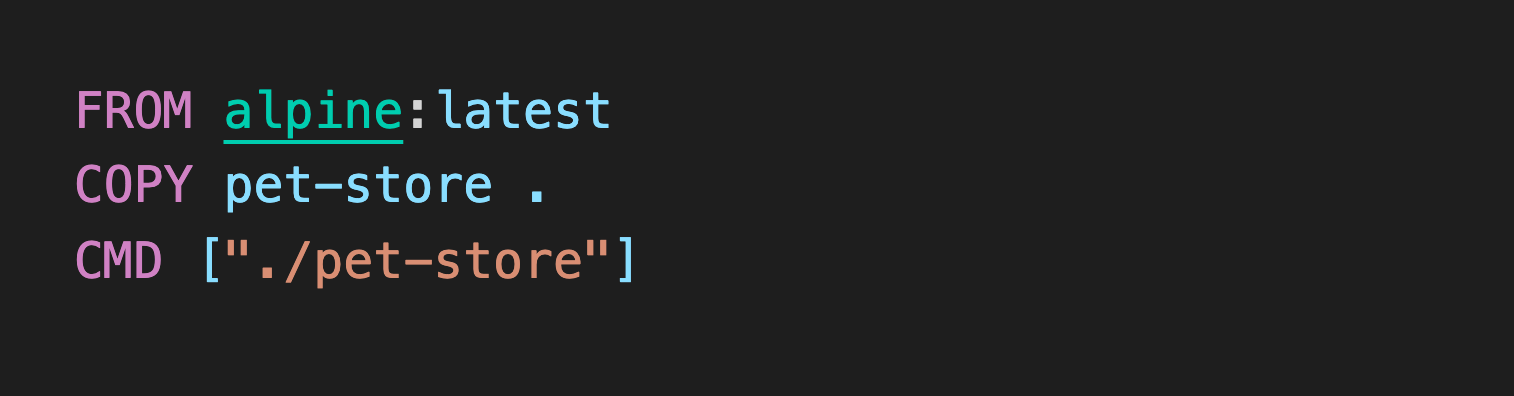
Yes, that's it! That's our Dockerfile folks! We used the Alpine Linux image as our base because it's the ultimate trim-down Linux-based image!
docker build -t petstore:latest .Showtime! Let's see how we fared with this:

Just 11.8 MB! That's a huge cut! And look at our build image, it's around 450 MBs which is also acceptable. Seems like our mission was successful after all! The Builder Pattern surely was effective. But there's still a little hiccup there.
Multi-Stage Builds
First, we had to maintain two separate files. Then, to get the final image, we first had to build the preliminary image using Dockerfile.build, copy the binary file to our local system and then pass the artifact during our main image build process. And to carry all these steps out we had a separate build script.
So what's the problem? Number one, we have two images, which obviously, are going to occupy space on the system. Next, we have all that file copying from one image to another. Not to mention, there's a local copy of the application binary being created. Hmm...not a good sign!
Know what? Builder patterns are passé! Enter Multi-Stage builds.
With multi-stage builds, you have just one Docker, but it's partitioned into "stages" or sections by using the FROM directive. In short, you can use multiple FROM statements in your Dockerfile.
Every new FROM statement kicks off a new build stage with the base image mentioned in it. And if you ever need to use an artifact from another stage using the COPY --from=<stage-name> command.
So for example, our revamped Dockerfile with multistage build looks like this:
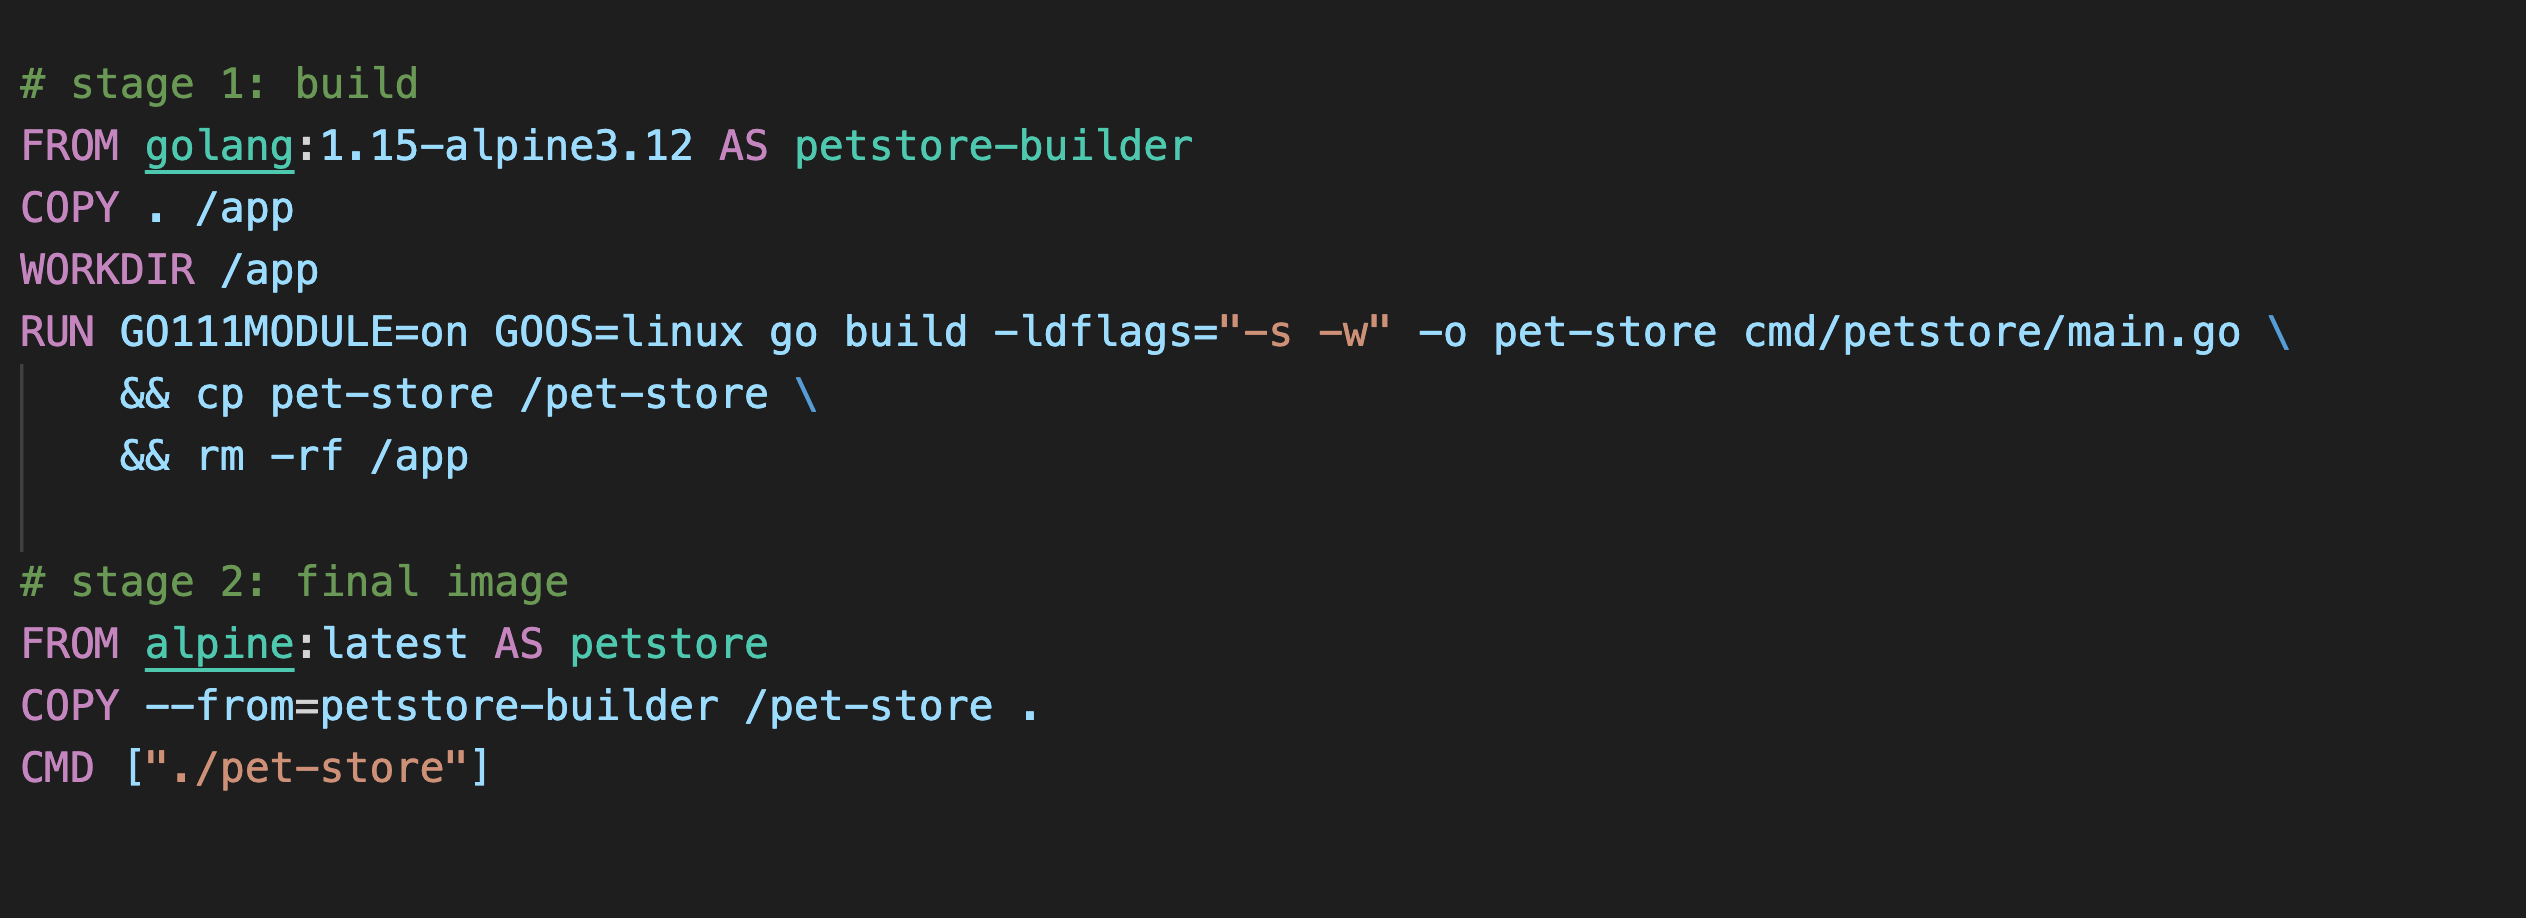
We have two stages called the petstore-builder and the petstore stage. (Yes you can give the build stage a name using AS keyword). The petstore-builder stage builds the application binary using the golang-alpine image as its base.
In the next stage, i.e. petstore stage, we use the binary created from the previous stage. All we have to do is use the COPY --from=petstore-builder command.
See? No hassle of different Dockerfiles, no artifact copying, and no separate scripts to do all that. And the result? You get the same lightweight image as you got before. Now isn't that comfortable?
In Summary
After all that trim down, we can now say that our image is eligible to be shipped to production. A reason why heavy images are not favored is that they can cause a security concern. Heavy images may mean more dependancies installed within them. And if the source of any of these dependencies turns out to be vaguely suspicious, the image will immediately come under the security radar. That's why it's best to cut down on these as far as possible. And of course, a lighter image will mean a faster build and a shorter start-up time!
References


Join the conversation