
Before developing microservices, it's advisable to define APIs first clearly stating the request and the response. And for REST APIs, Open API Specification is the way to go. This post details defining of APIs with OAS and Swagger
In our previous post, we discussed APIs and REST. We even went through the task of creating flows for our application. These are going to be really helpful when designing APIs.
Now it’s our turn to create a few. Designing APIs is about deciding what data should be sent by the server in accordance to the user input. In simple terms, all you need to do is map input data to the appropriate output data.
In this post, we'll be defining all APIs required for each flow using the Open API Specification.
We also call this the ‘API First Design Approach’.
An API first design approach means that the APIs of your application are going to be treated like first class citizens. The APIs are going to be consumed by mobile and web apps. This is where designing and documentation becomes an important part before development. Once this is done data models, that align with the API specifications, will be created.
Prerequisites
Remember the two flows which we had designed earlier? This is what they looked like,

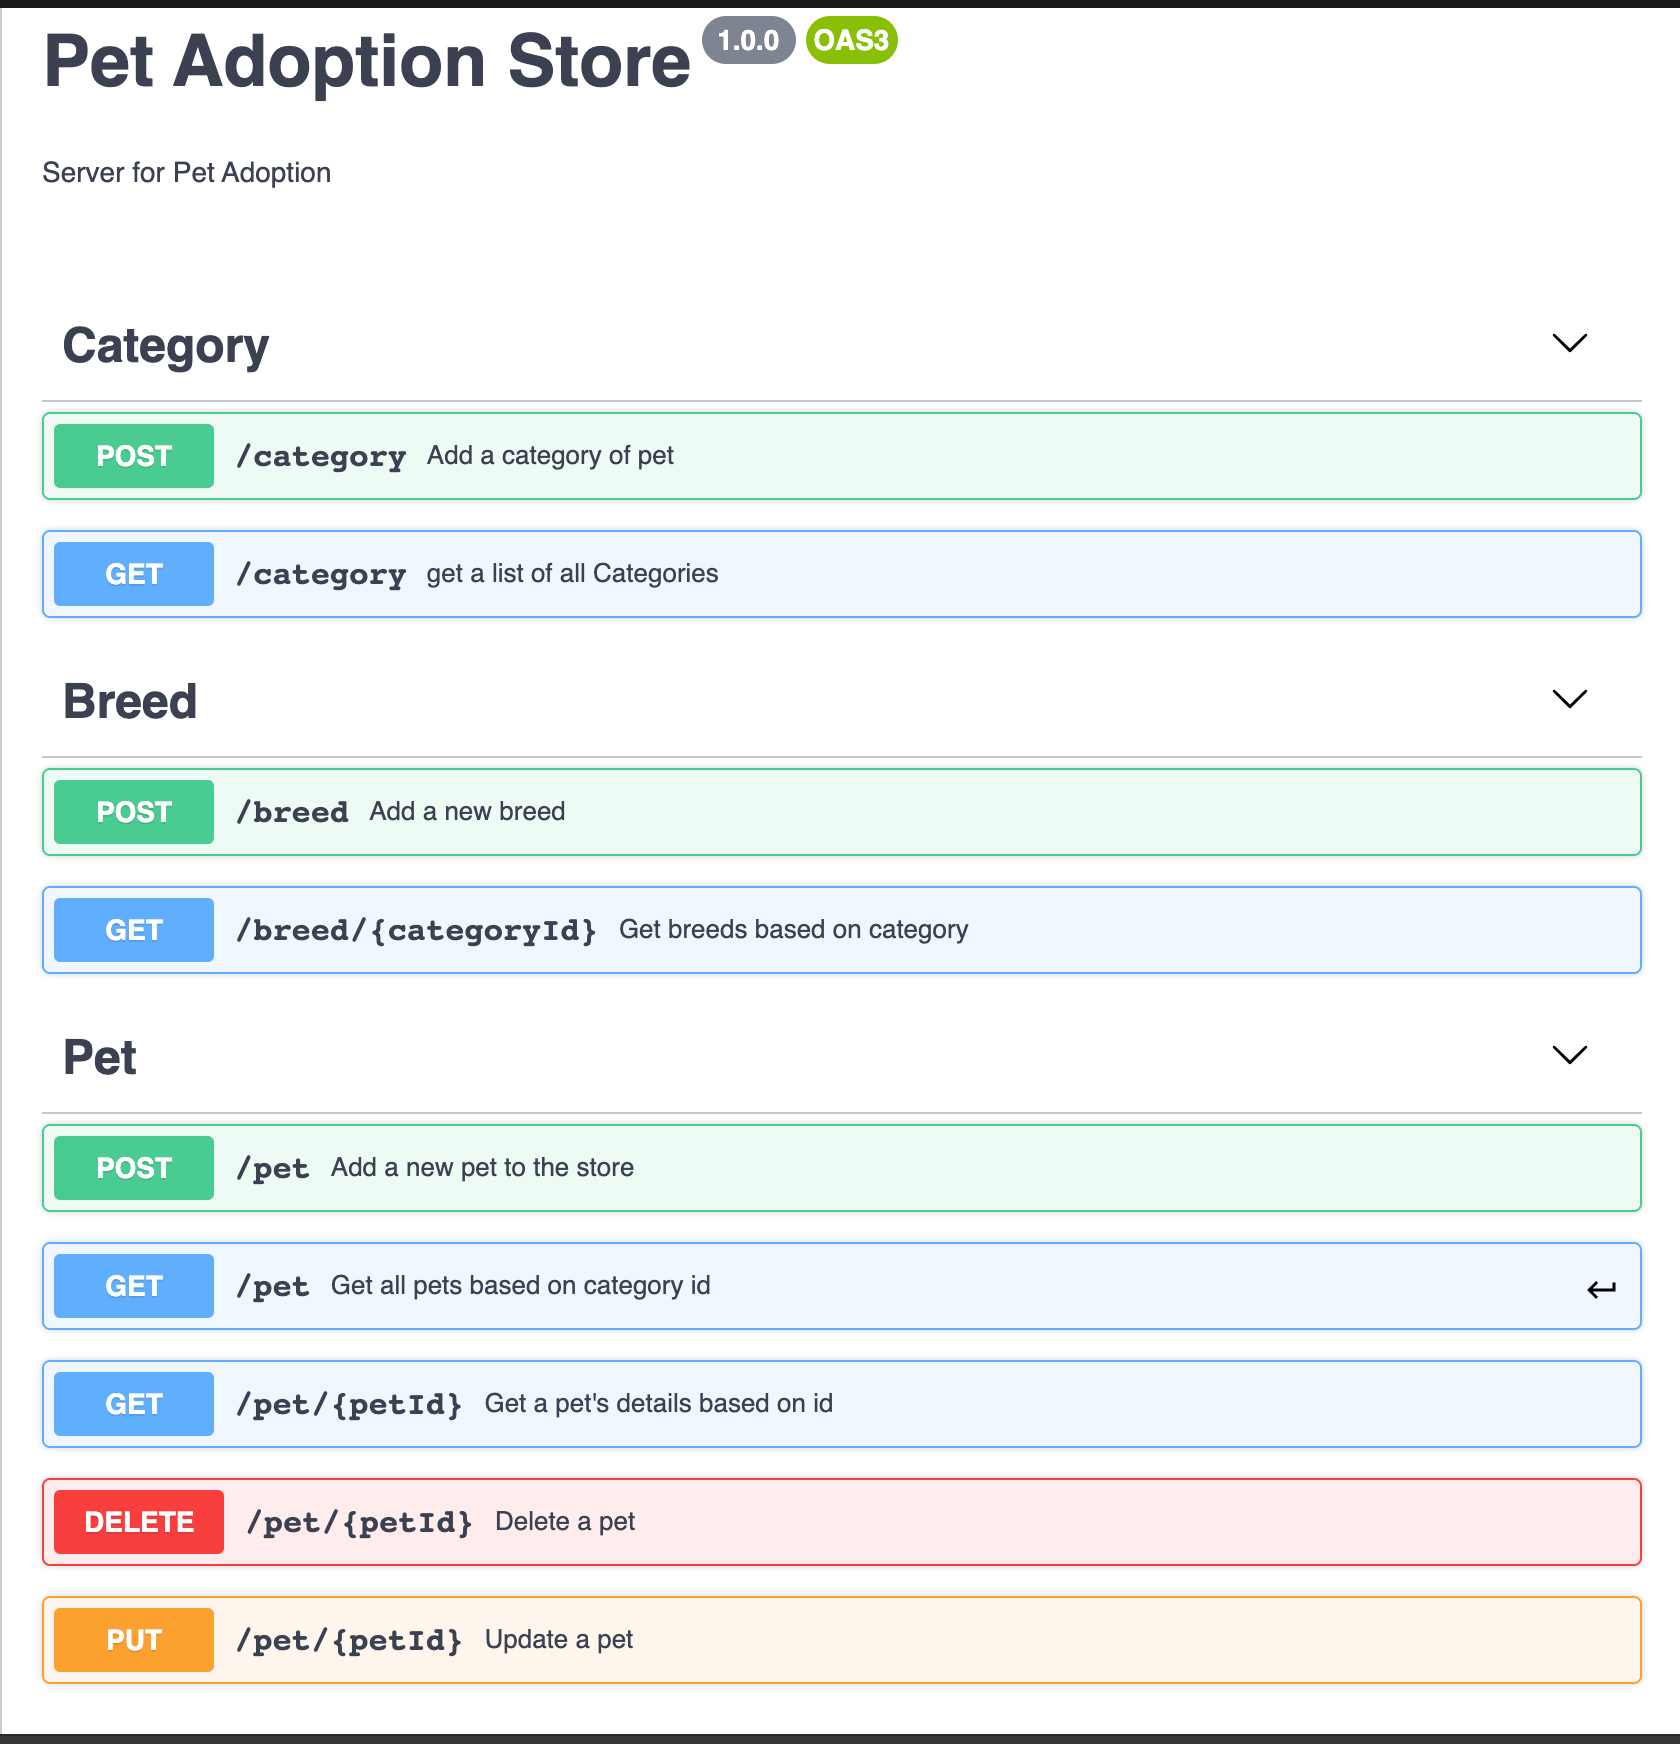
These flows deal with either creating or fetching a pet. But first, we need a few APIs that will help create and fetch the dependent data that is required. This data includes:
- A list of categories (dogs, cats, birds, etc).
- A list of breeds in each category (e.g. "Doberman" is a breed under the dog category).
- A list of locations which we will be catering to in our application.
Each of these entities will need endpoints for ‘create’, ‘fetch’, ‘delete’ and ‘update’ operations. An example endpoint for creating a category is,
Request for POST
POST /category

{
	categoryName: "dog"
}
Response
{
	"categoryId" : 1
}
Here, we send the name of the category in the request and get a unique identifier for the category back on successful creation. We can then use this ID to perform a ‘GET’ operation to fetch the category:
Request for GET
GET /category/{categoryId}Response
{
	"categoryId" : 1,
    "categoryName" : "dog"
}
Similarly, we can define routes for breed and location. Once these are in place, we can then move on to the APIs for our flows.
Defining API interfaces for our flows
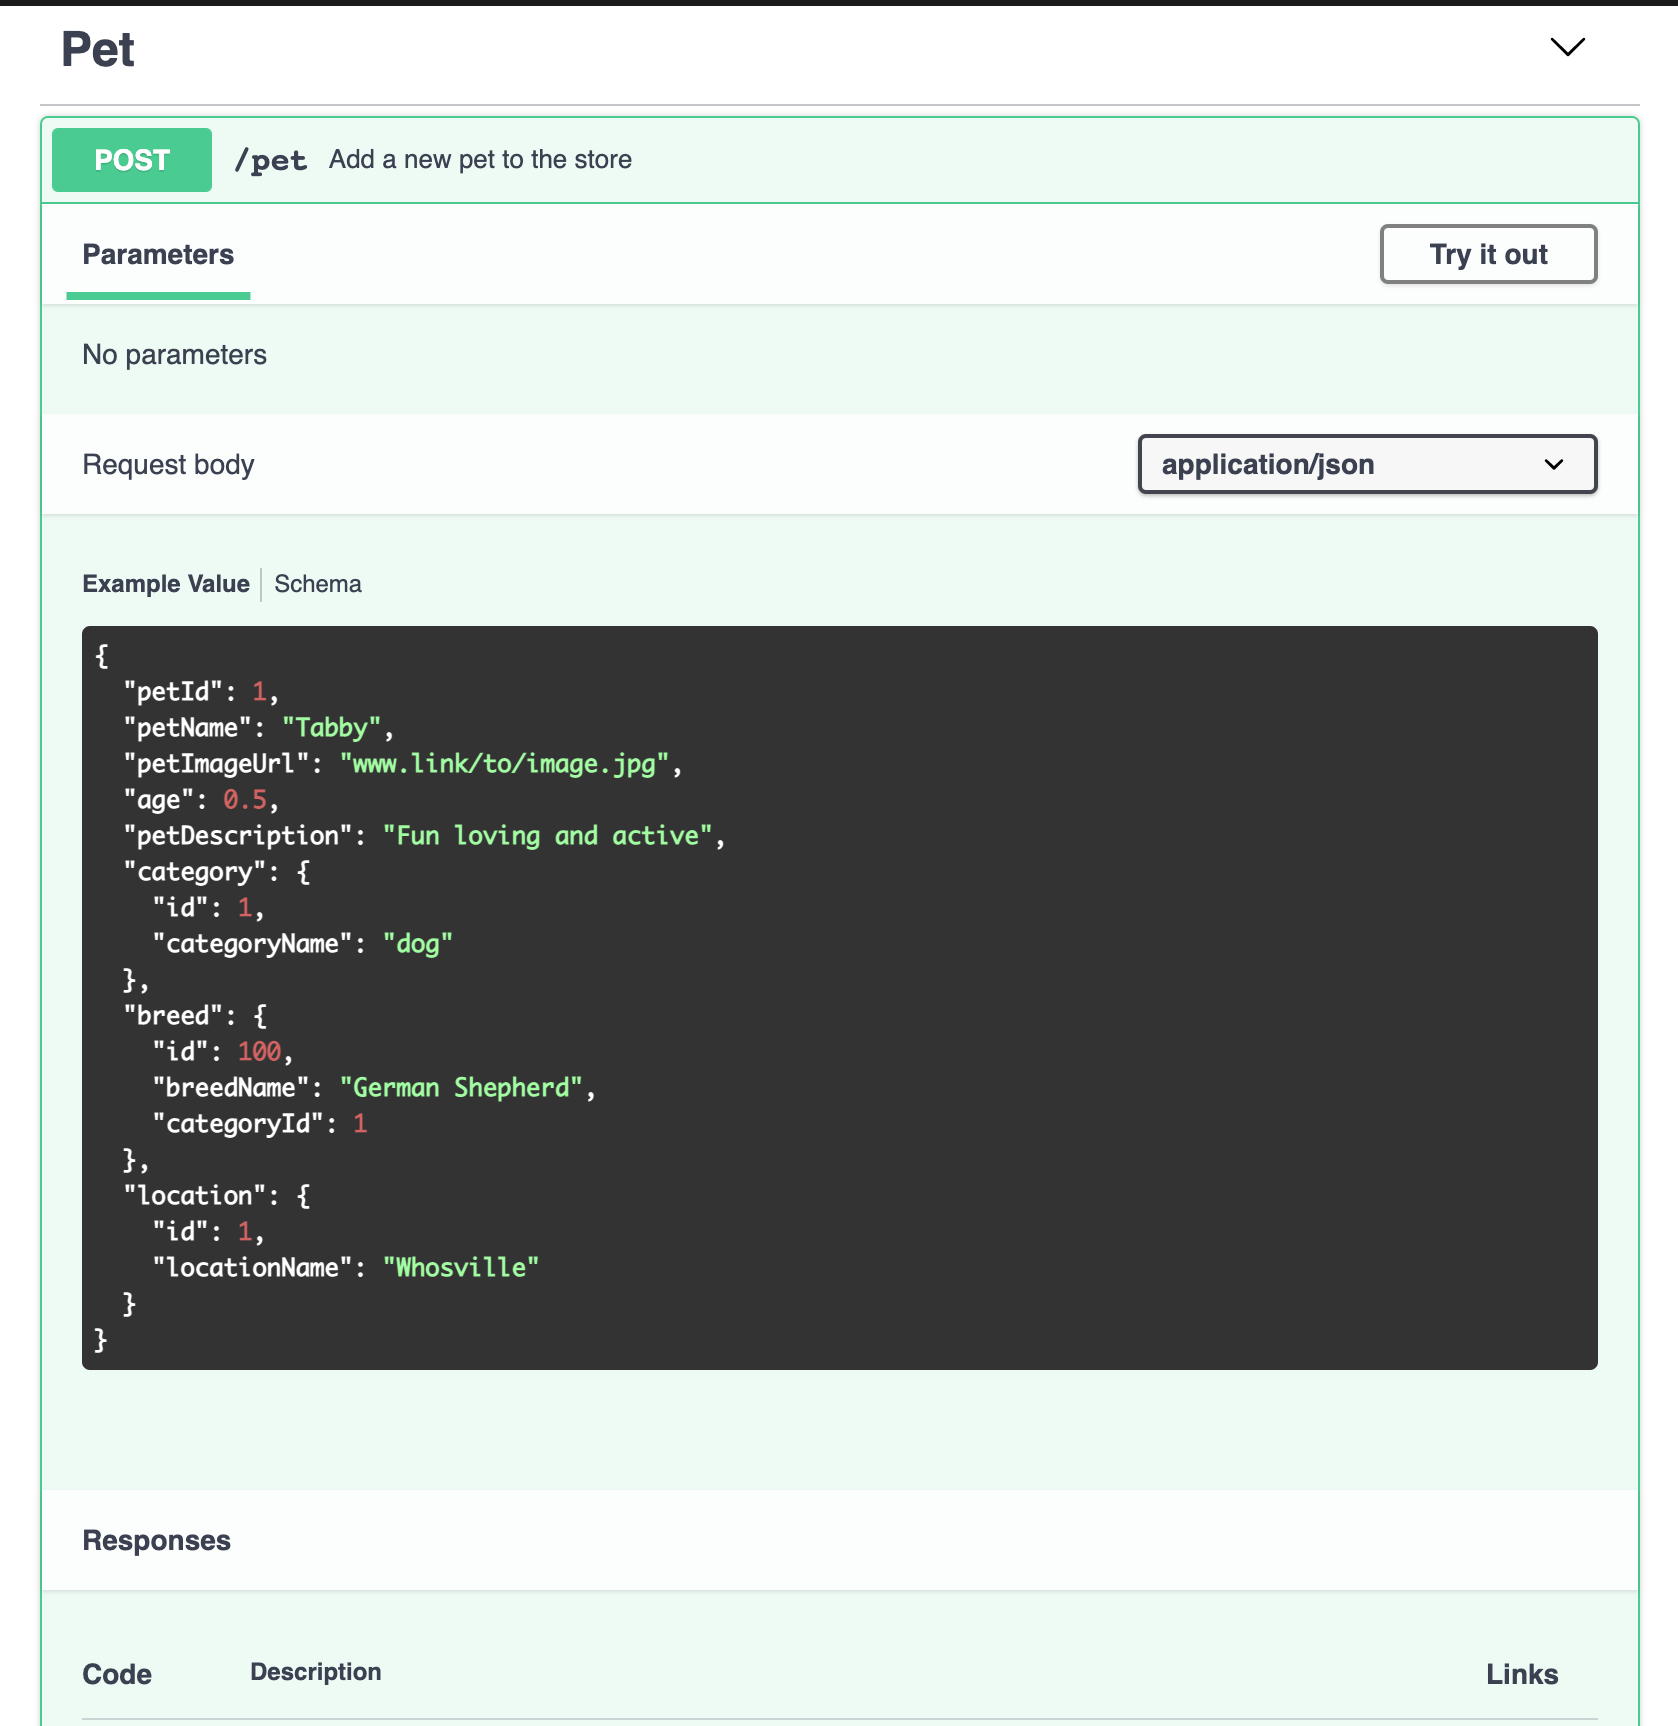
1: Adding a pet to the store
Adding a new pet is simple. The details about a pet are consolidated in a specific format and sent to the server. The server then persists the data in its’ database. On successful storage, the server will send a confirmation back to the user interface with a status code. (Don’t worry , we’ll explore this further in the future). Data that needs to be sent to add a pet to the store.
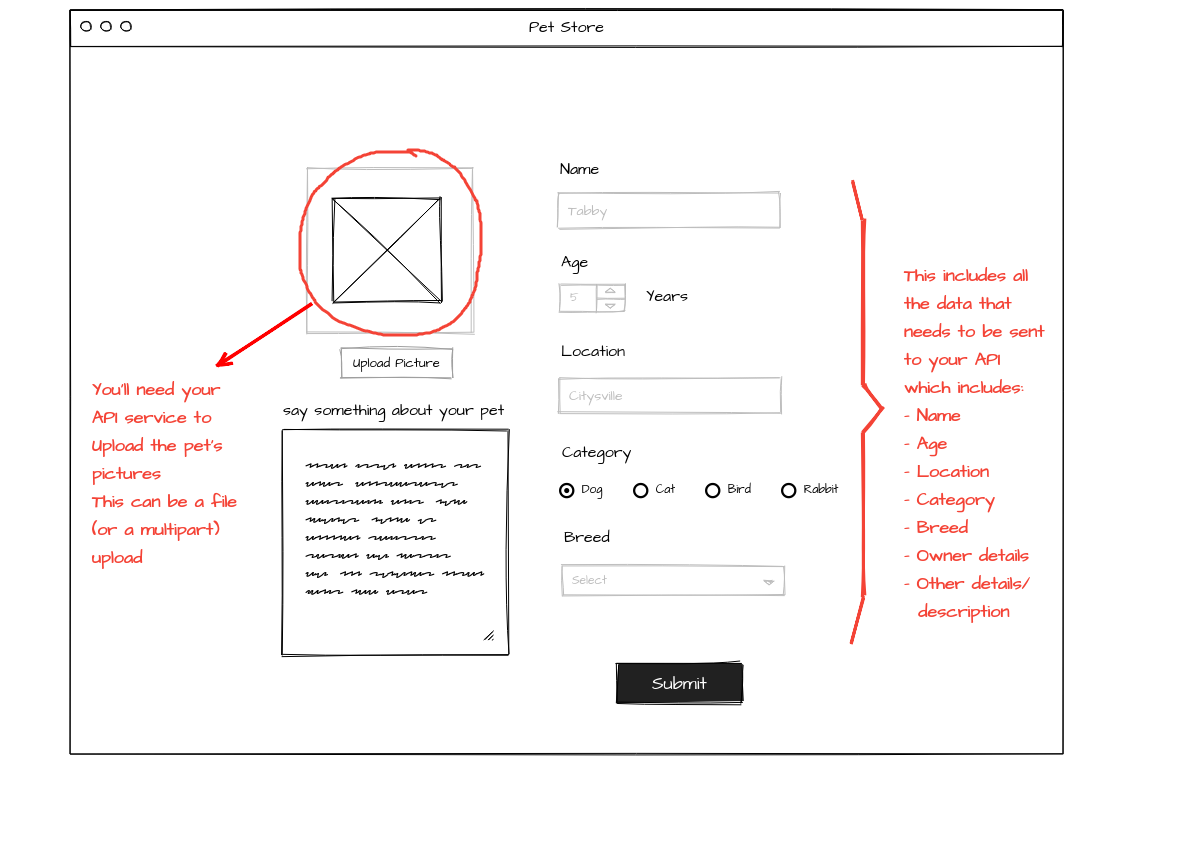
For the sake of simplicity, this API will be a ‘POST’ call with the request body containing the details about the pet. In return, a unique identifier for the pet will be sent back as a response.
Request Body
POST /pet

{
        "name": "Toby",
        "age": 0.5,
        "description": "Fun loving and active",
        "imageUrl": "link/to/image",
        "location": {
            "id": 1,
            "locationName": "Whosville"
        },
        "category": {
            "id": 1,
            "categoryname": "dog"
        },
        "breed": {
            "breedId": 100,
            "breedName": "Greyhound"
            "categoryId" : 1
        }
}Response
{
  "petId": 1
}
2: Getting a list of pets based on the category
To get a list of pets, the user first selects a category of pet (i.e dogs, cats etc), based on which the appropriate list of pets will be retrieved. So, we can say the input request contains the category (or an identifier for the category). The output will be a list where each element will contain details like the pet's name, age, breed etc.
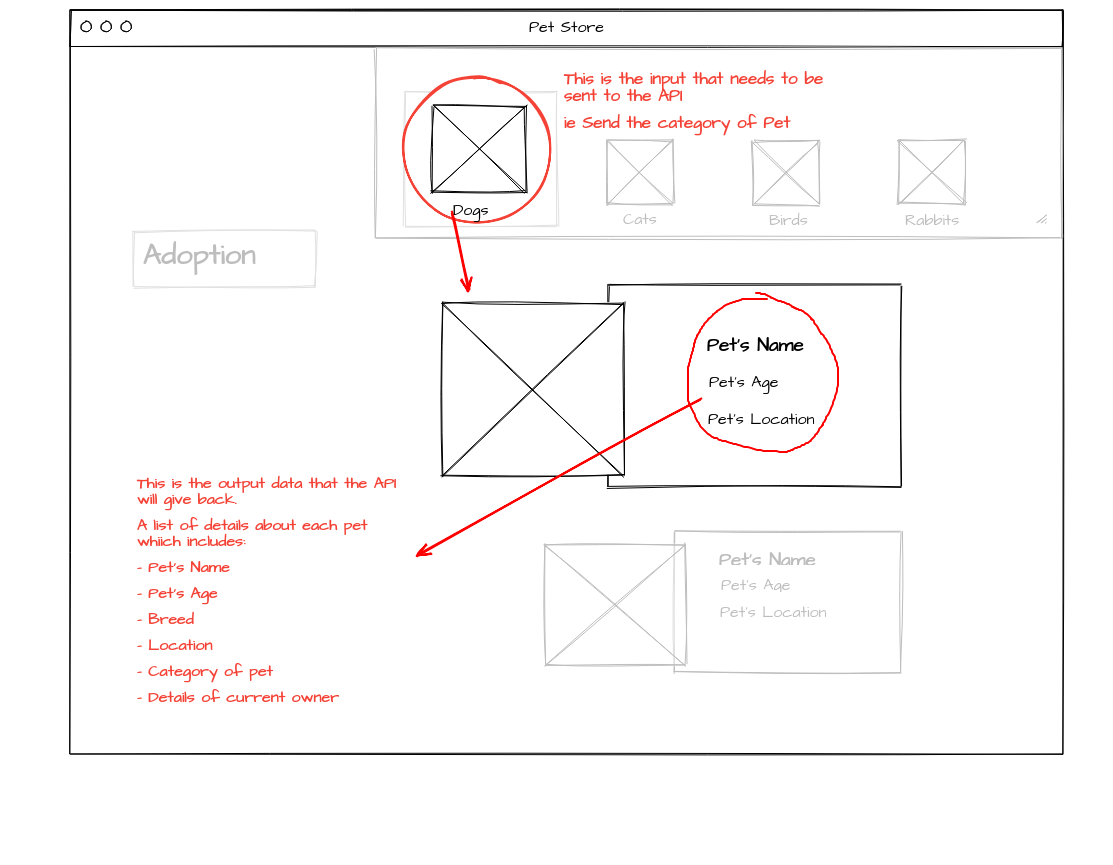
This one is going to be a ‘GET’ request (since we are fetching data) with the unique identifier for the category sent as query parameters. The response will be a list of JSON objects with the required details for pets.
Request
GET /pet?categoryId=1Response
[
    {
        "id": 1,
        "name": "Toby",
        "age": 0.5,
        "description": "Fun loving and active",
        "imageUrl": "link/to/image",
        "location": {
            "id": 1,
            "locationName": "Whosville"
        },
        "category": {
            "id": 1,
            "categoryname": "dog"
        },
        "breed": {
            "breedId": 100,
            "breedName": "Greyhound"
        }
    }
]Creating the OpenAPI specification
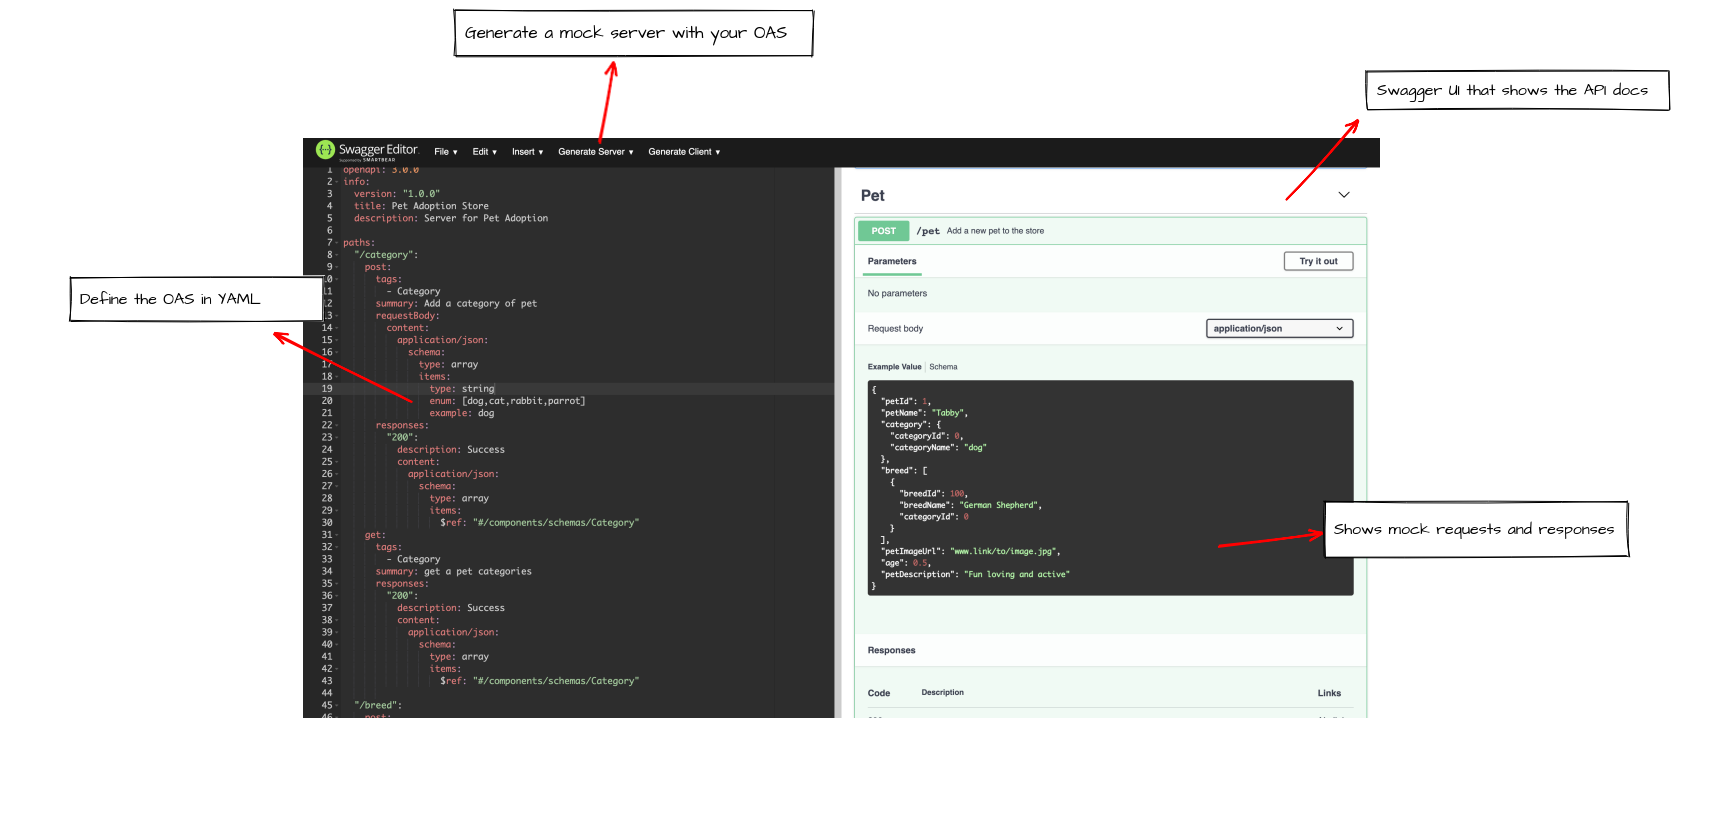
Now, it’s time to formalize our APIs using OpenAPI Specification (OAS). OpenAPI Specification is where you can design and document APIs using the YAML syntax, and the Swagger editor is a great place to start. The editor loads the Swagger UI on the side which shows the API documentation generated from the OAS.
The header
The OAS will always start with the OpenAPI version followed by some basic information about the services. This can include basic things like the title, version and description of the API specification and additional information like links to external documentation, the domain URLs, the license information etc. All the services are then written under "paths" section
Tags can be seen as a logical grouping of services. For example, all the services under the "pet" tag will perform some operation (create, read, update or delete ) on the "pet" entity.
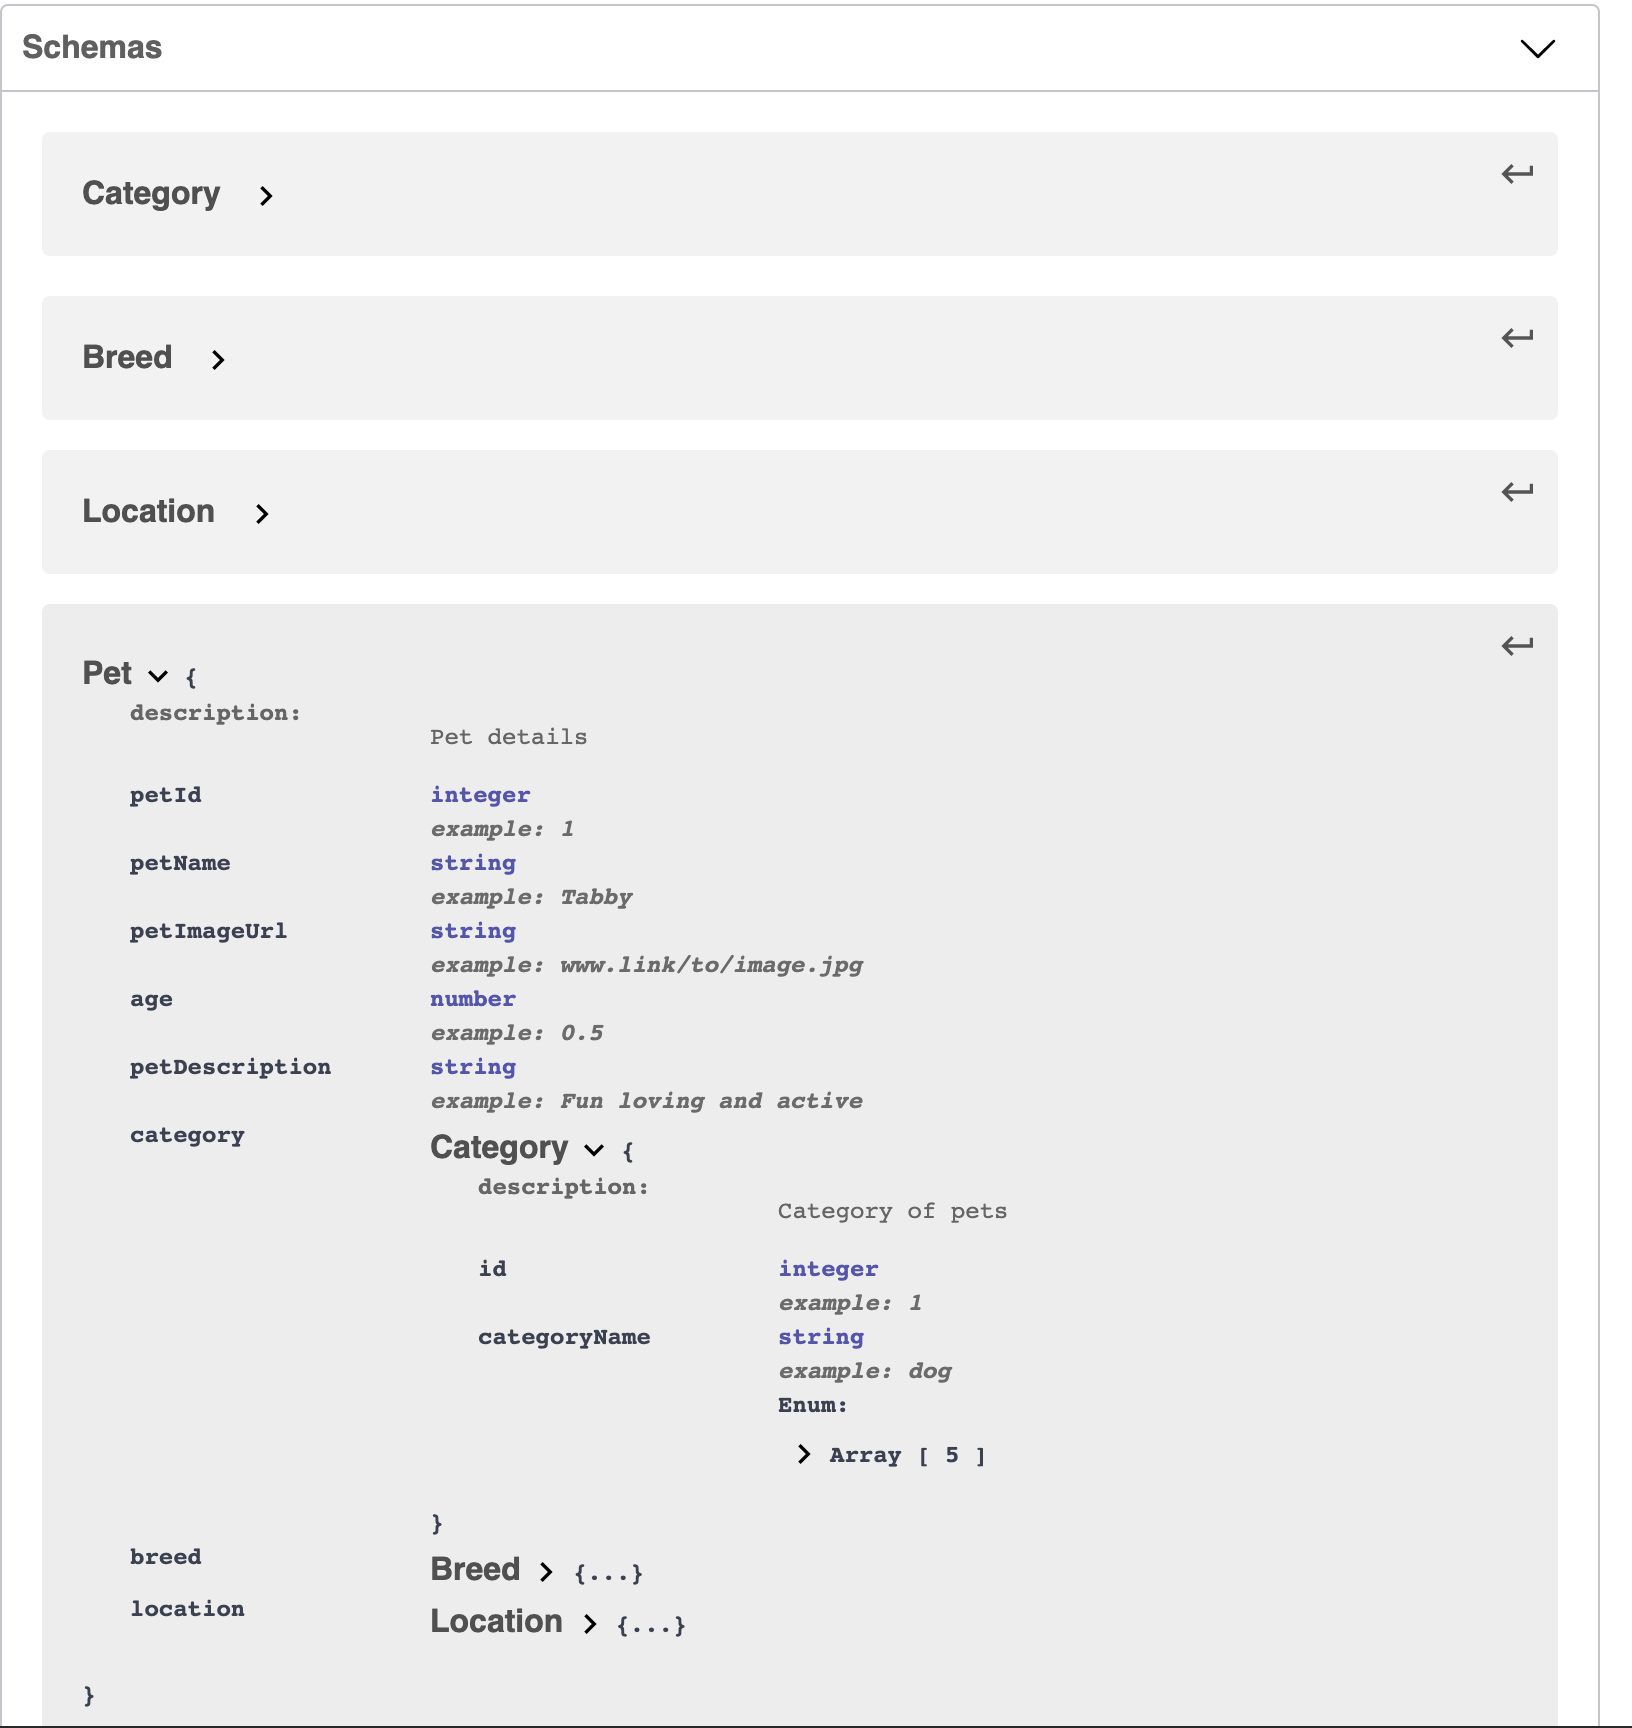
Defining a schema
A schema is a predefined structure that will be either sent in a request body or will be received as a response. This is helpful especially in cases where multiple APIs send/receive the same JSON object.
A schema represents a particular entity and its attributes and is always defined under the 'components' and 'schema' sections.
Creating OAS for a POST
For the POST route, the 'Pet' schema will be sent in the request body. In return, we get an object specifying the identifier for the pet added.
Creating OAS for a GET
The ‘GET’ route has a query parameter called "categoryId" which is the unique identifier of the category of the pet. The response sent back is a list of objects belonging to the ‘Pet’ schema.
For now we are only defining the responses for success scenarios (status code 200). We’ll cover handling failure conditions and other status codes later.
The complete spec
The complete specification is available as a gist on our GitHub. Go ahead and take a look for better understanding. Past the entire gist in the swagger editor to get an interactive UI.
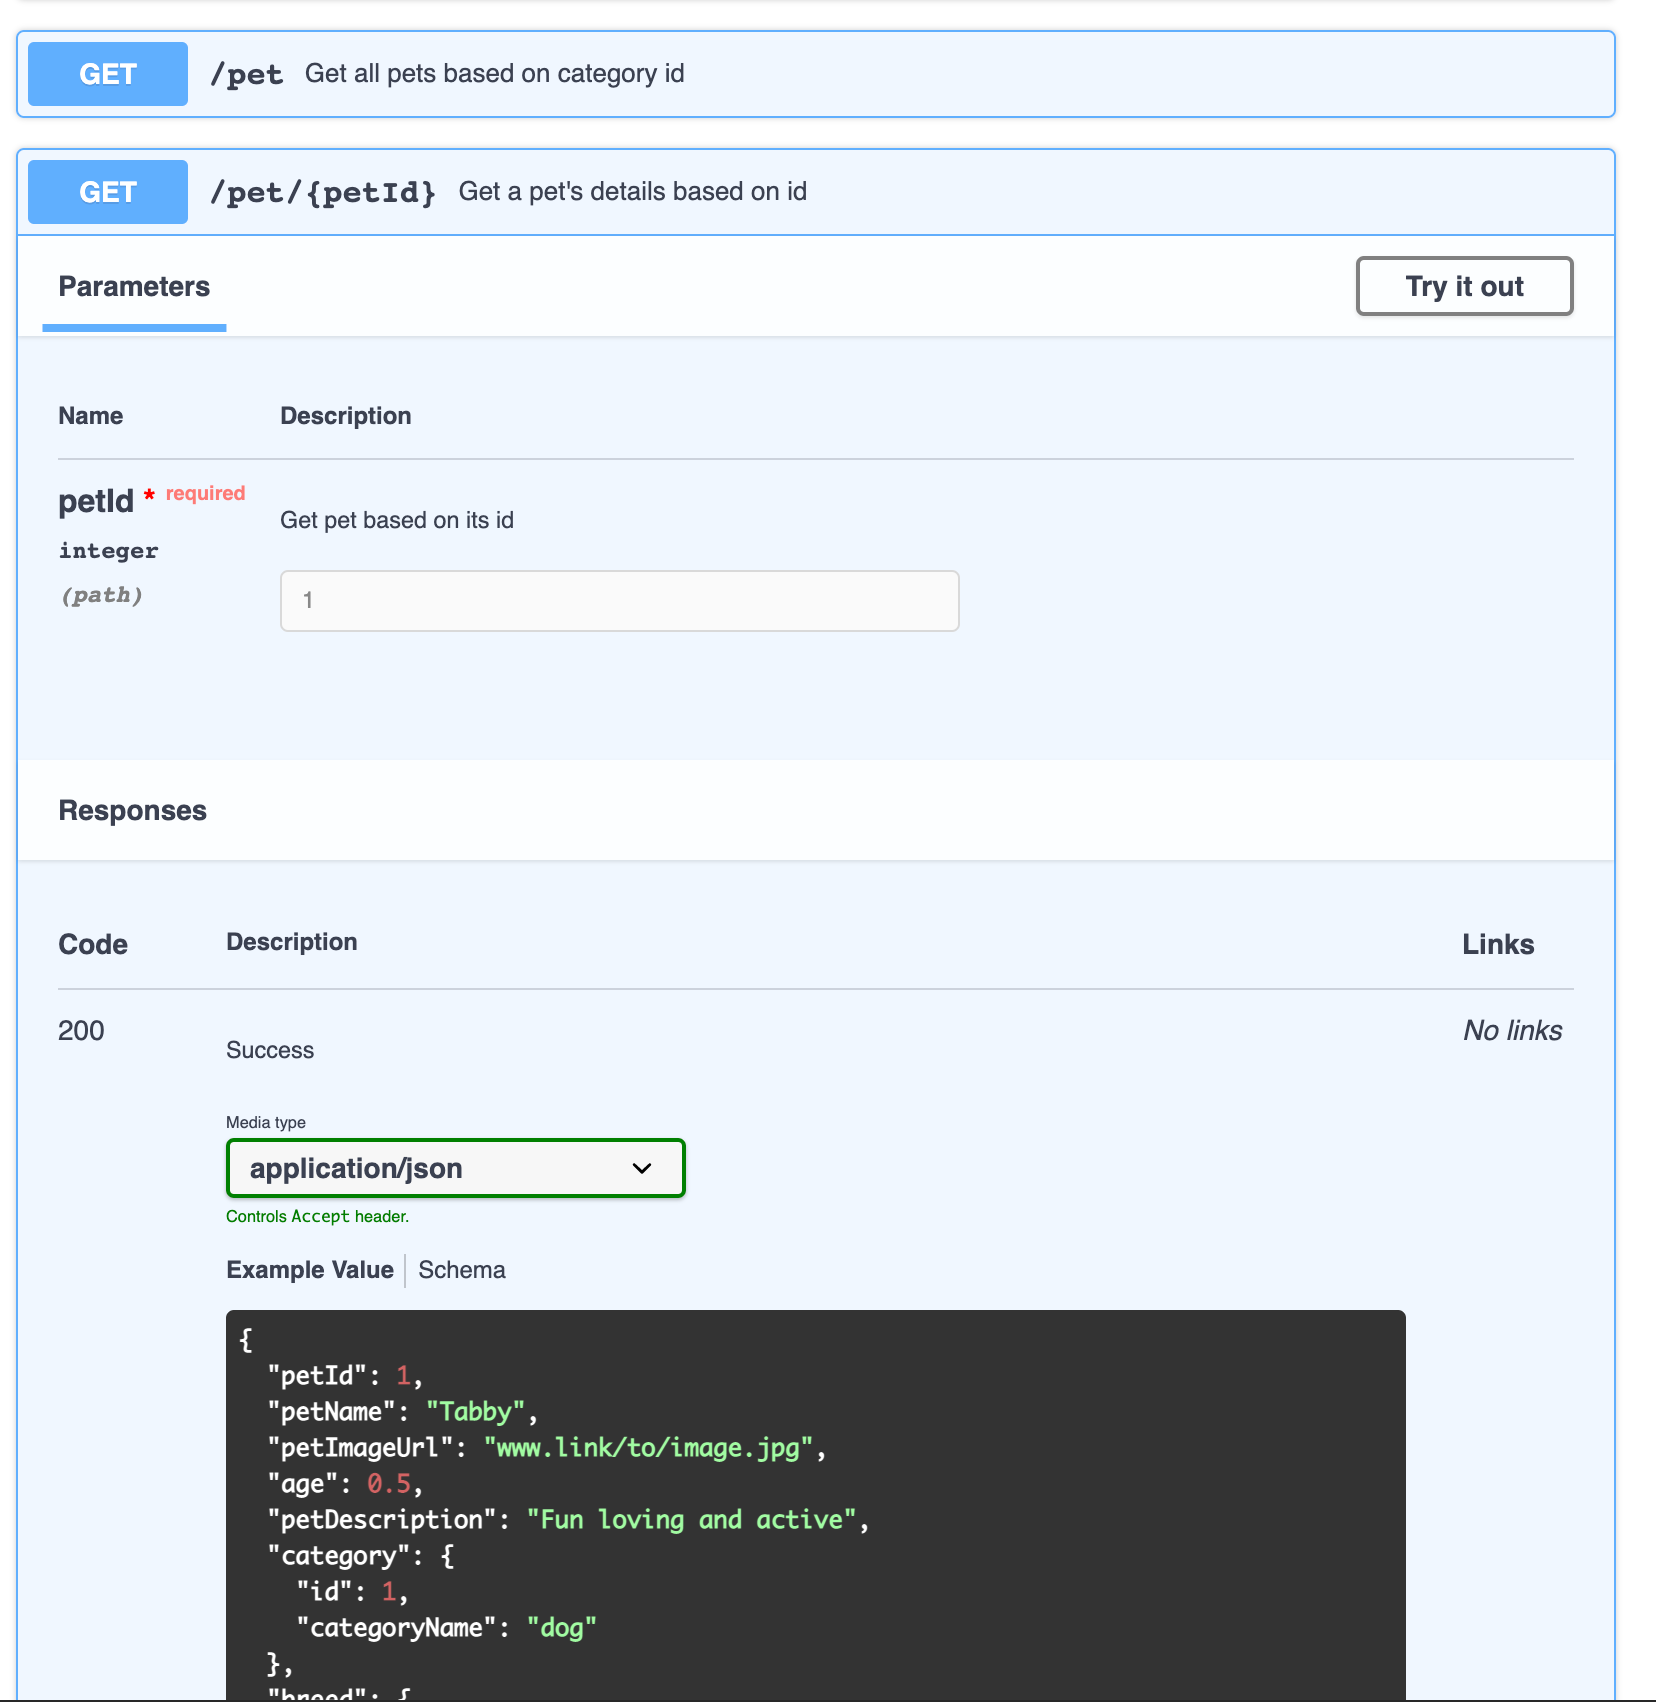
The resulting Swagger UI
By defining the OAS, an interactive UI is automatically generated:
Now that we have defined the API's lets design the database which will hold our data for the API's to consume.
Can't remember where we stopped? Check out Microservices-I: Part II - Being RESTful with APIs or the complete series here.
References:
To know the more about OAS, visit https://swagger.io/specification/.

Join the conversation