
An application usually revolves around a "domain". We usually start with the defining "models" of the domain and the actions that need to be performed on/by these models. In this post, we'll be defining these using Go structs and interfaces.
Repository setup? Check! Database up and running? Check! API Specification in place? Check! Extra strong coffee? Double Check!
It's finally code time!
In our previous post , we setup our project in a particular structure. This is where we're going to start filling that structure with code! Let's Go!
How do we design a data model?
Each application usually revolves around what we usually call a "domain". Think of the domain as the theme of the application or a world where your application resides.
When starting with development, we usually start with the defining "models" of the domain. These are like the objects/entities present in your domain. You define the actions that need to be performed on/by these models. Implementation wise, these models can map to a database table, or a schema defined in the API.
In our pet store application, the models correspond to both, the database tables and the API schemas. Remember we have four tables and four schemas called category, breed, location and pet. These are our models. We will perform basic operations on each them like creation, retrieval, updation and deletion (your generic CRUD operations).
Defining Models in Go
How to create models?
In Go, the model is represented as a struct. While the operations on the model are defined as interfaces on the model's struct.
The interfaces are just function signatures where the name specifies what operation will be carried out on the data. The function's parameters specify the input required for this operation and the return parameters specify the expected output.
For our pet store application, the models are going to look like this:
Category:
Breed:
Location:
And , finally, Pet:
See the "json" tag we've added in the models? This is a way in which you can map the struct to a JSON object. The struct's members are mapped to a JSON property. This is pretty neat if you want to convert from struct to JSON and back.
Why create models ?
These models act as guiding templates for any further development. The structs specify the data that the application acts on and the interfaces specify how this data should be manipulated in the application.
For example, in our application, we have defined the 'Pet' struct which stores the details of a pet. We have defined interfaces called 'CreatePet' and 'GetPet'. "CreatePet" very intuitively tells us that the function will accept an object of the pet struct and create a pet record entry in the backend database or throw out an error. While the 'GetPet' clearly specifies that it will return a pet object when an identifier is passed to it (or throw an error in case of failure).
Notice how these functions are interfaces and are not implemented? This is because these models can then be imported and used for implementing the interfaces.
For example, in our application, if one person is using files as storage, then his implementation for creating/fetching a pet will be quite different than another person who is using a SQL database (like we are). But the function signatures are going to be the same for both of them, since the interfaces and have put those constraints in.
Hence the model definitions are usually defined at the root level of the project or within a directory, where they can be accessed globally. Which leads us to our next question...
Where do we keep the models?
Since we know that our model definitions are going to be used by external packages we need to place them accordingly.
Now, remember, we said that /pkg keeps all the "public" code, meaning that the code can be imported by any other external project or package? This means we also need to create a folder called 'pkg'.
This is where we'll keep our model files. We define a folder called "models" within the 'pkg' folder (so your path is /pkg/models) and create one file per model. So we have four file under pkg/models: category.go, pet.go, location.go and breed.go
The folder structure will look something like this:
 petstore
│
└─── pkg
│   └─── models
│       └─── category.go
│       └─── breed.go
│       └─── location.go
│       └─── pet.go
│
└─── ...
Remember the model definitions have no external dependencies, i.e., there will be no external imports required under the 'pkg/models' folder. This is because we want our models to be generic for all implementations and not dependent on anything else.
Where and how will these models be used?
We have our models in place, the next step is to use them. For this, we need to implement the interfaces we defined. And we'll be doing just that in the upcoming posts, but before you go, we would like to focus on a tiny little concept: how will our code will pass control and where will the models fit in?
The Code Control Flow
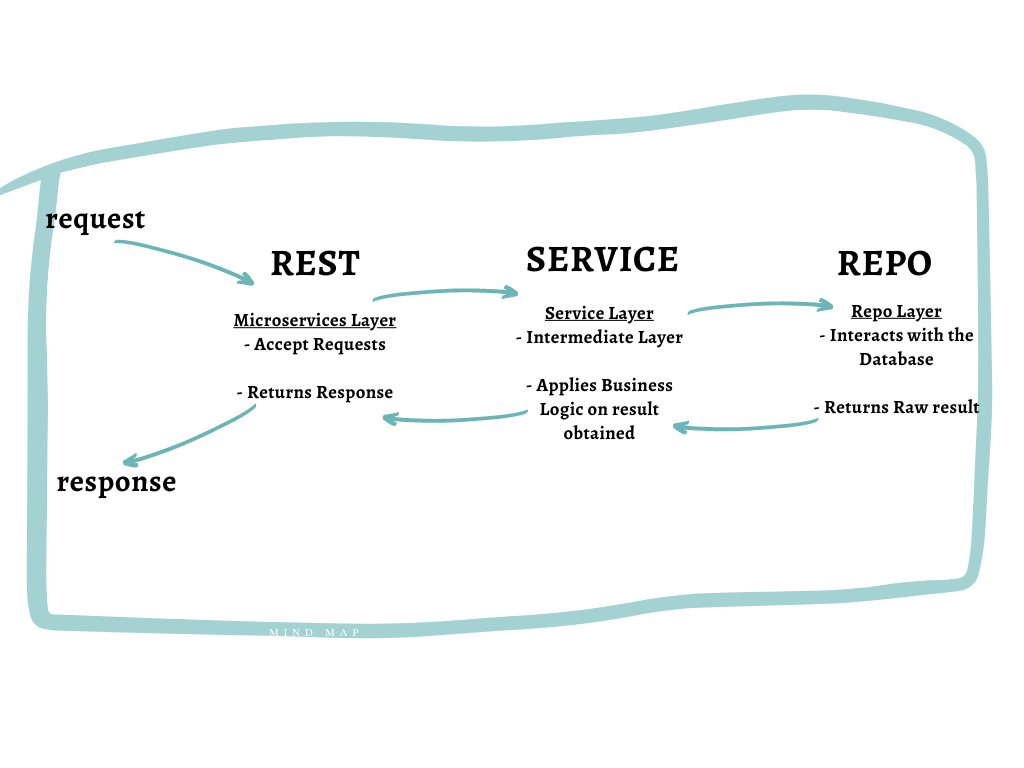
In Part I, we have created three folders under the "internal" folder, namely, "rest","service" and "repo". Think of these folders as layers where each will have individual responsibilities.
The Rest Layer acts as the Interface and will accept requests and send responses to the users.
The Repo layer is the one which is directly interacting with your database. This layer will execute queries on the database and return raw results
The Service Layer is like an intermediate layer that ties both the Rest layer and the Repo Layer. It accepts input from the Rest Layer and calls the Repo Layer. In turn, it accepts the results from the Repo Layer and sends it back to the Rest Layer. In both cases, the service layer is responsible to carry out any extra business logic or data manipulations that may be required.
In short:
The models that we have defined will be implemented in the Repo Layer (and also, sometimes, the service layer). That means the we will have the actual implementation of the interfaces in the Repo Layer. This will be covered in depth in our next post.
That's all for domain models!
We are done with the model definitions! Though, we're only just getting started. Brace yourself, the following blogs are going to be code heavy. We will start writing logic for interacting with the database to perform operations on these models. Head over to the next post in the series when you are ready!
Looking for a refresher? Here's our previous post on setting up a repository and our Microservices I: Pre-Development Series.

Join the conversation