

Once Devtron is installed, we can start deploying applications. All CI/CD pipelines and configurations will be done via the Devtron UI without any code. We'll tell you how in this post!
We have our clusters in place and Devtron set up! If you aren't with us till here, we'd say have a look at our previous posts and you'll be up to speed.
In this post, we are finally deploying! And believe it or not, we're writing zero code. None! Nada! We're going to use Devtron of course! You'll soon find out how. Keep on reading!
Get Ready
To start off with application deployments, we'll tell you a little bit about how our CI/CD pipelines will work.
We have a simple microservice called <"> that has a single endpoint (the root endpoint). The code repository can be found within our GitHub account. What we want to achieve is that our microservice should be deployed onto our dev and prod environments and the API endpoint exposed over the "/" route.
Now here's the CI part (continuous integration)
Whenever a push action takes place onto our "main" branch in GitHub, our CI pipeline should clone our repository and build a Docker image that's specified in a Dockerfile within our repository. The resulting image will then be pushed to our Dockerhub account by the CI process.
And for the CD part:
Once the CI process is complete, the CD process will take over and will deploy the application to our dev and prod clusters.
Both of these will take place automatically once we do a git push onto our repository. But we also should be allowed to trigger a deployment manually if the need arises.
PS: Both of our environments, dev, and prod, are Kubernetes clusters on GCP (GKE).
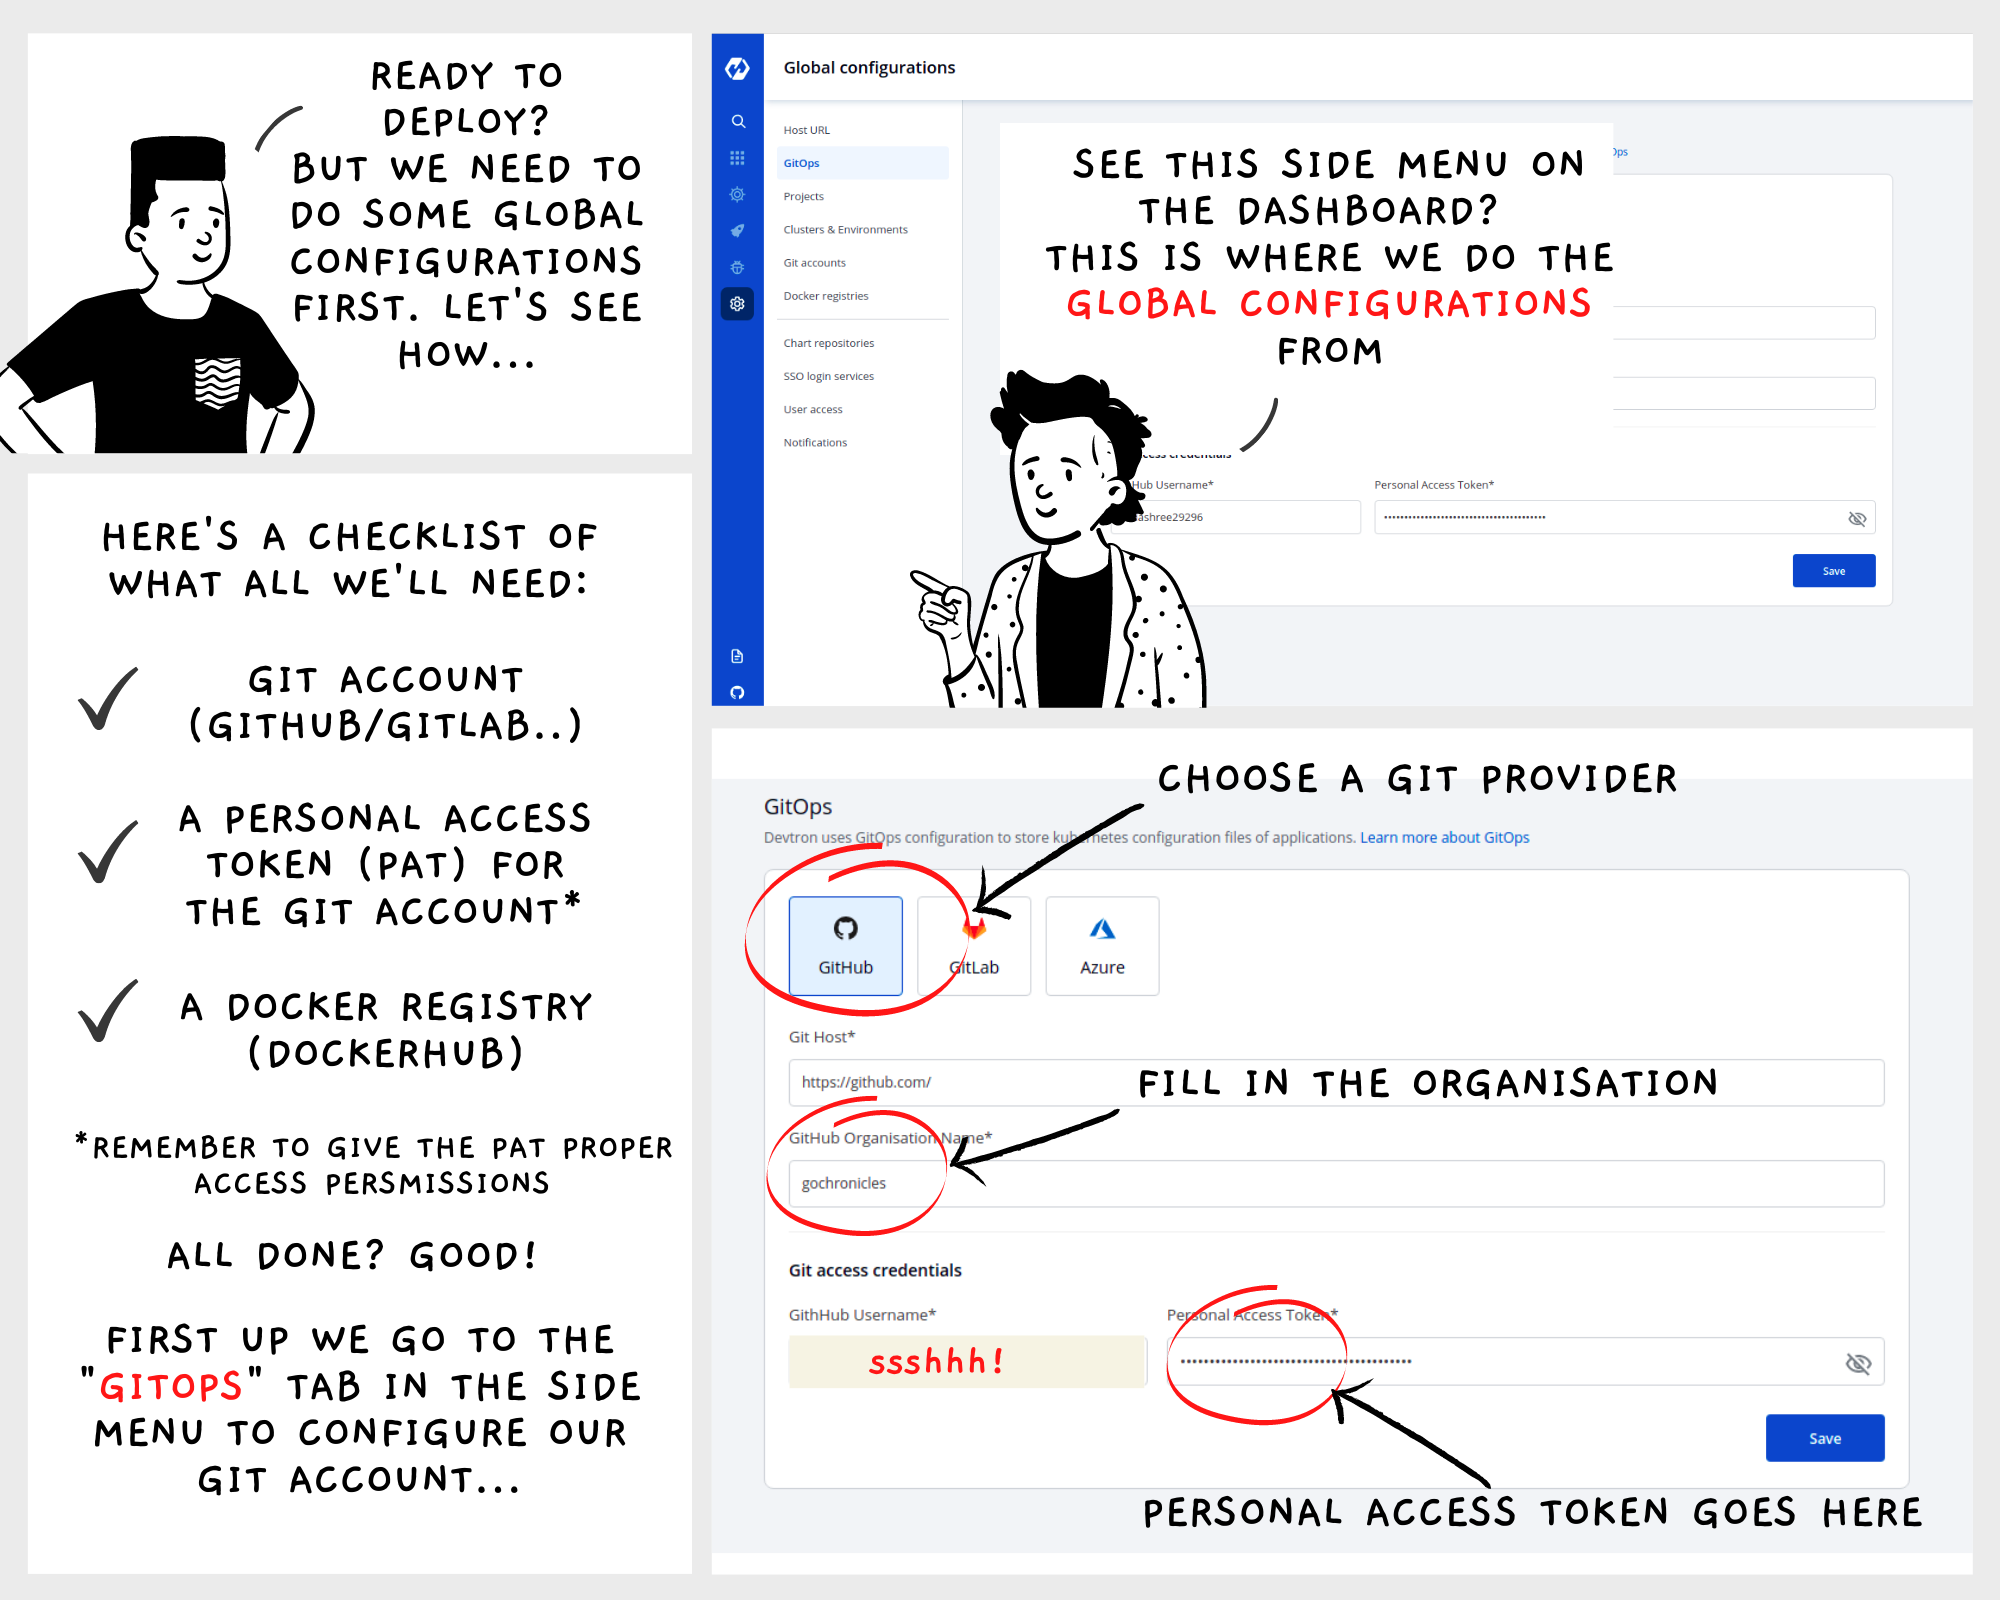
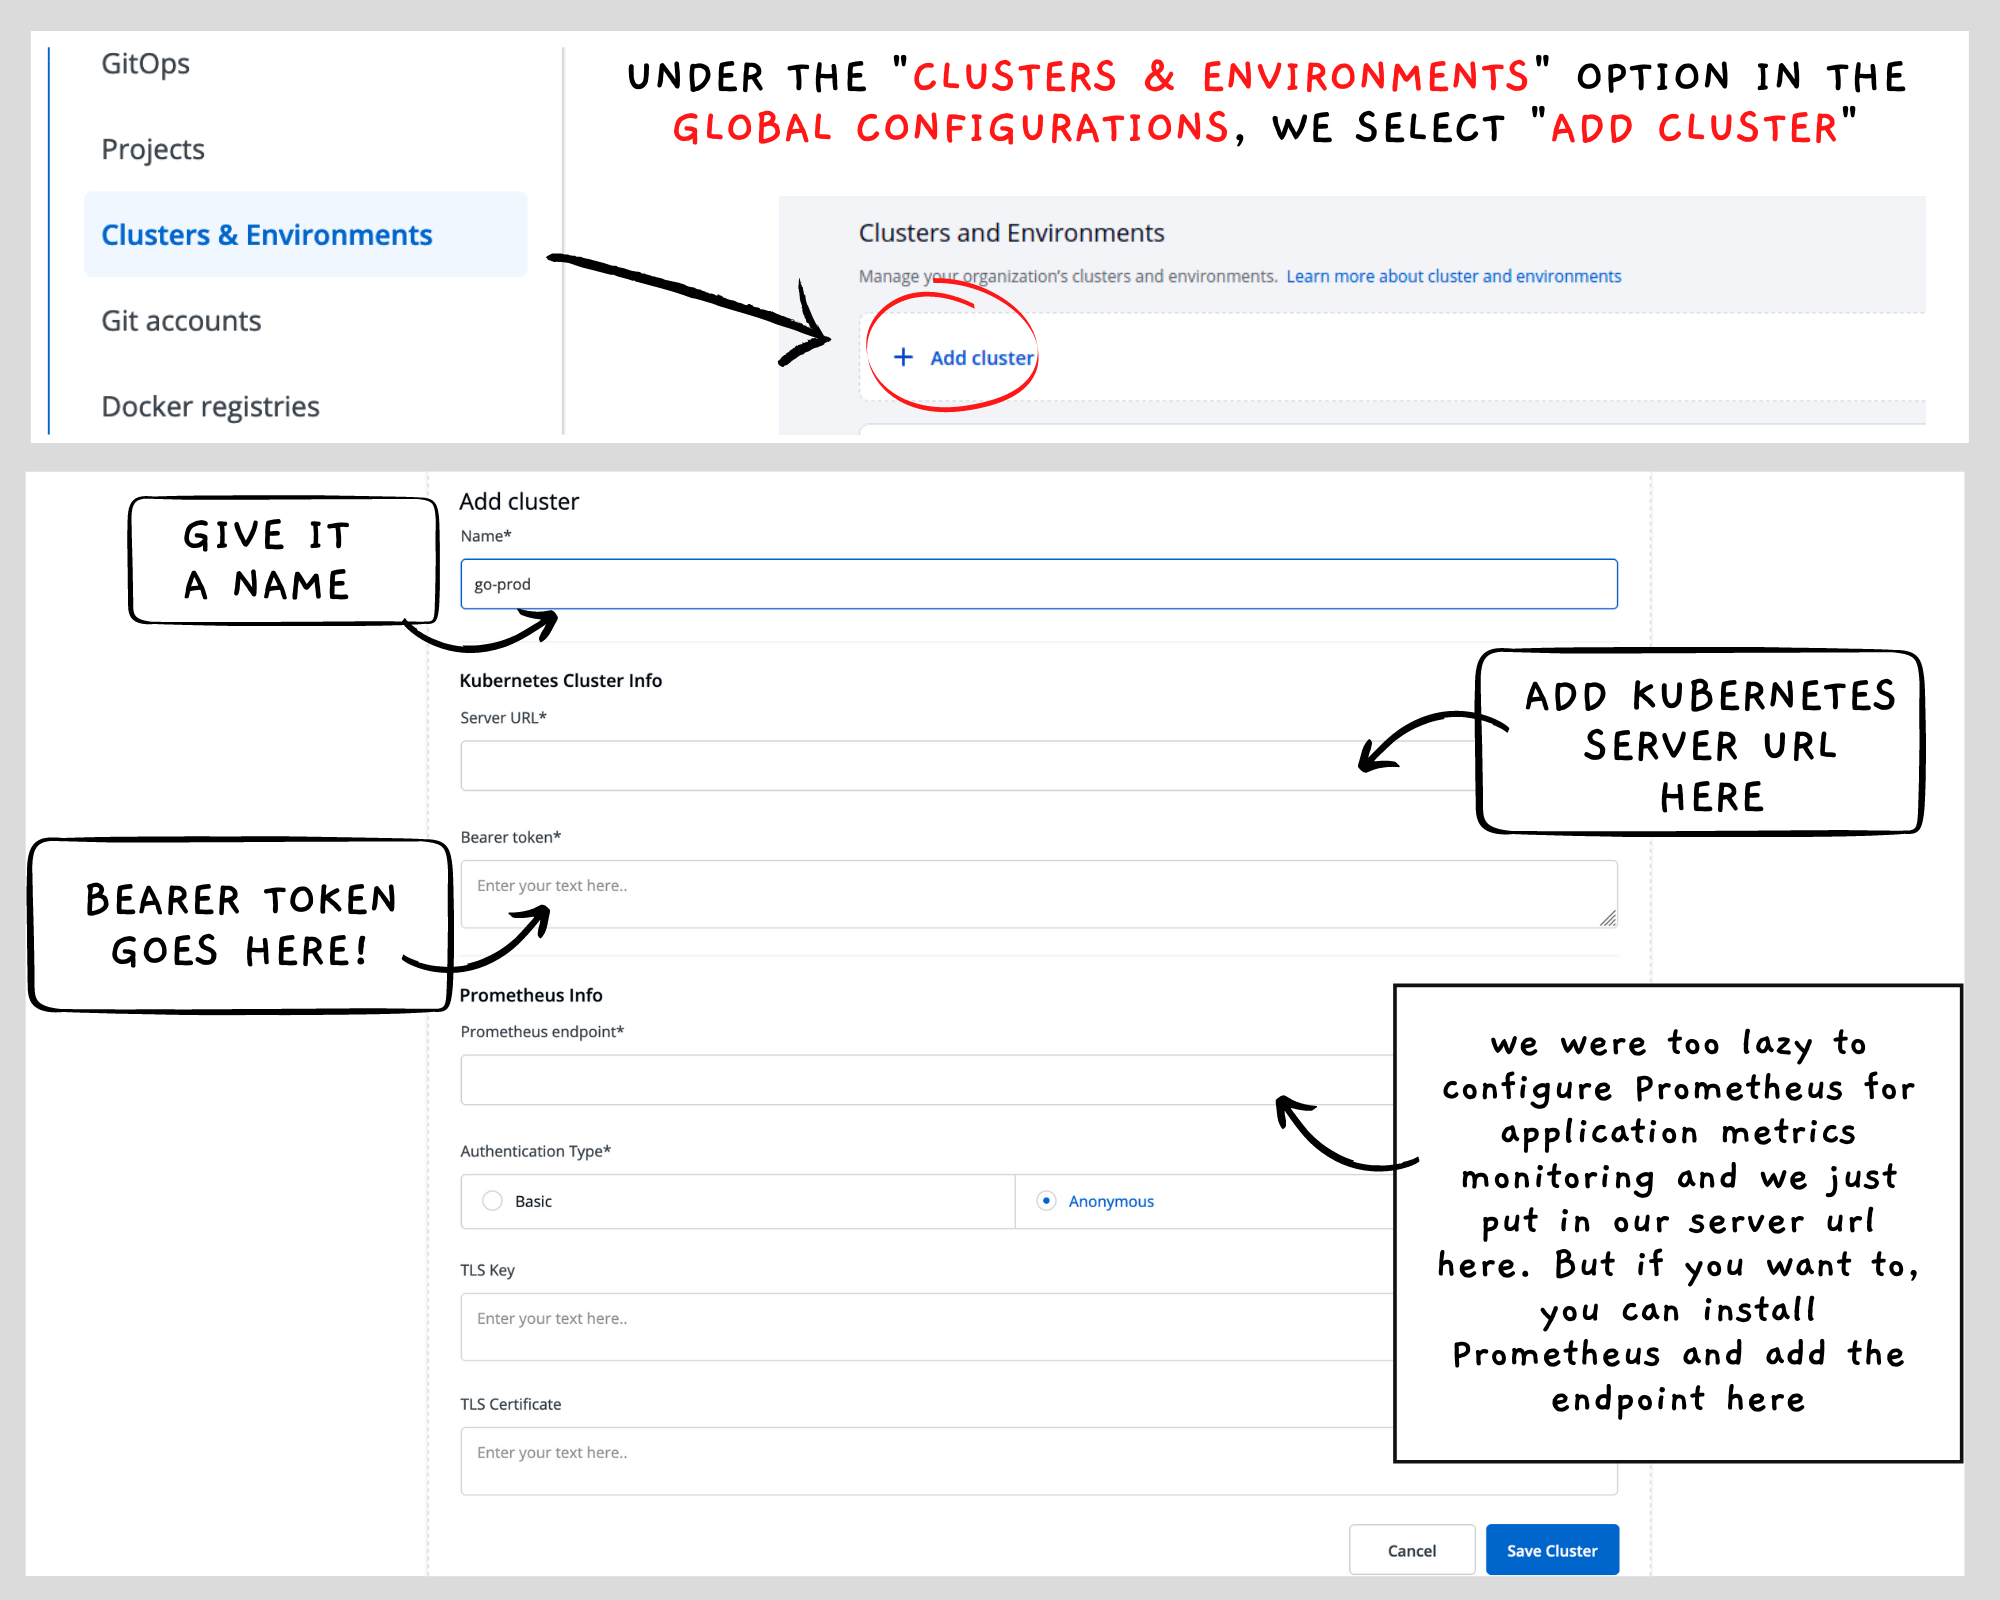
Step 1: Global configurations
Even before the application comes into the picture, we need to define a few global configurations. These are just a few common things like your Git account and Docker registry credentials and all the Clusters.
An additional step is to create projects. Applications are grouped into projects which means we can have multiple projects that have multiple applications.
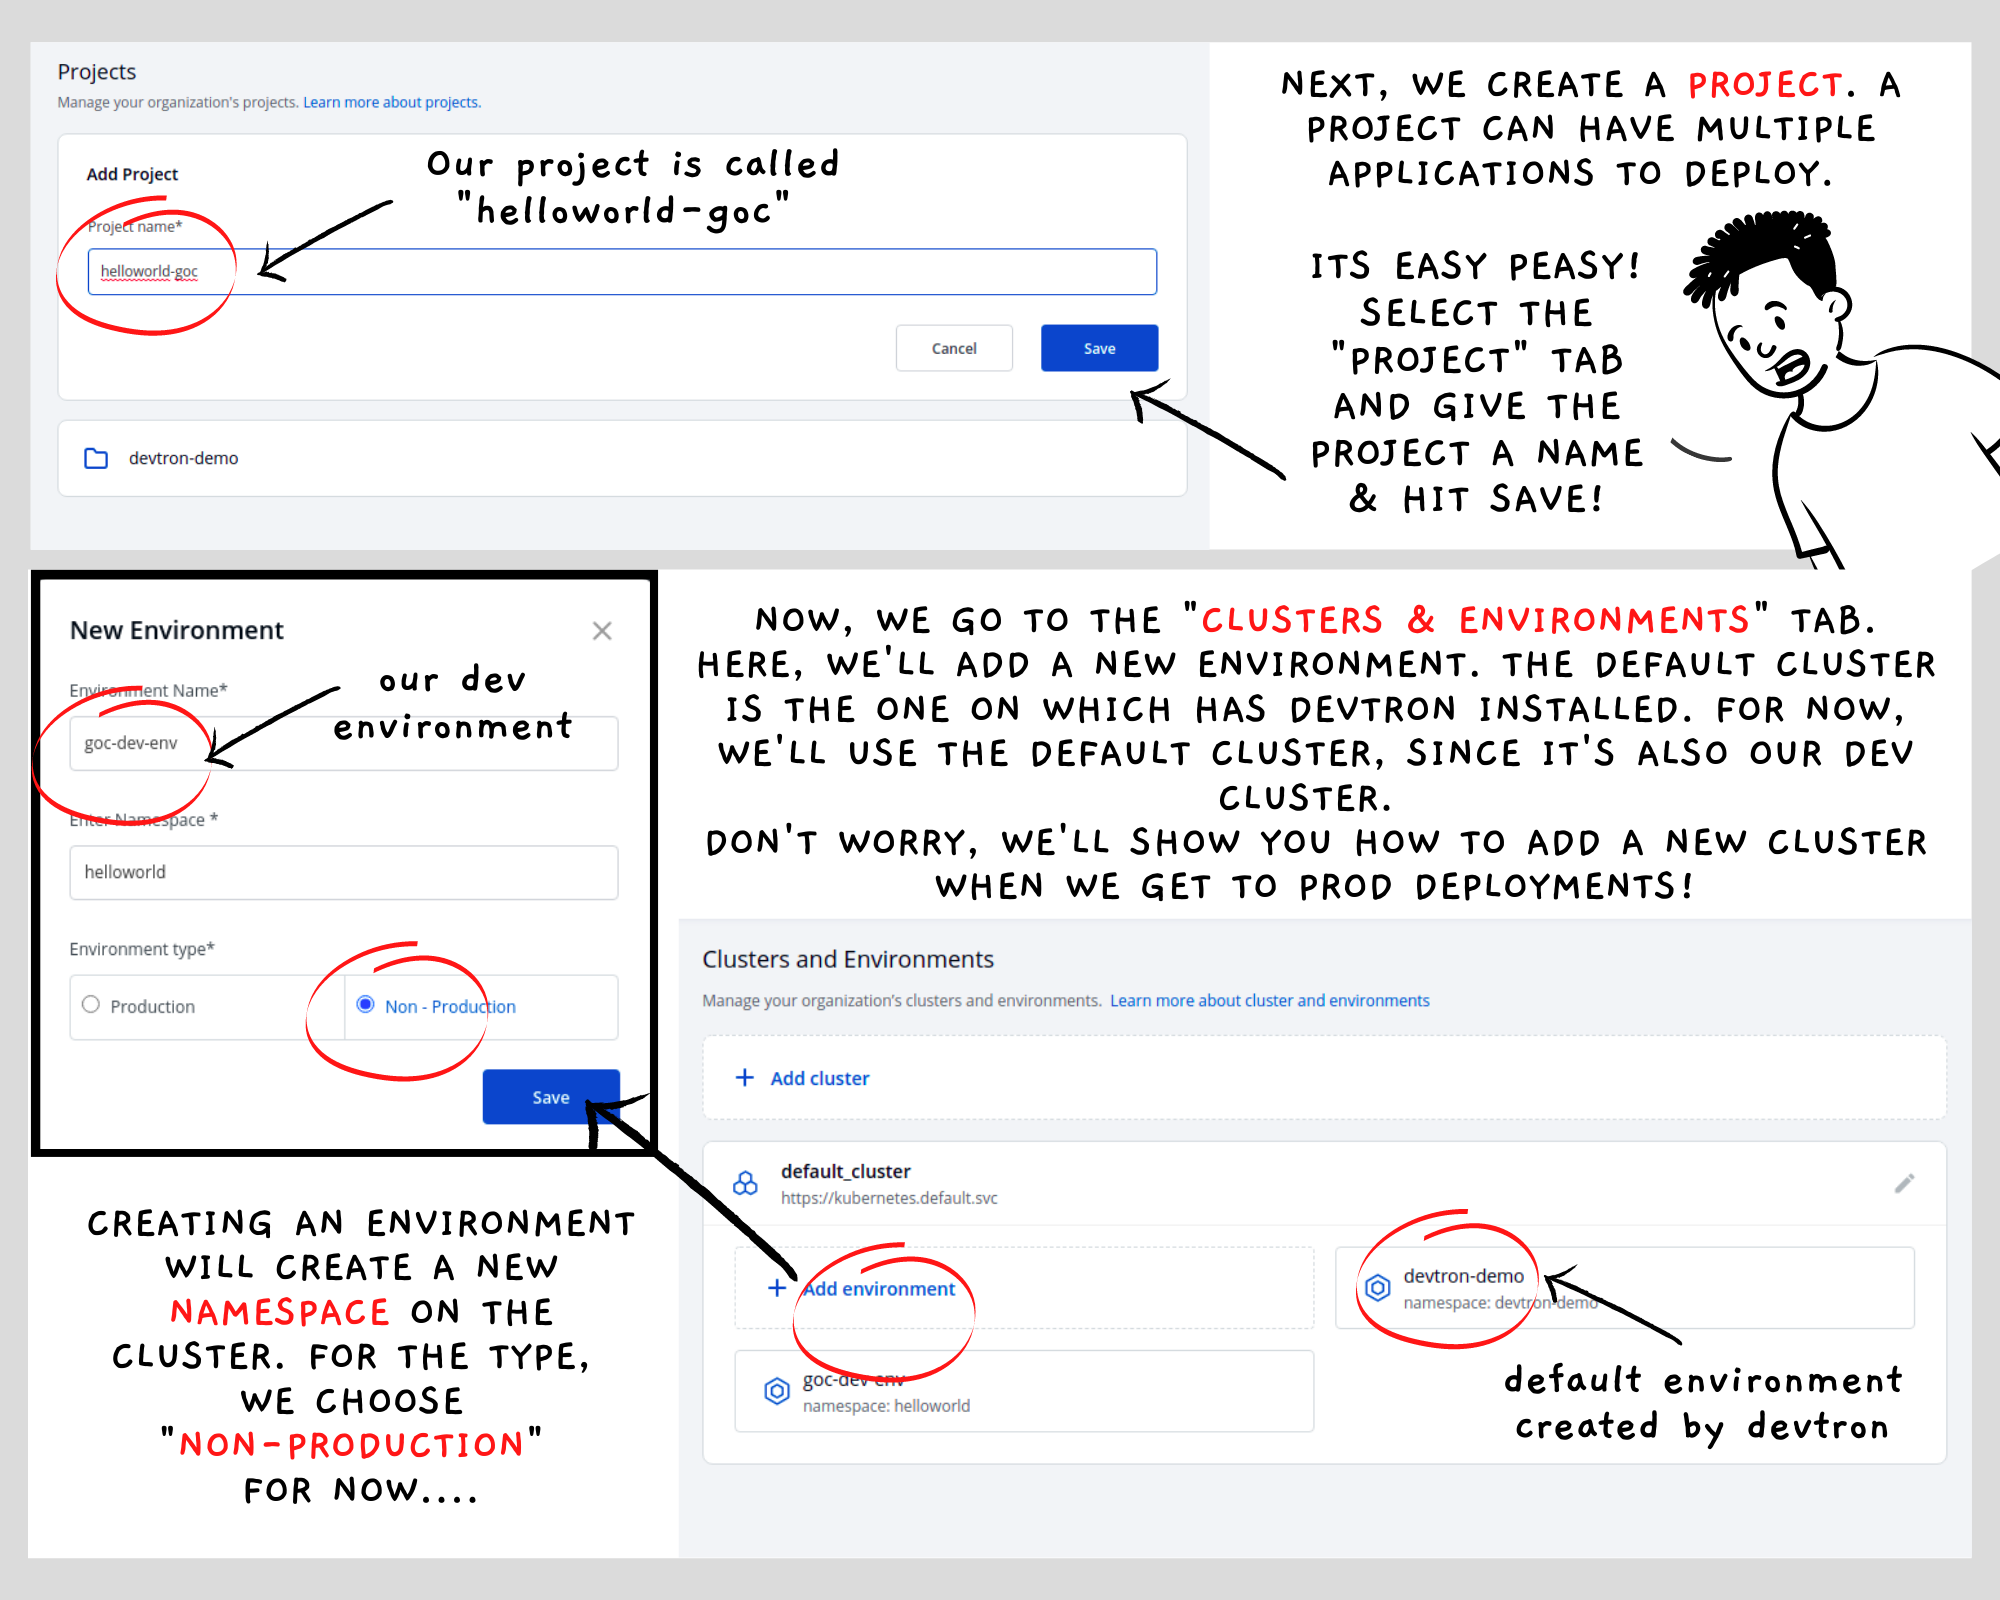
The cluster that Devtron is running on is the default cluster. Devtron also creates a default environment called "devtron-demo". An environment within a cluster will always map to a Kubernetes namespace for the cluster.
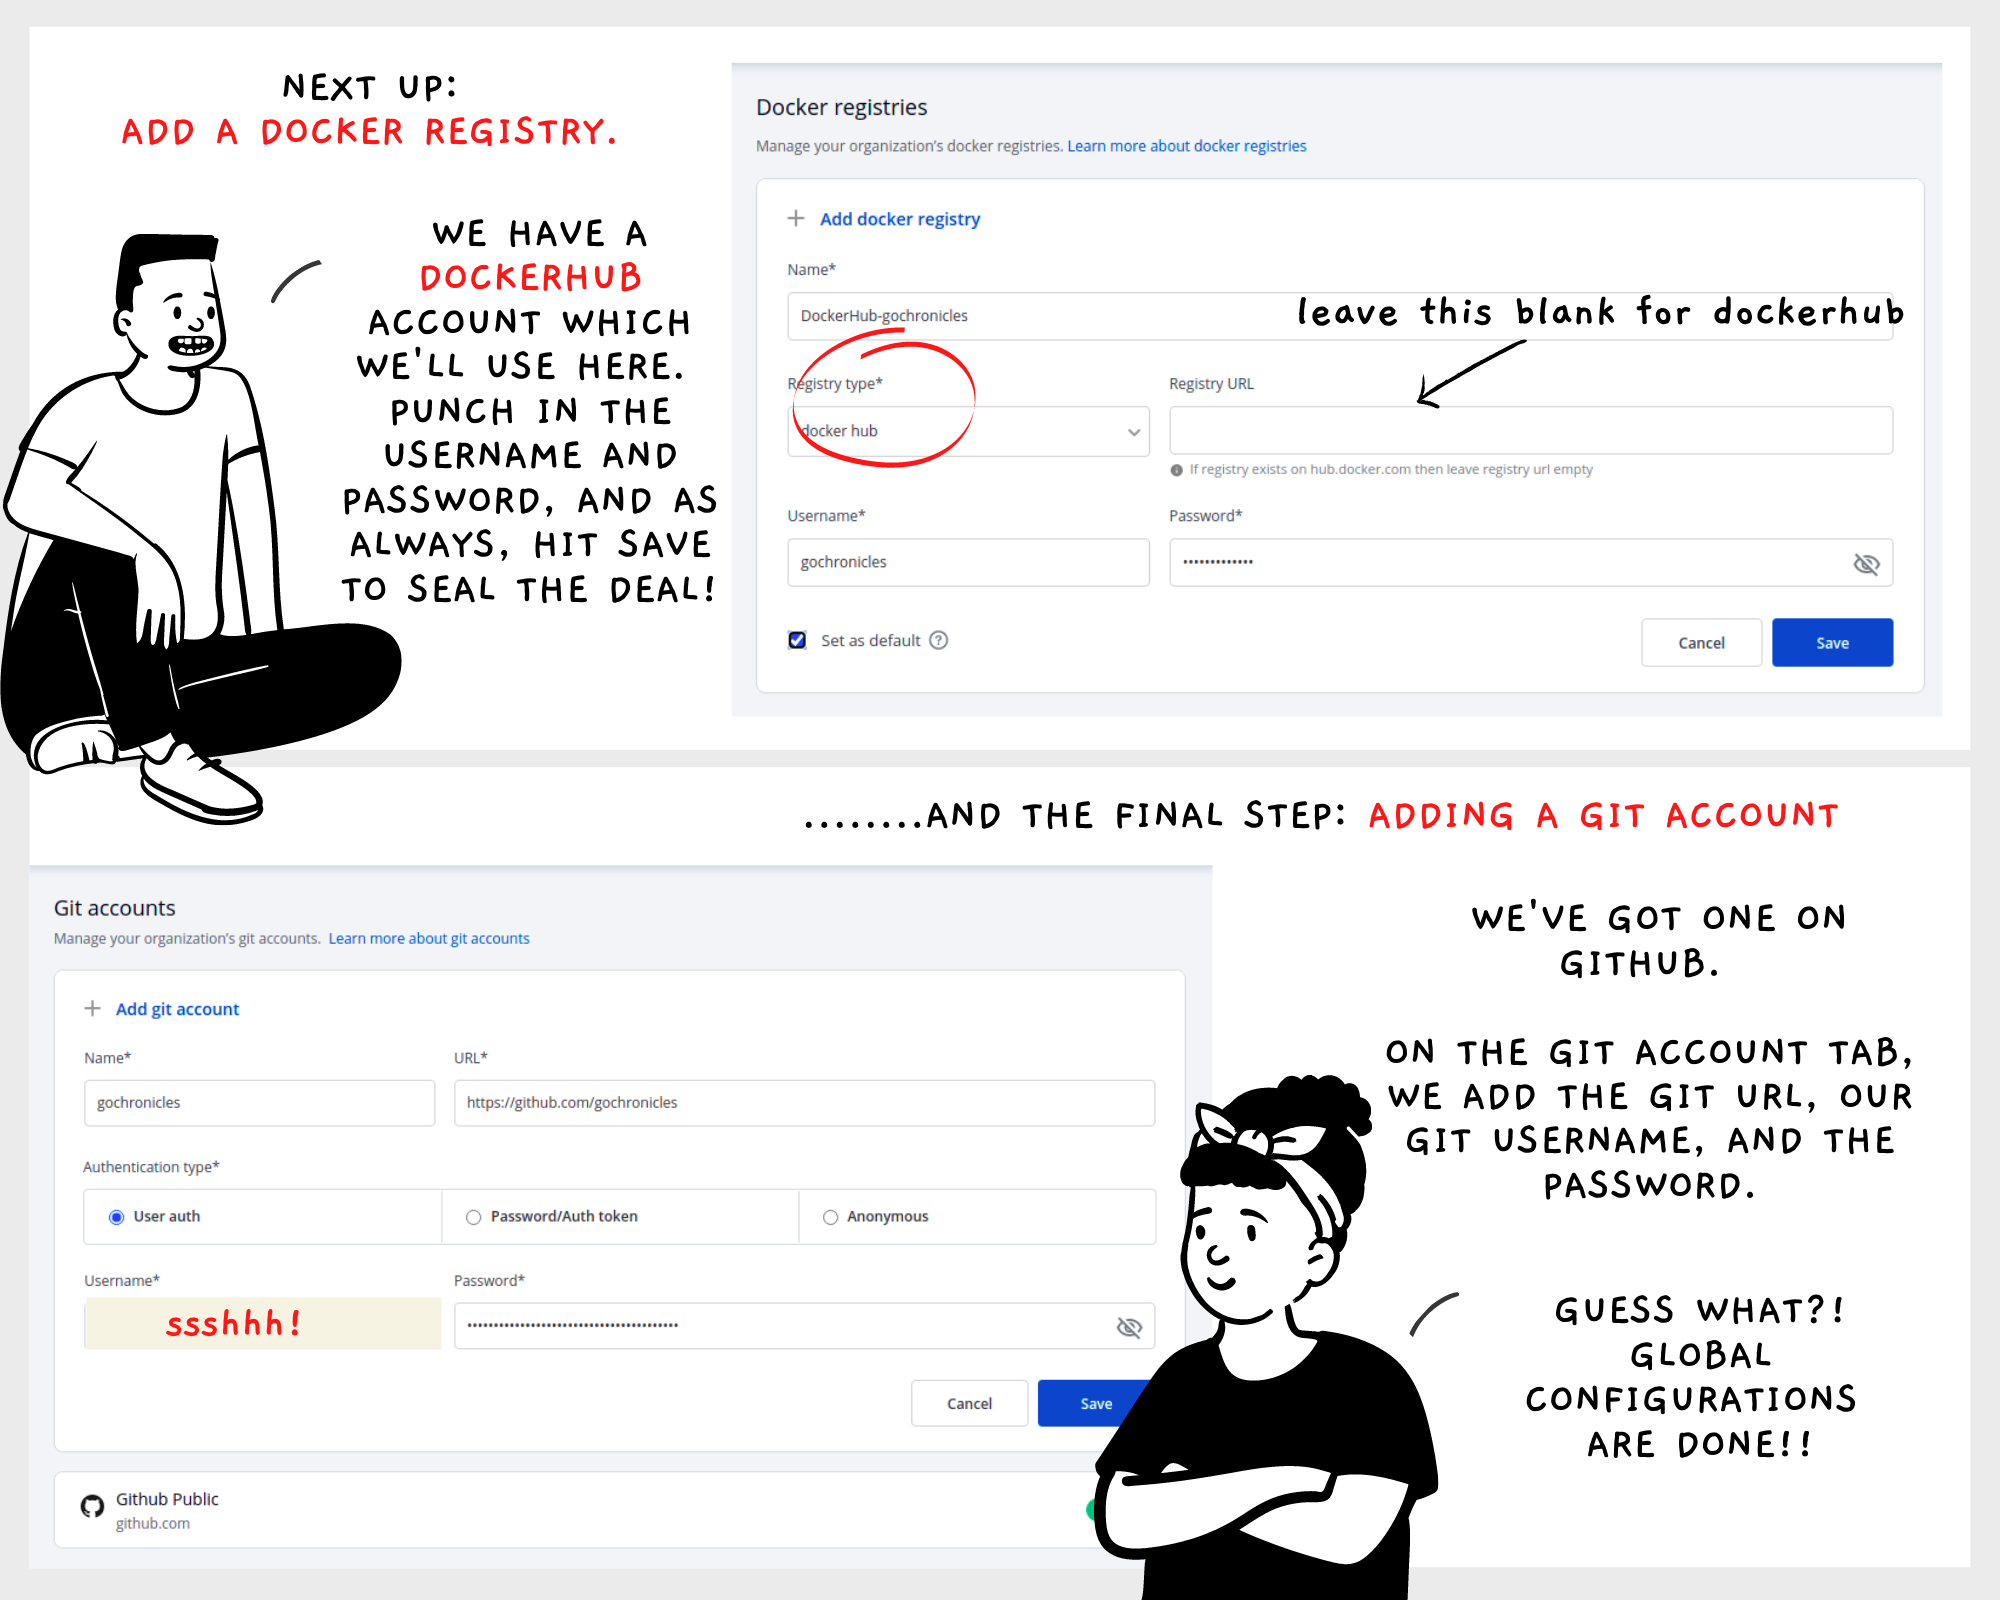
Devtron currently supports ECR and DockerHub. If you use any other registry, you just need to add the registry URL along with your credentials
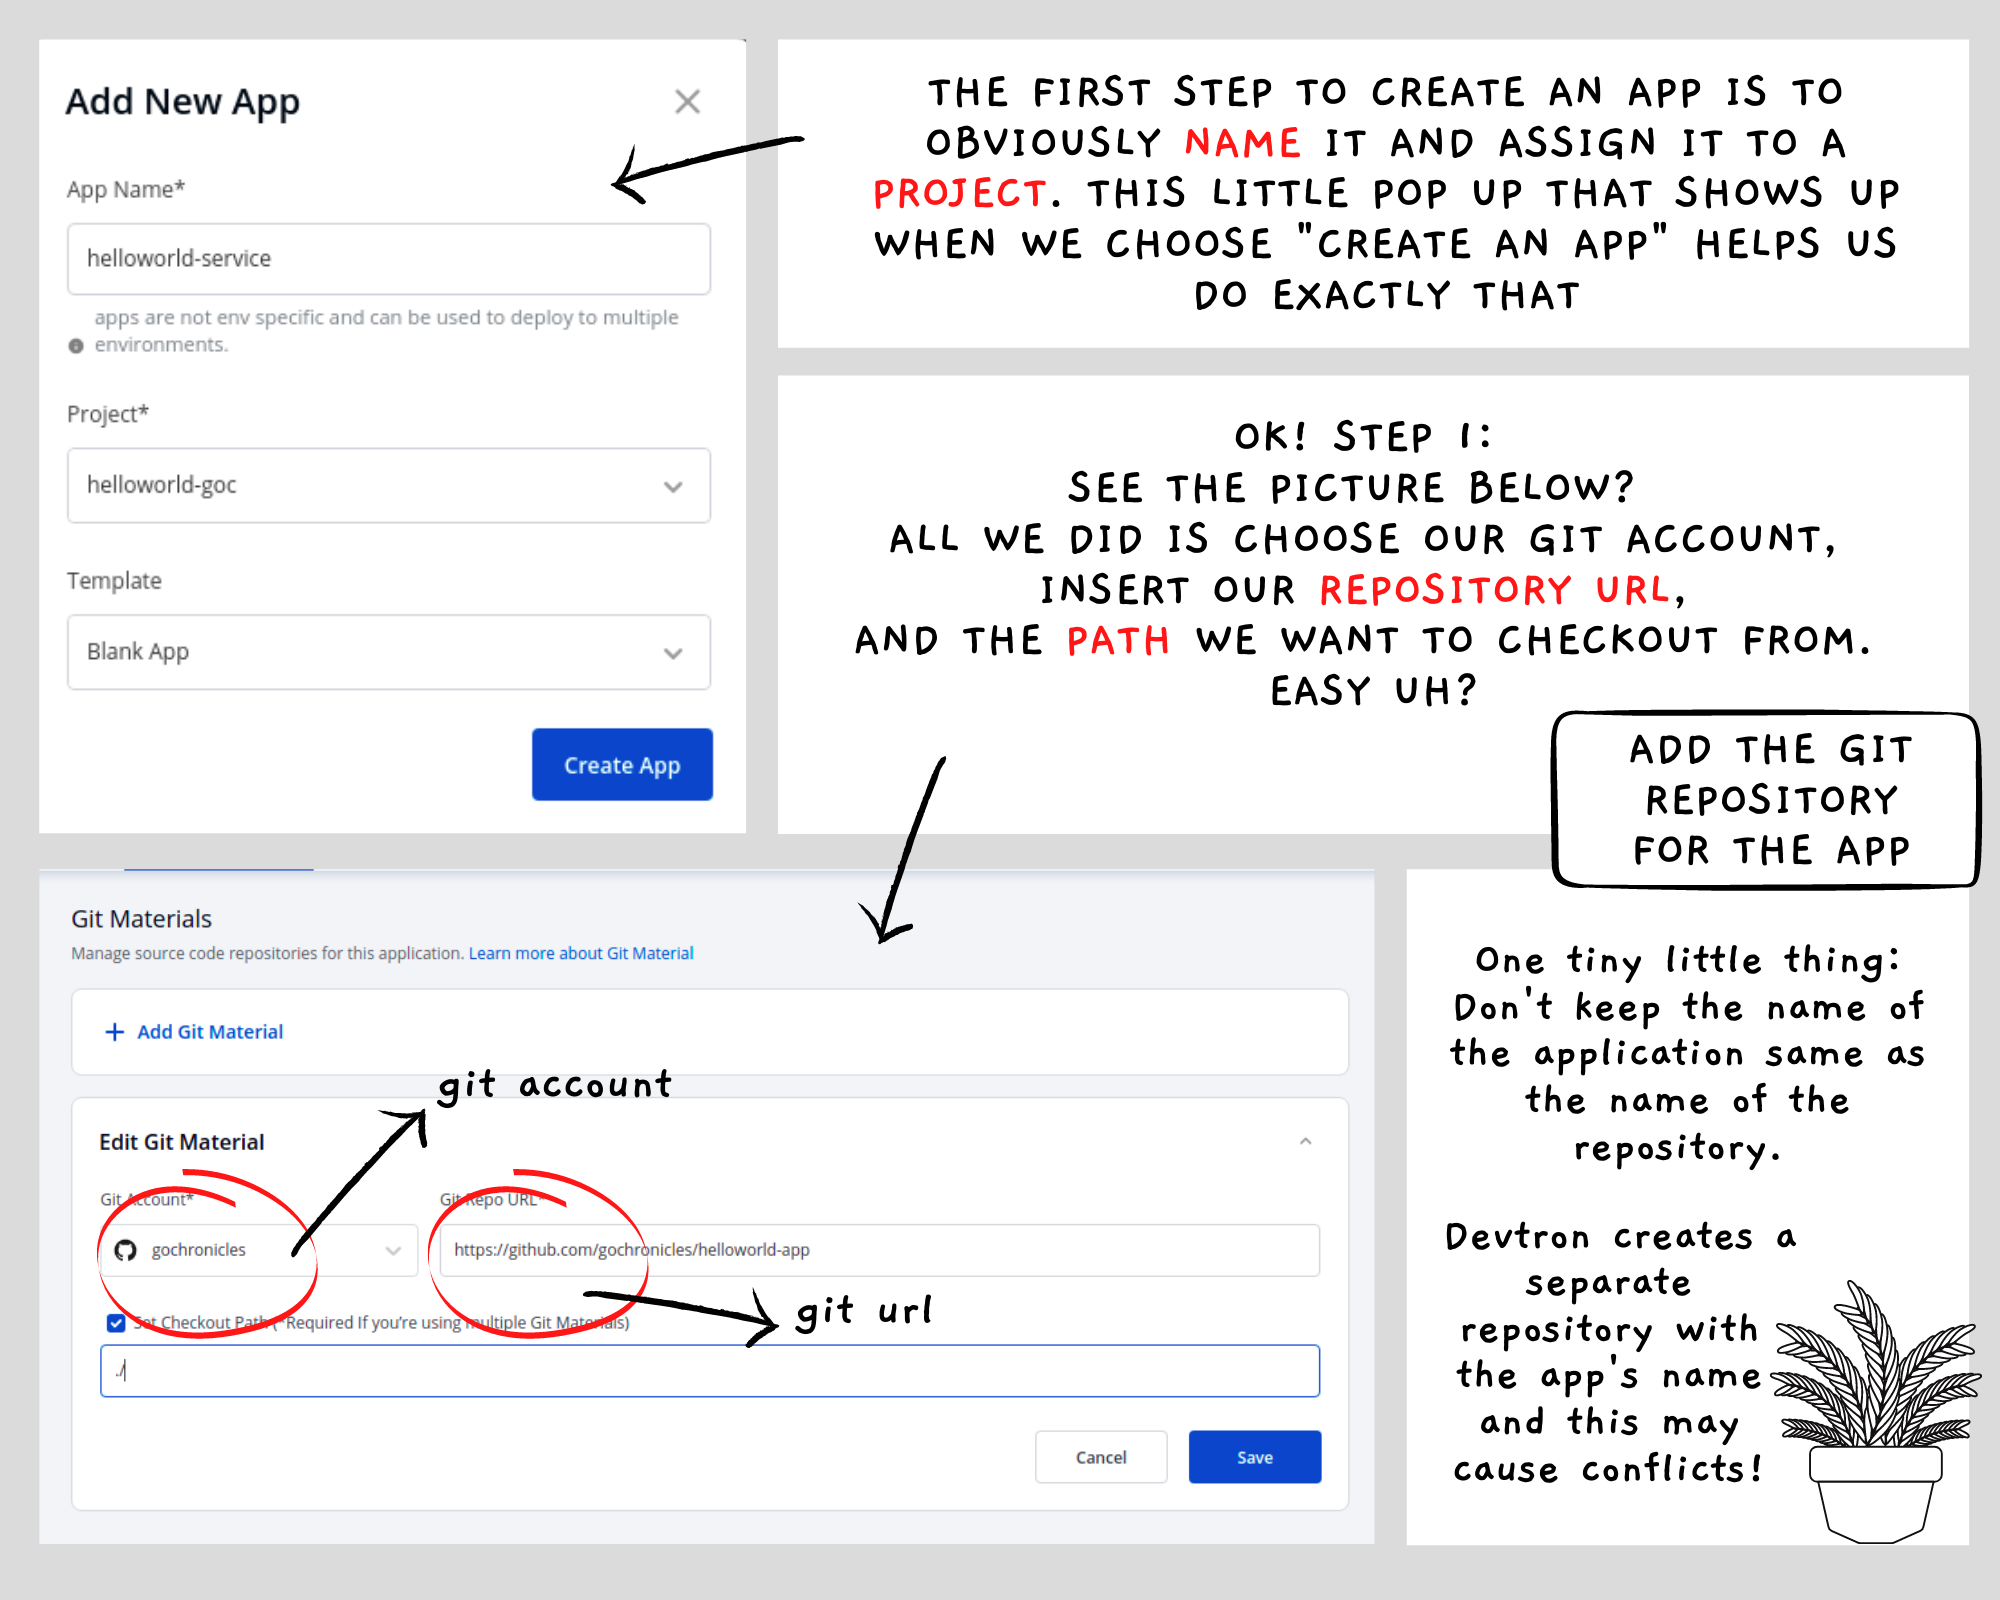
Step 2: Create an Application
Once the Global Configurations are complete, you can start configuring applications that have to be deployed.
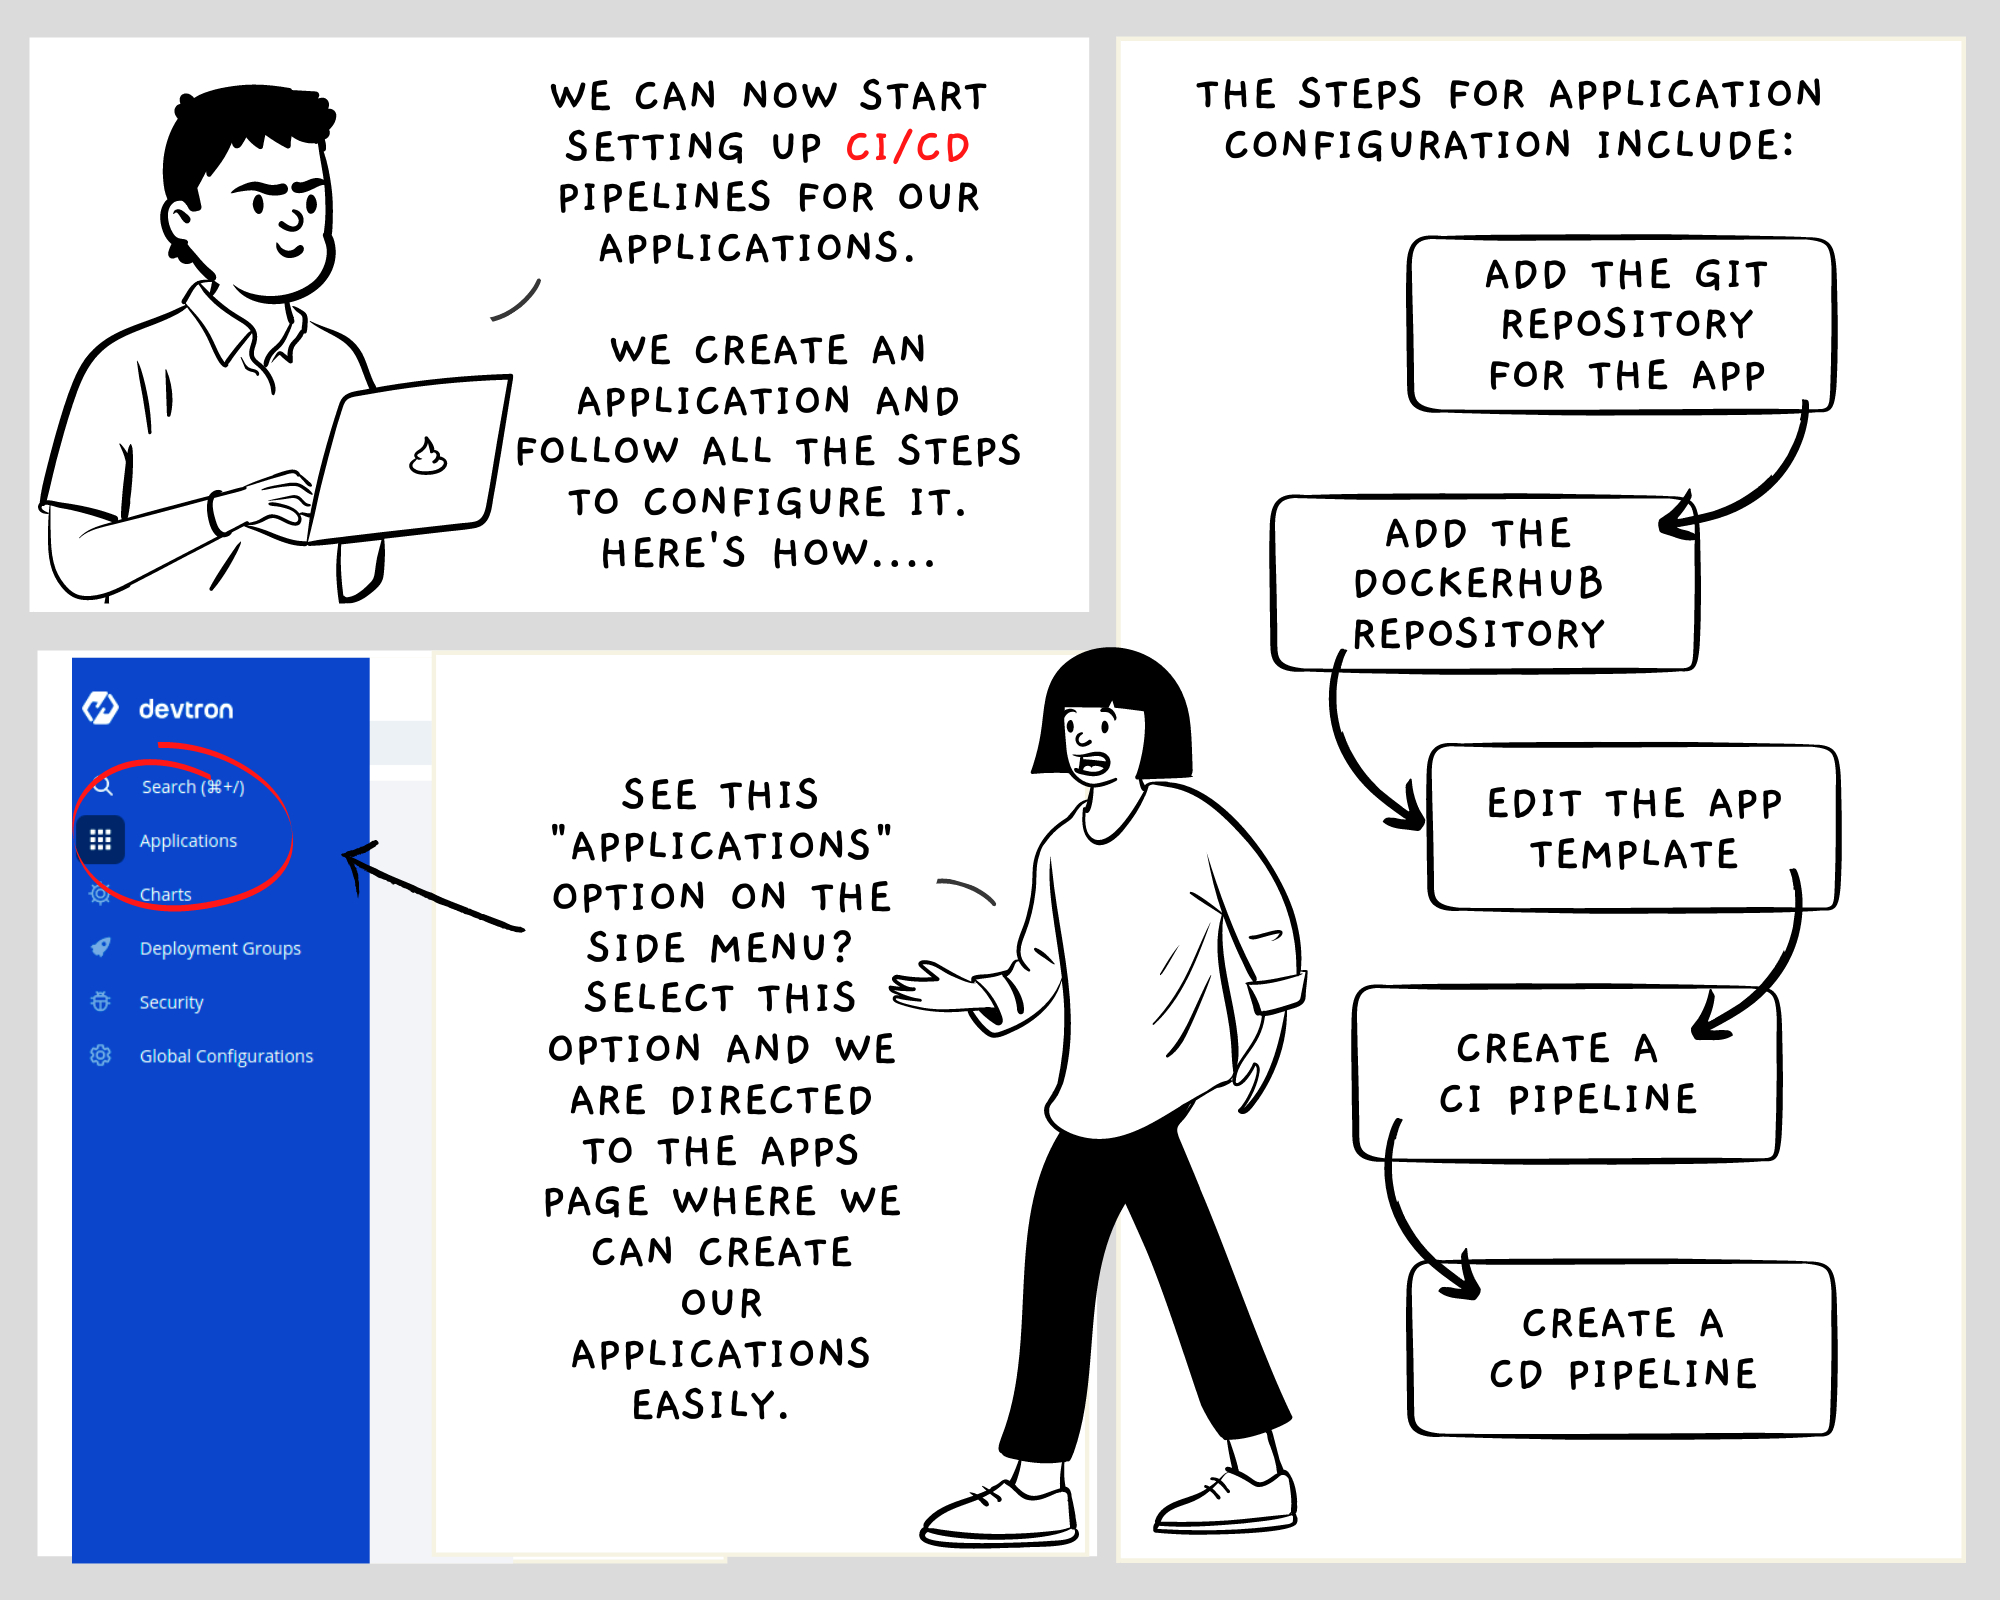
The application will always belong to a project but can be deployed to multiple clusters and environments.
Next, we add the Dockerhub repository details. Once we do that, we see our app's deployment template.
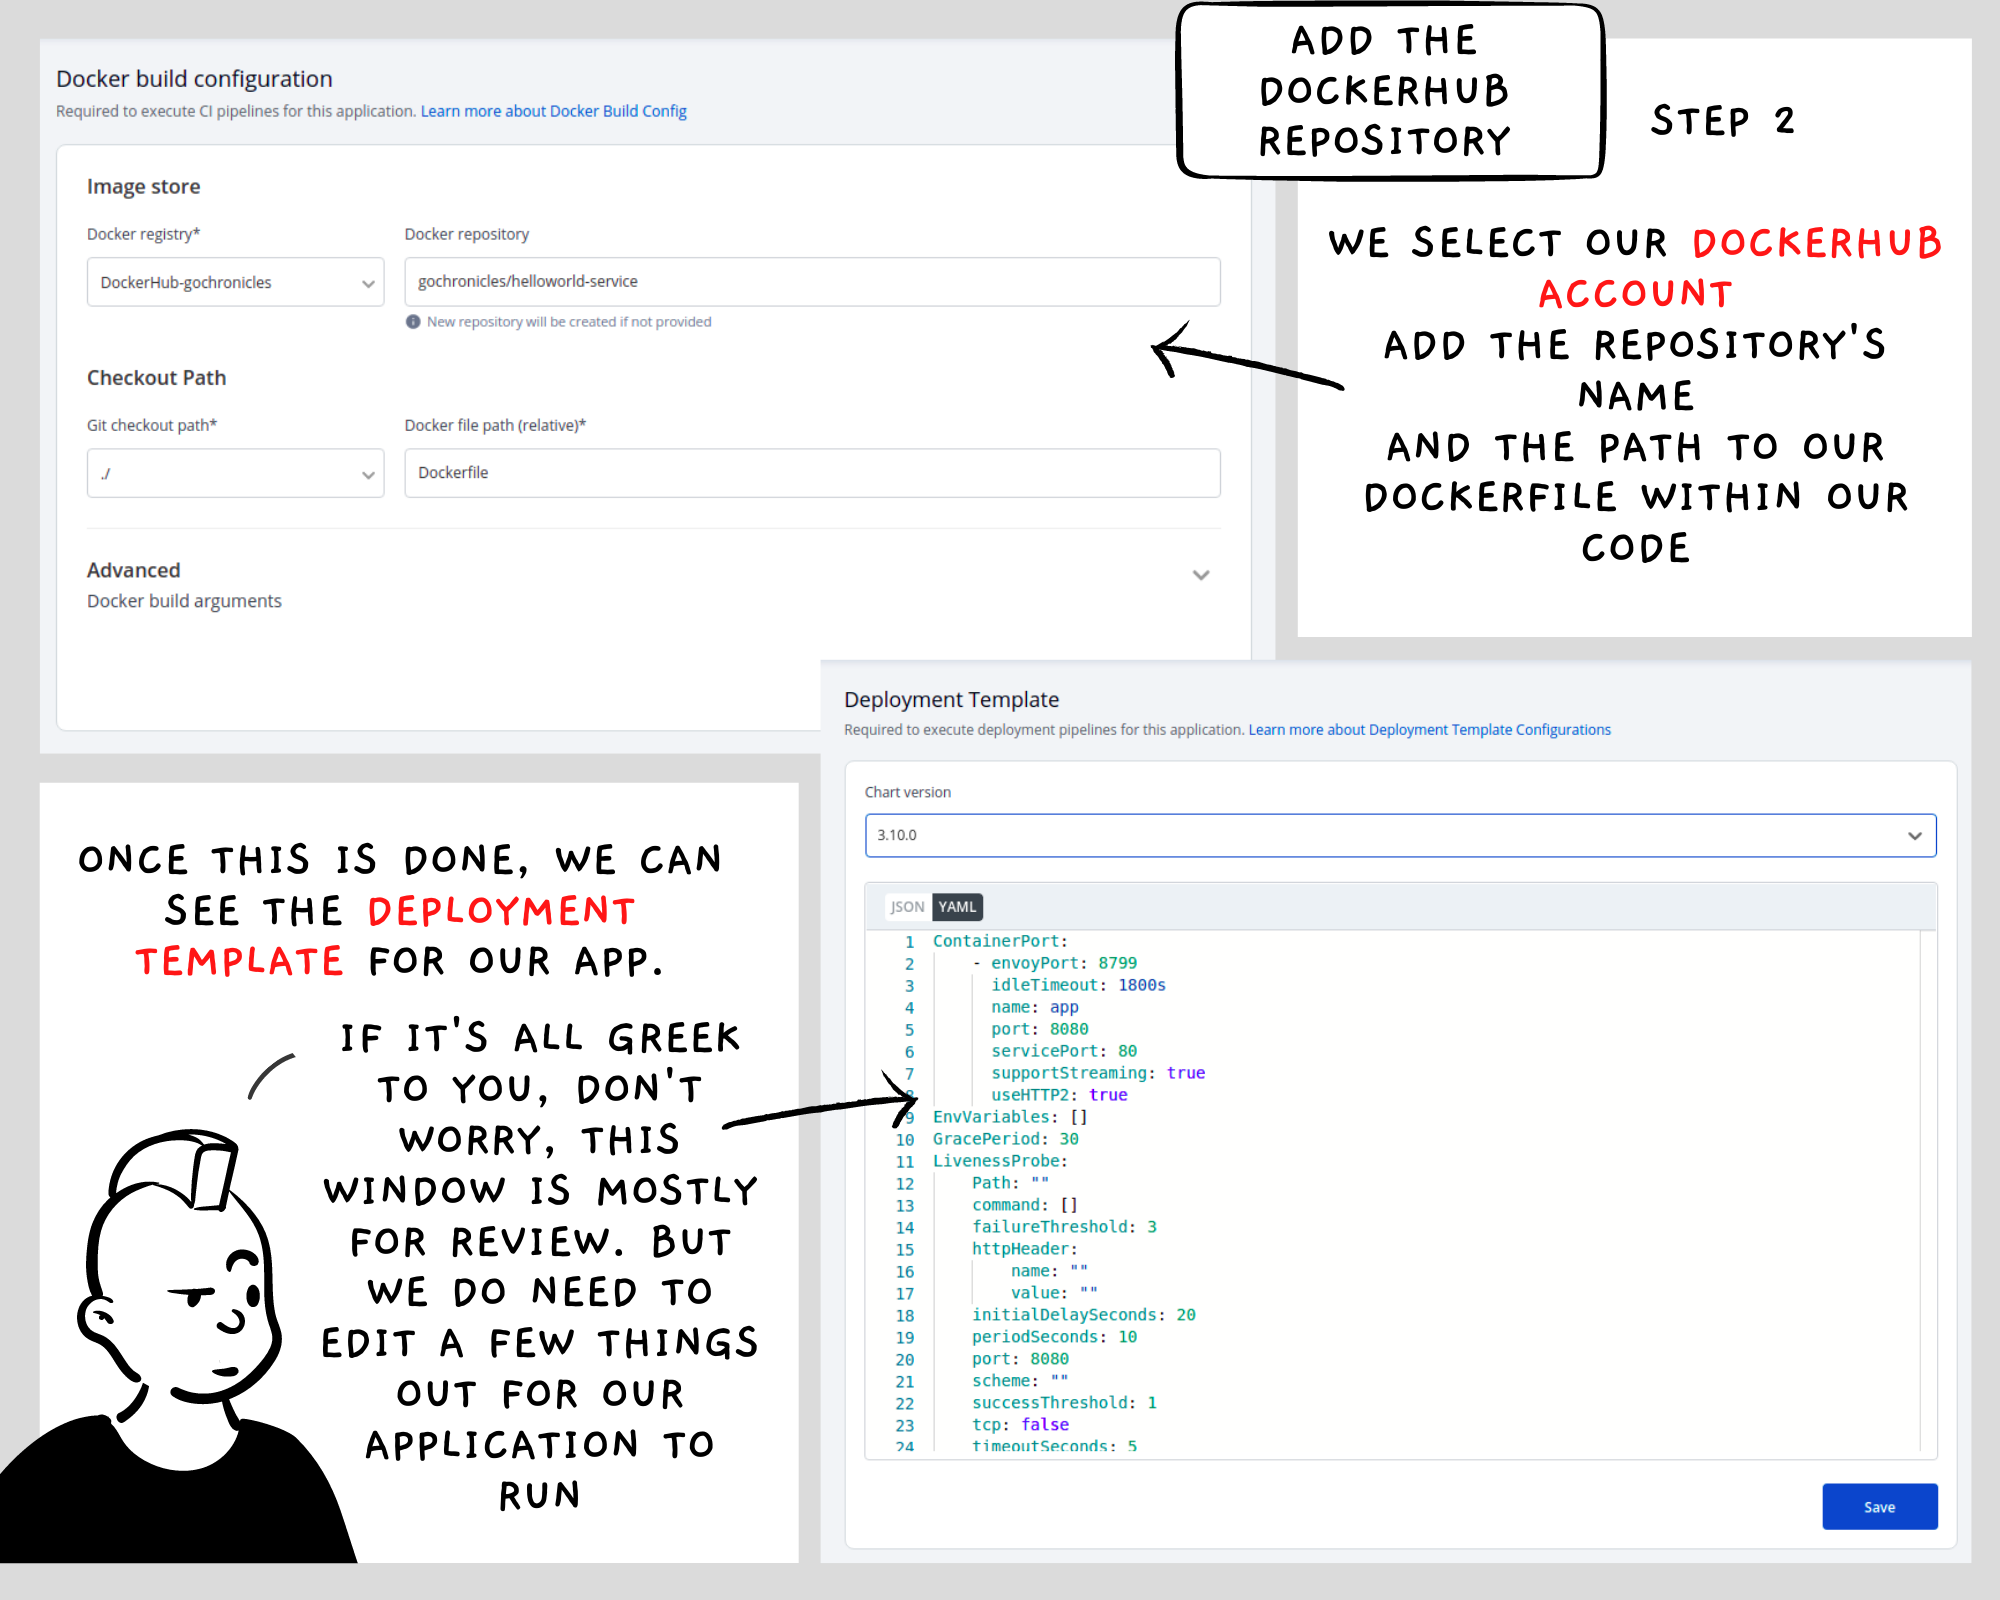
Before we hit "Save", we need to edit this template...
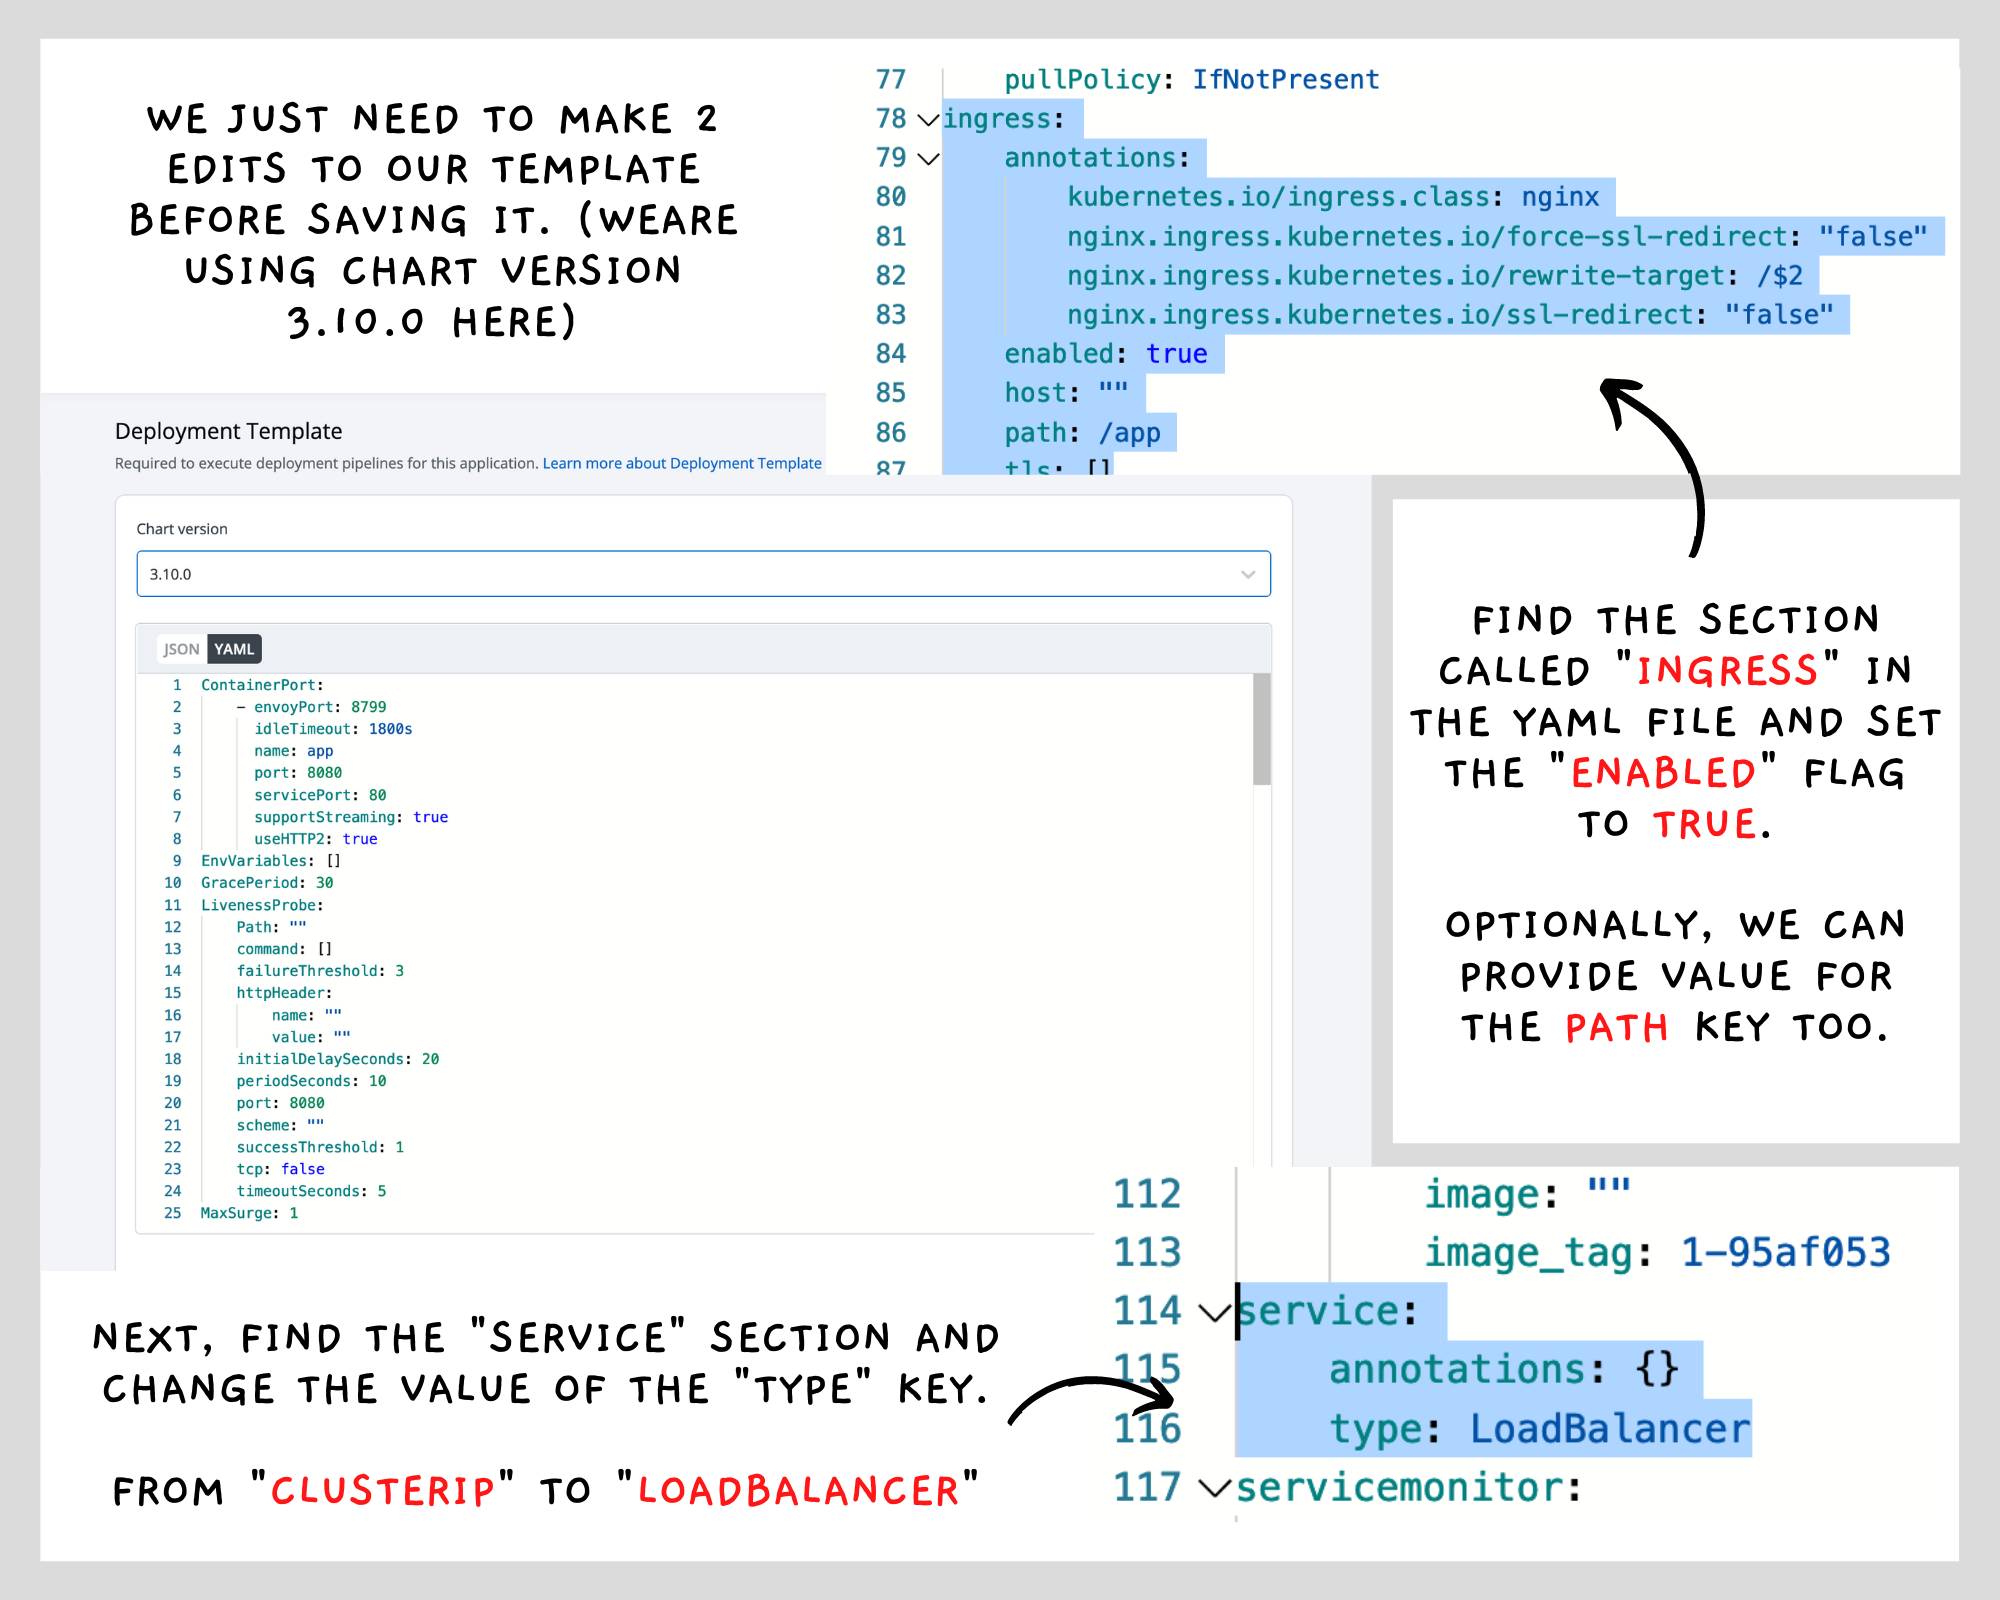
There are a few other steps like defining secrets and config maps along with overrides for each environment. But here, we are keeping it as minimal and simple as possible. You can definitely refer to Devtron's documentation for more details.
We then create our CI/CD pipelines. First the CI .......
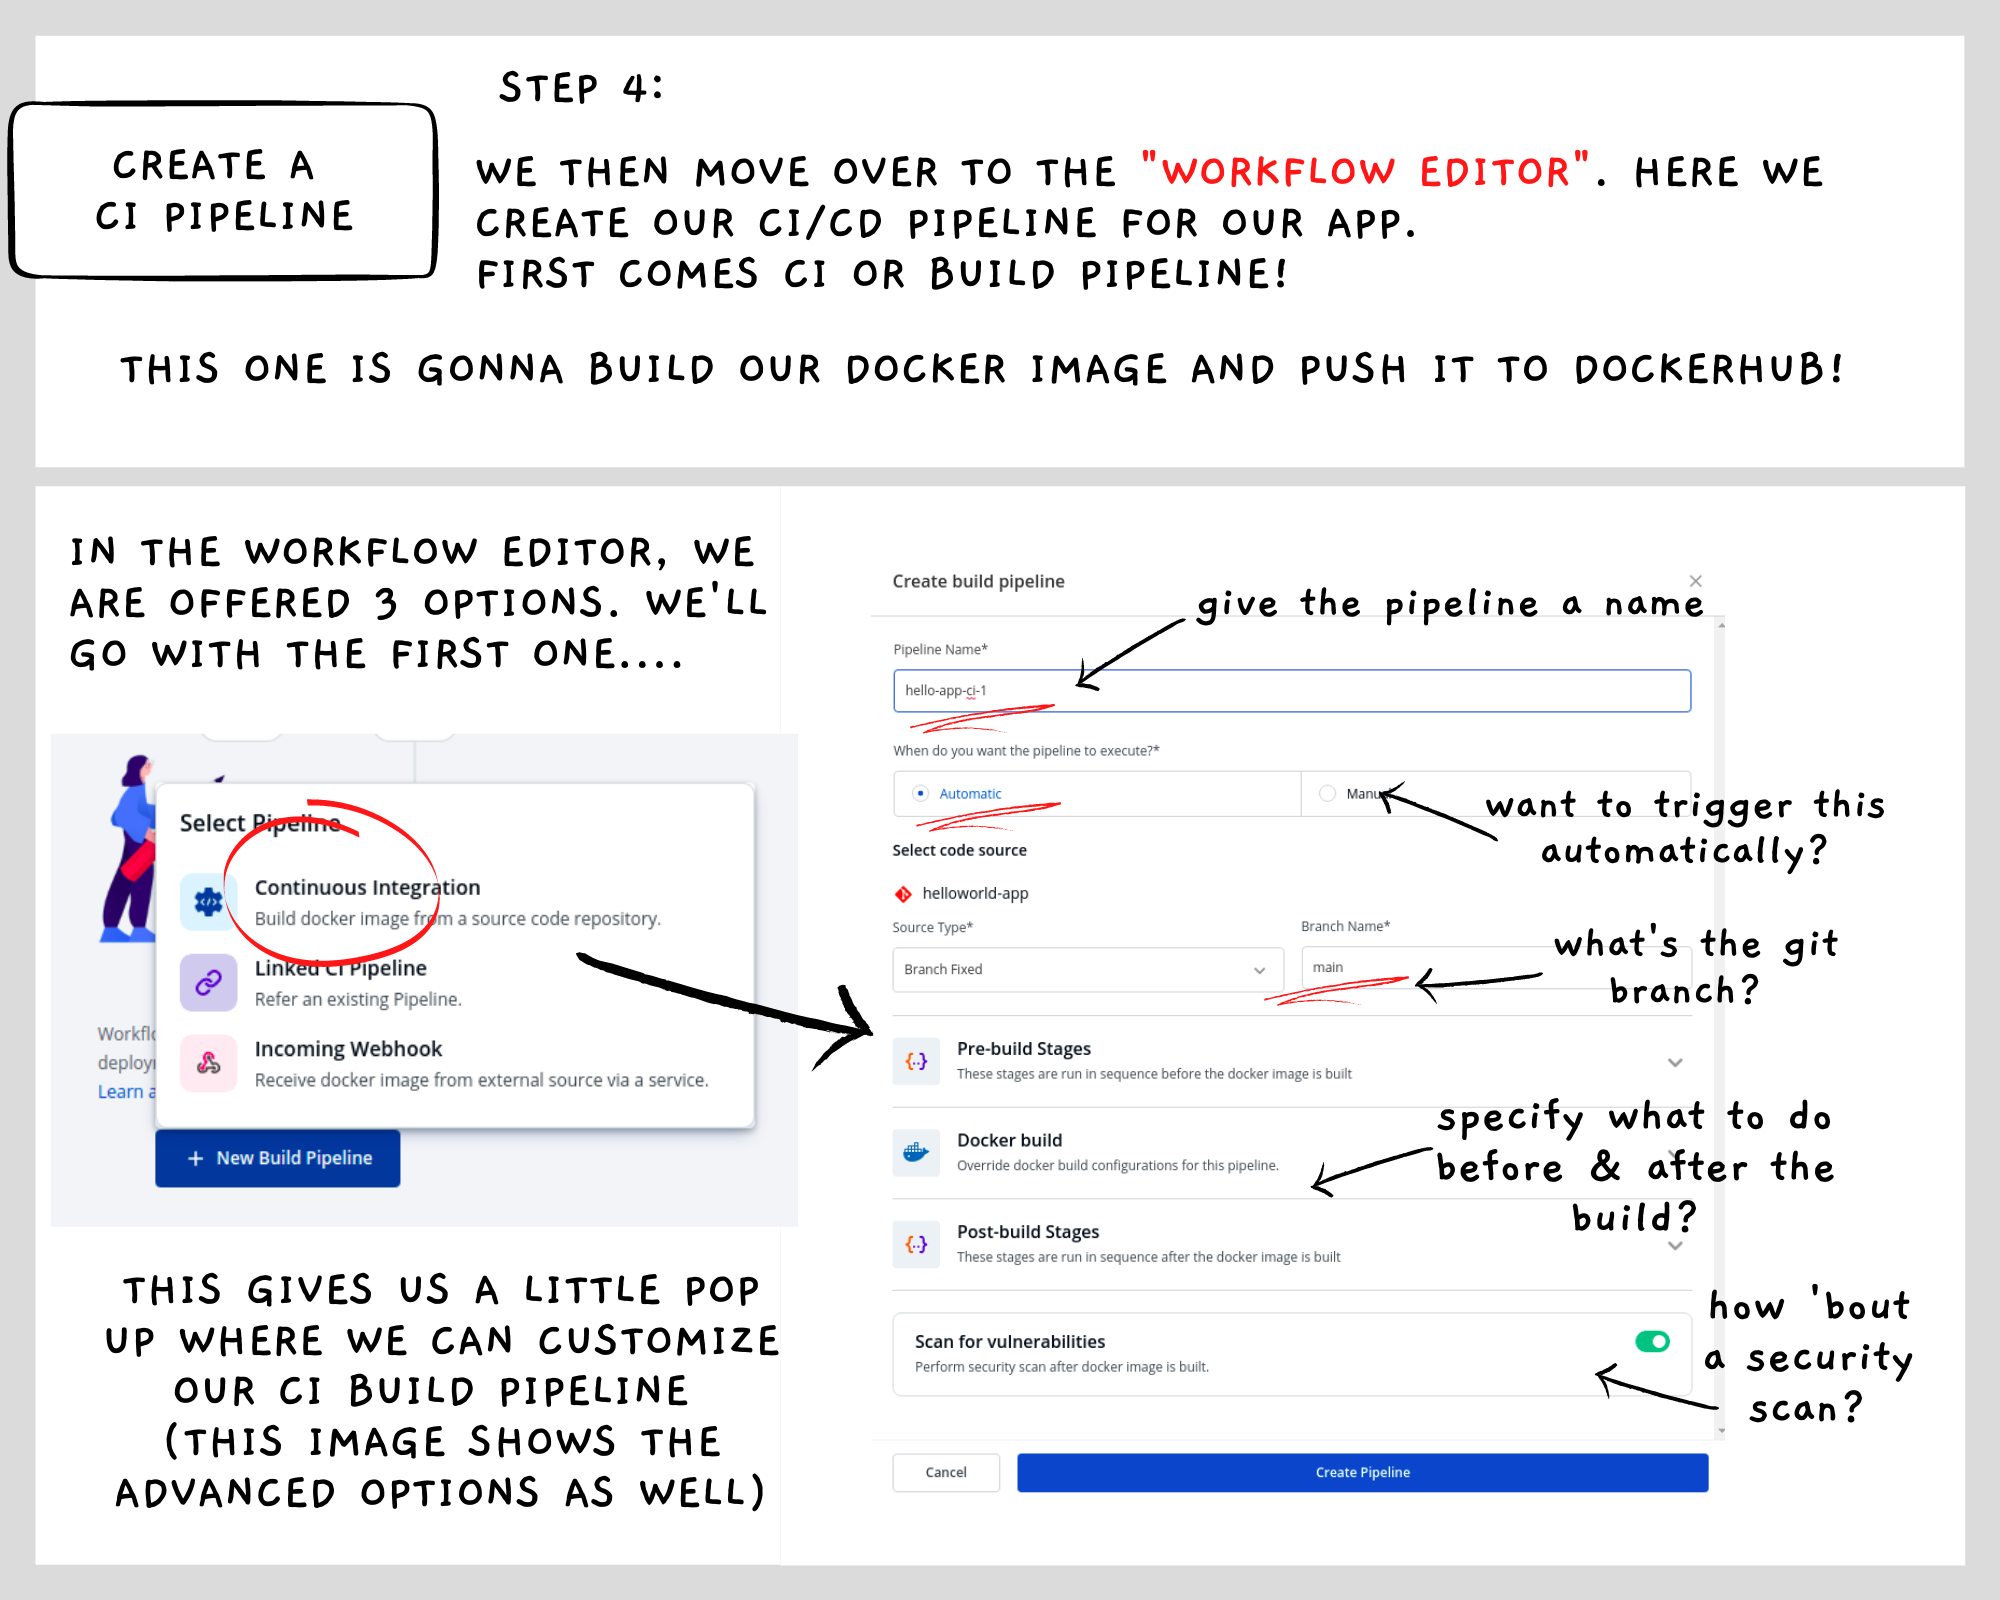
..... And then CD
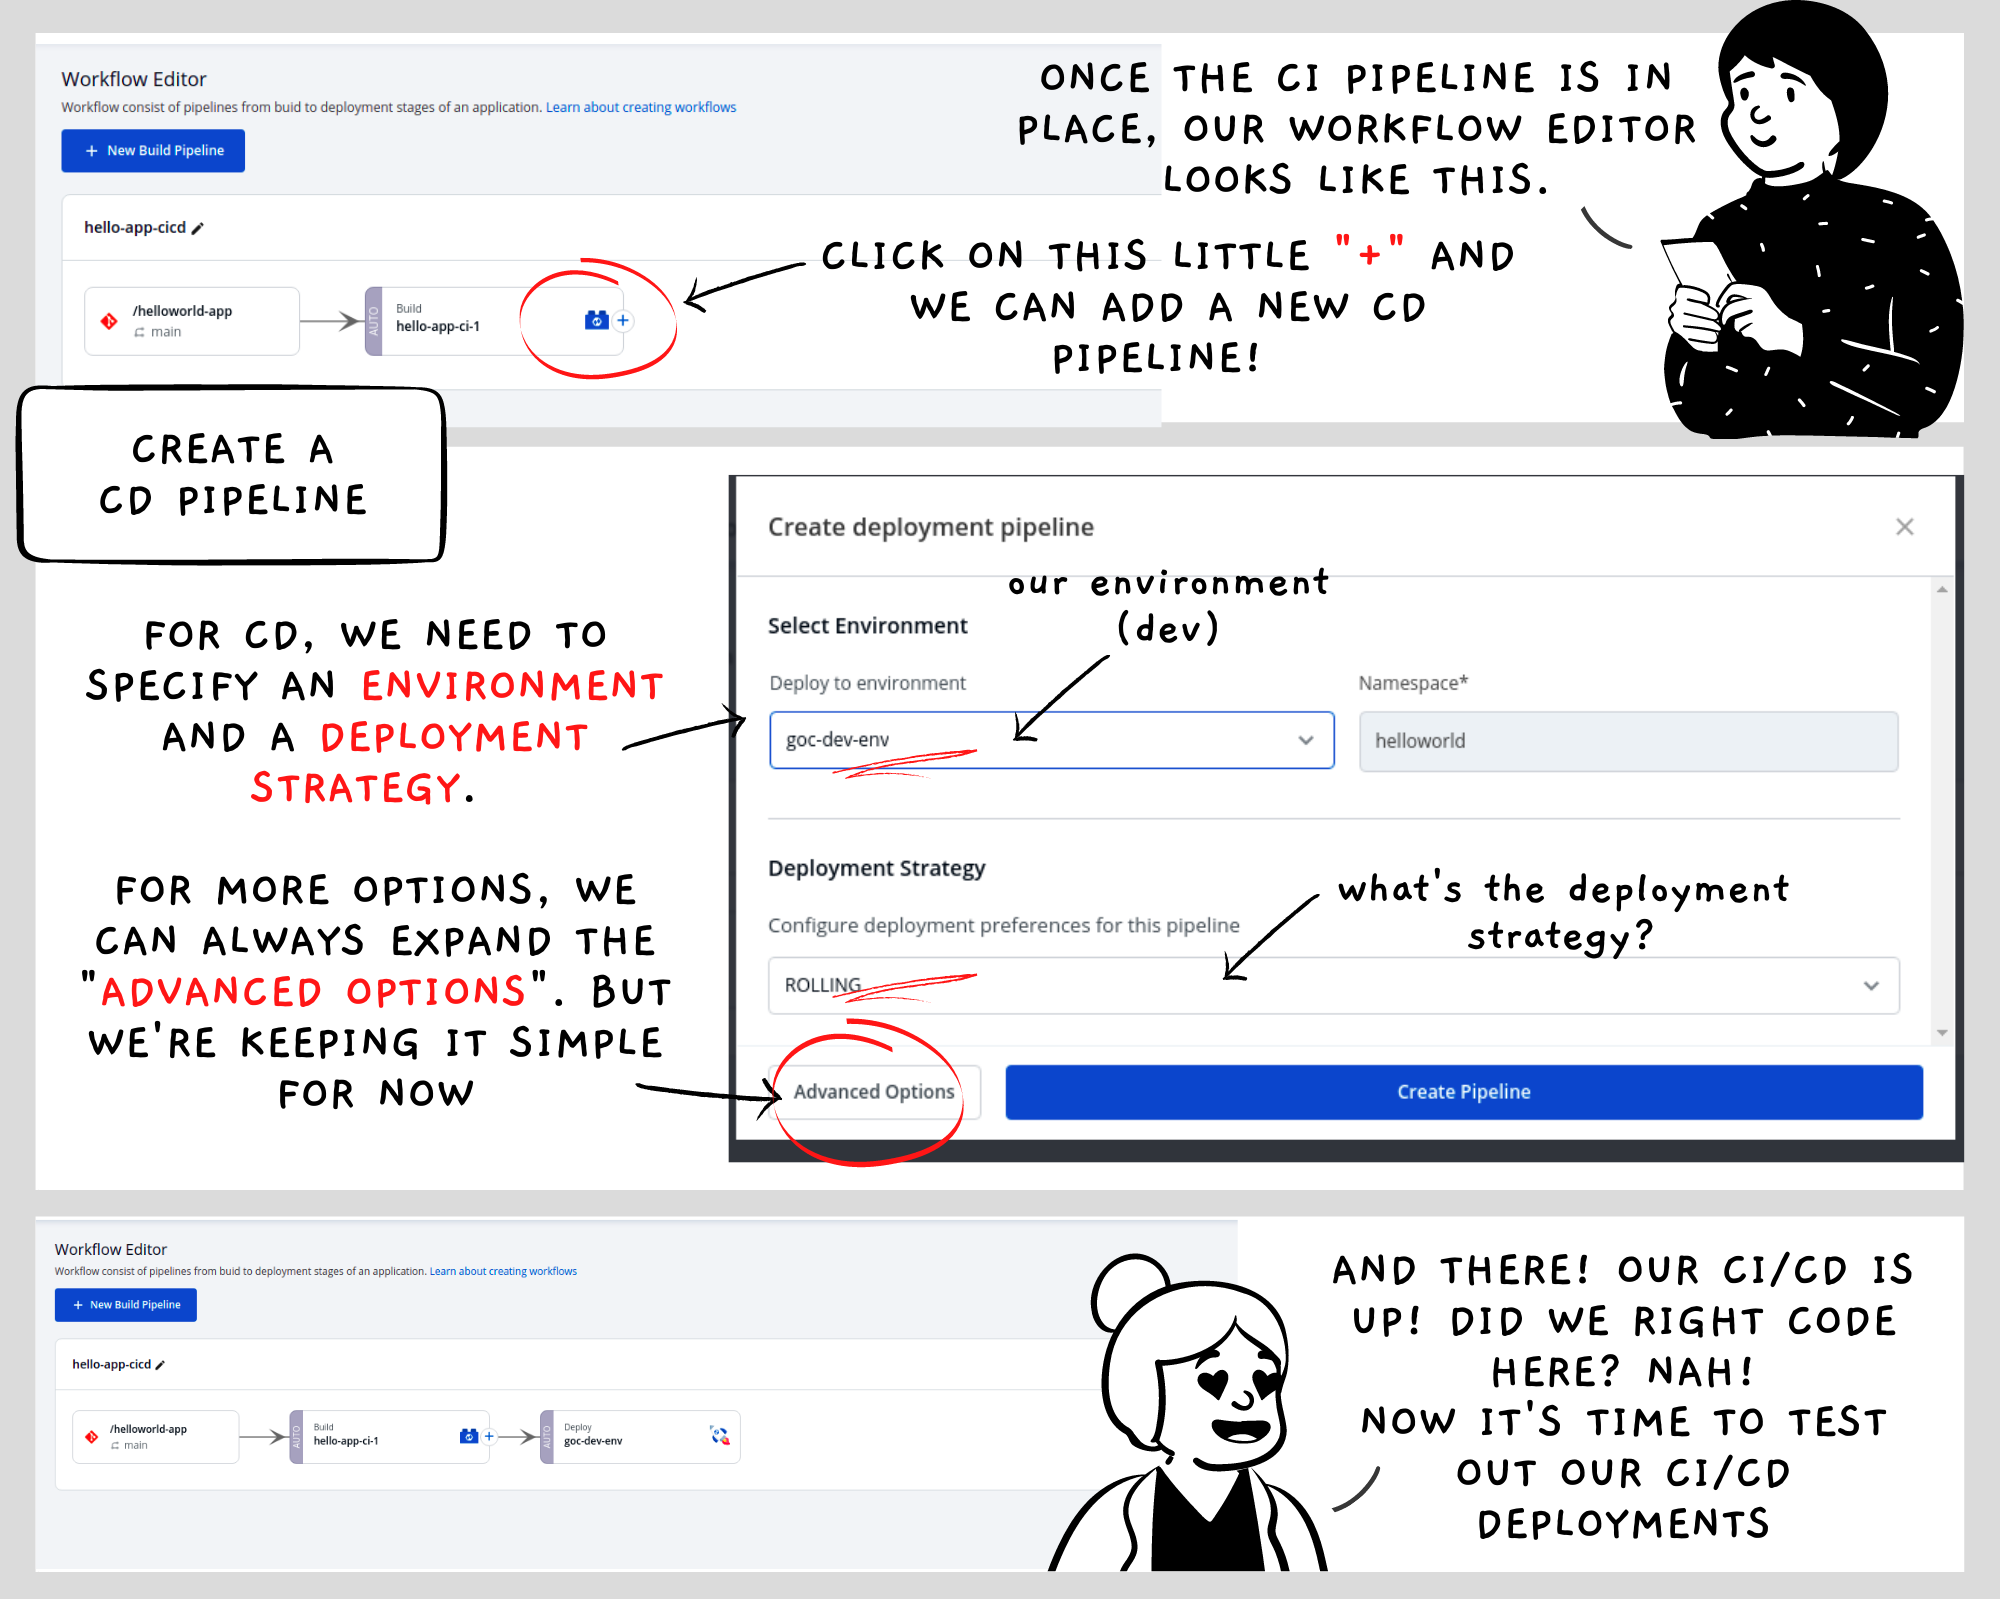
This particular CD pipeline will deploy to our dev environment. We can create another one for our prod environment in the same manner.
Dev Deployment
Time to deploy to Dev environment. Although deployment will be triggered automatically when there is a push action on the main branch of our repo, we can still do a manual deployment
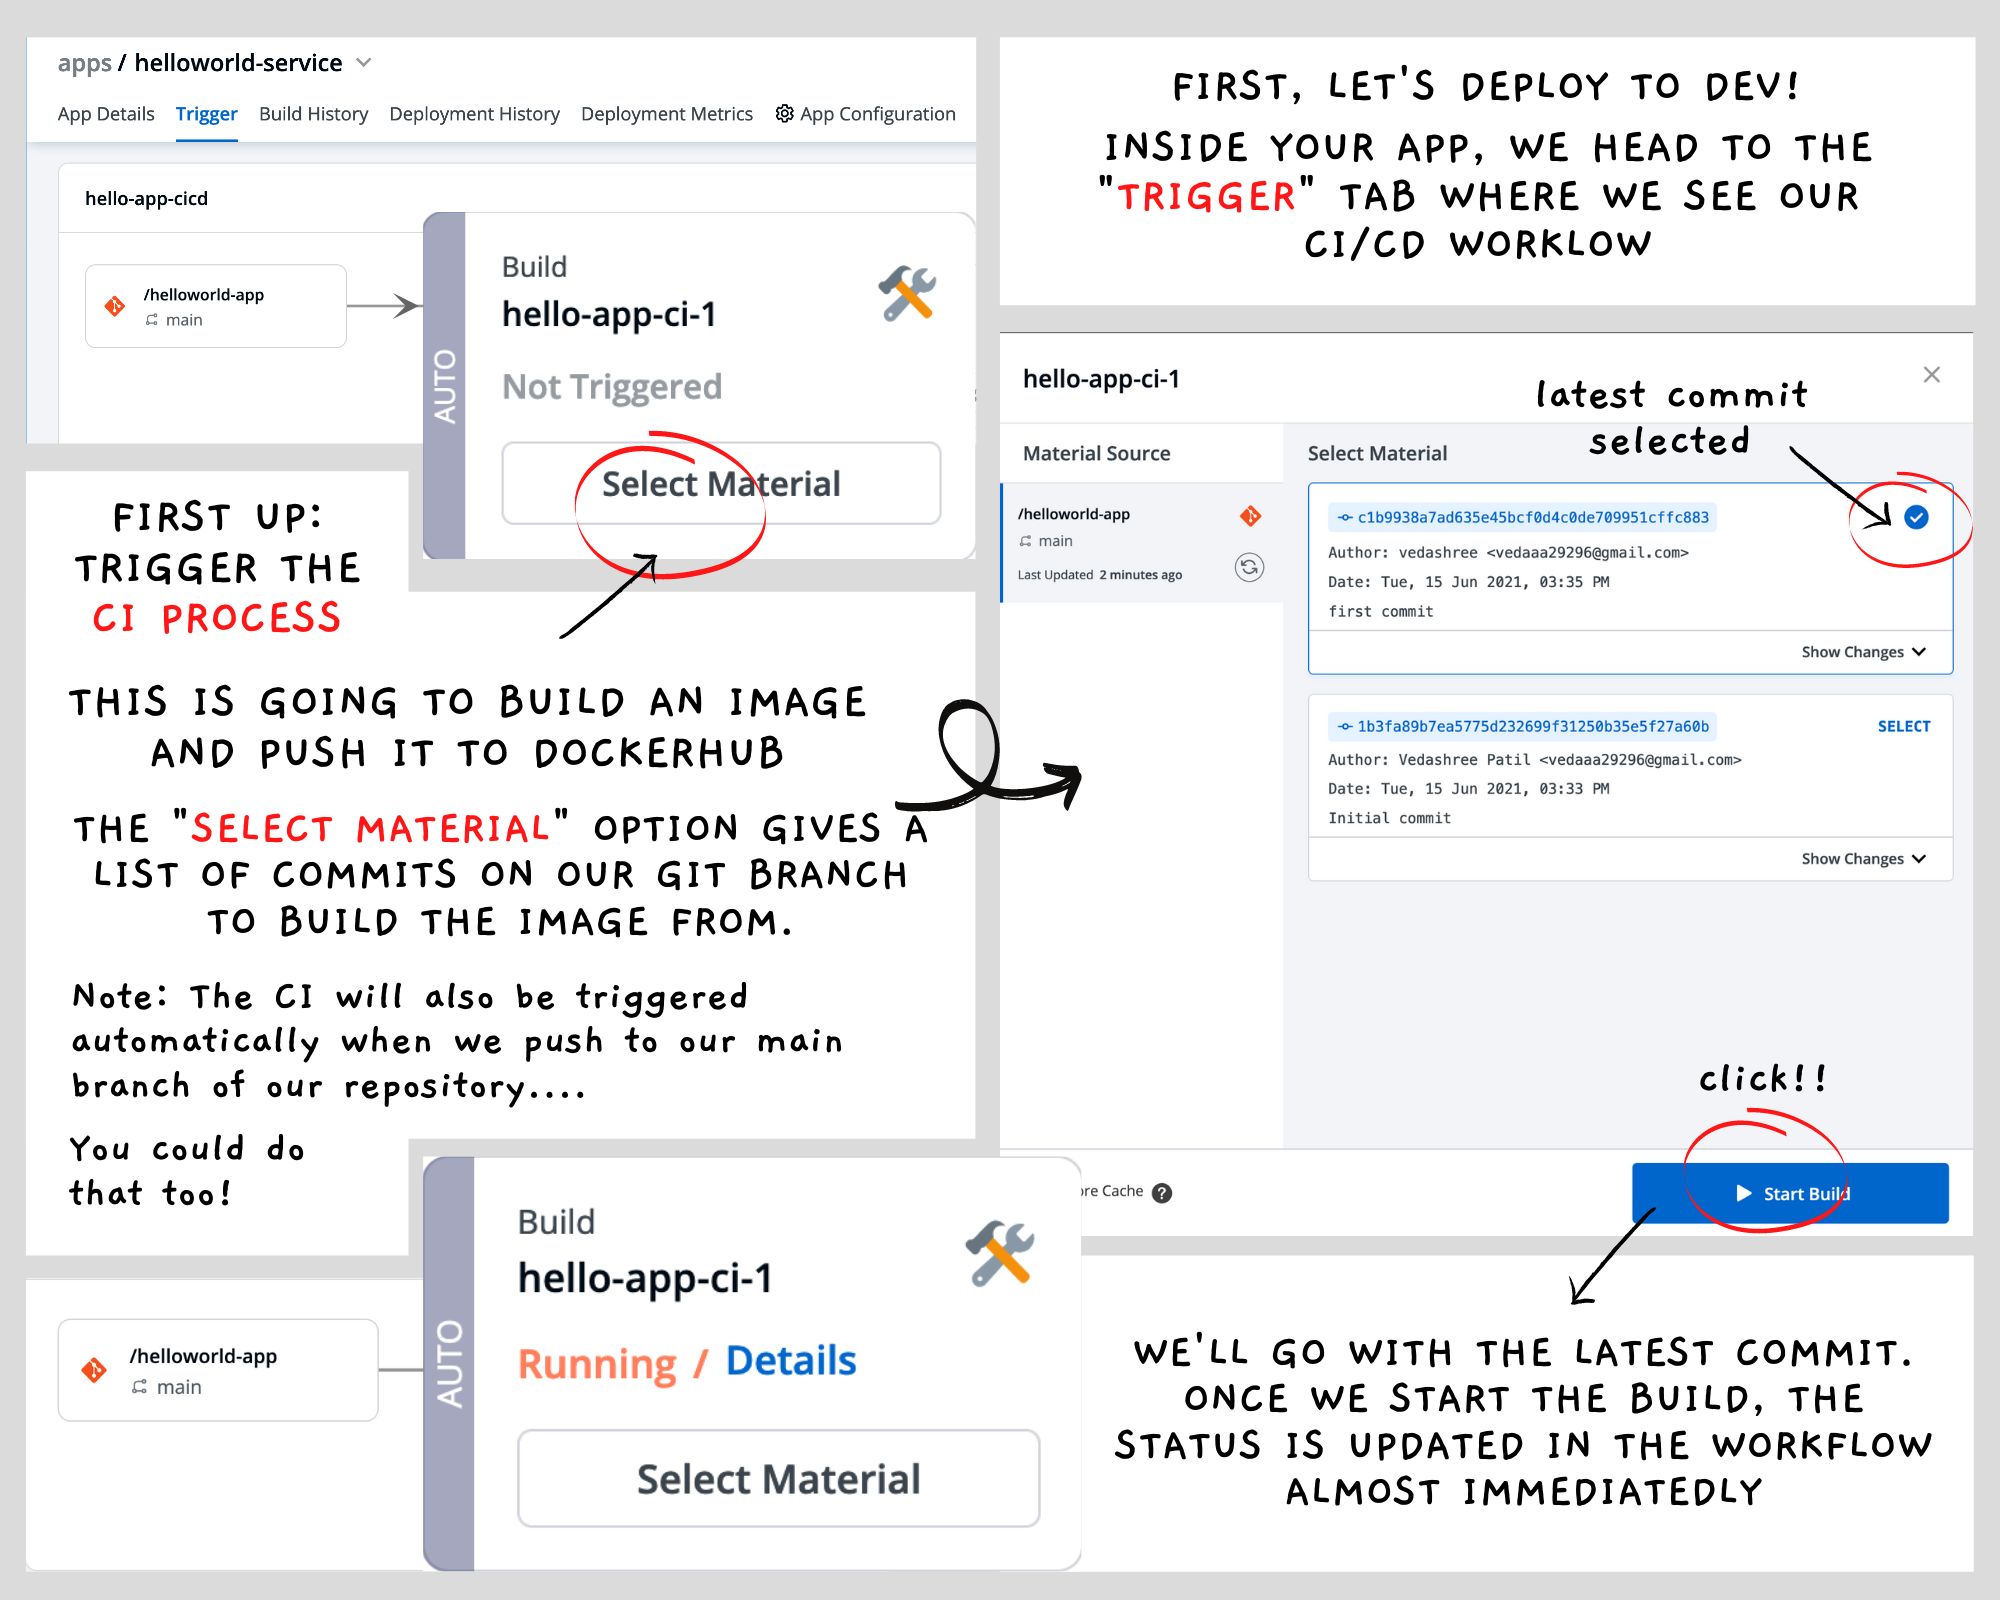
We'll let our CI pipeline do the work! Once it's done, we can start the CD pipeline
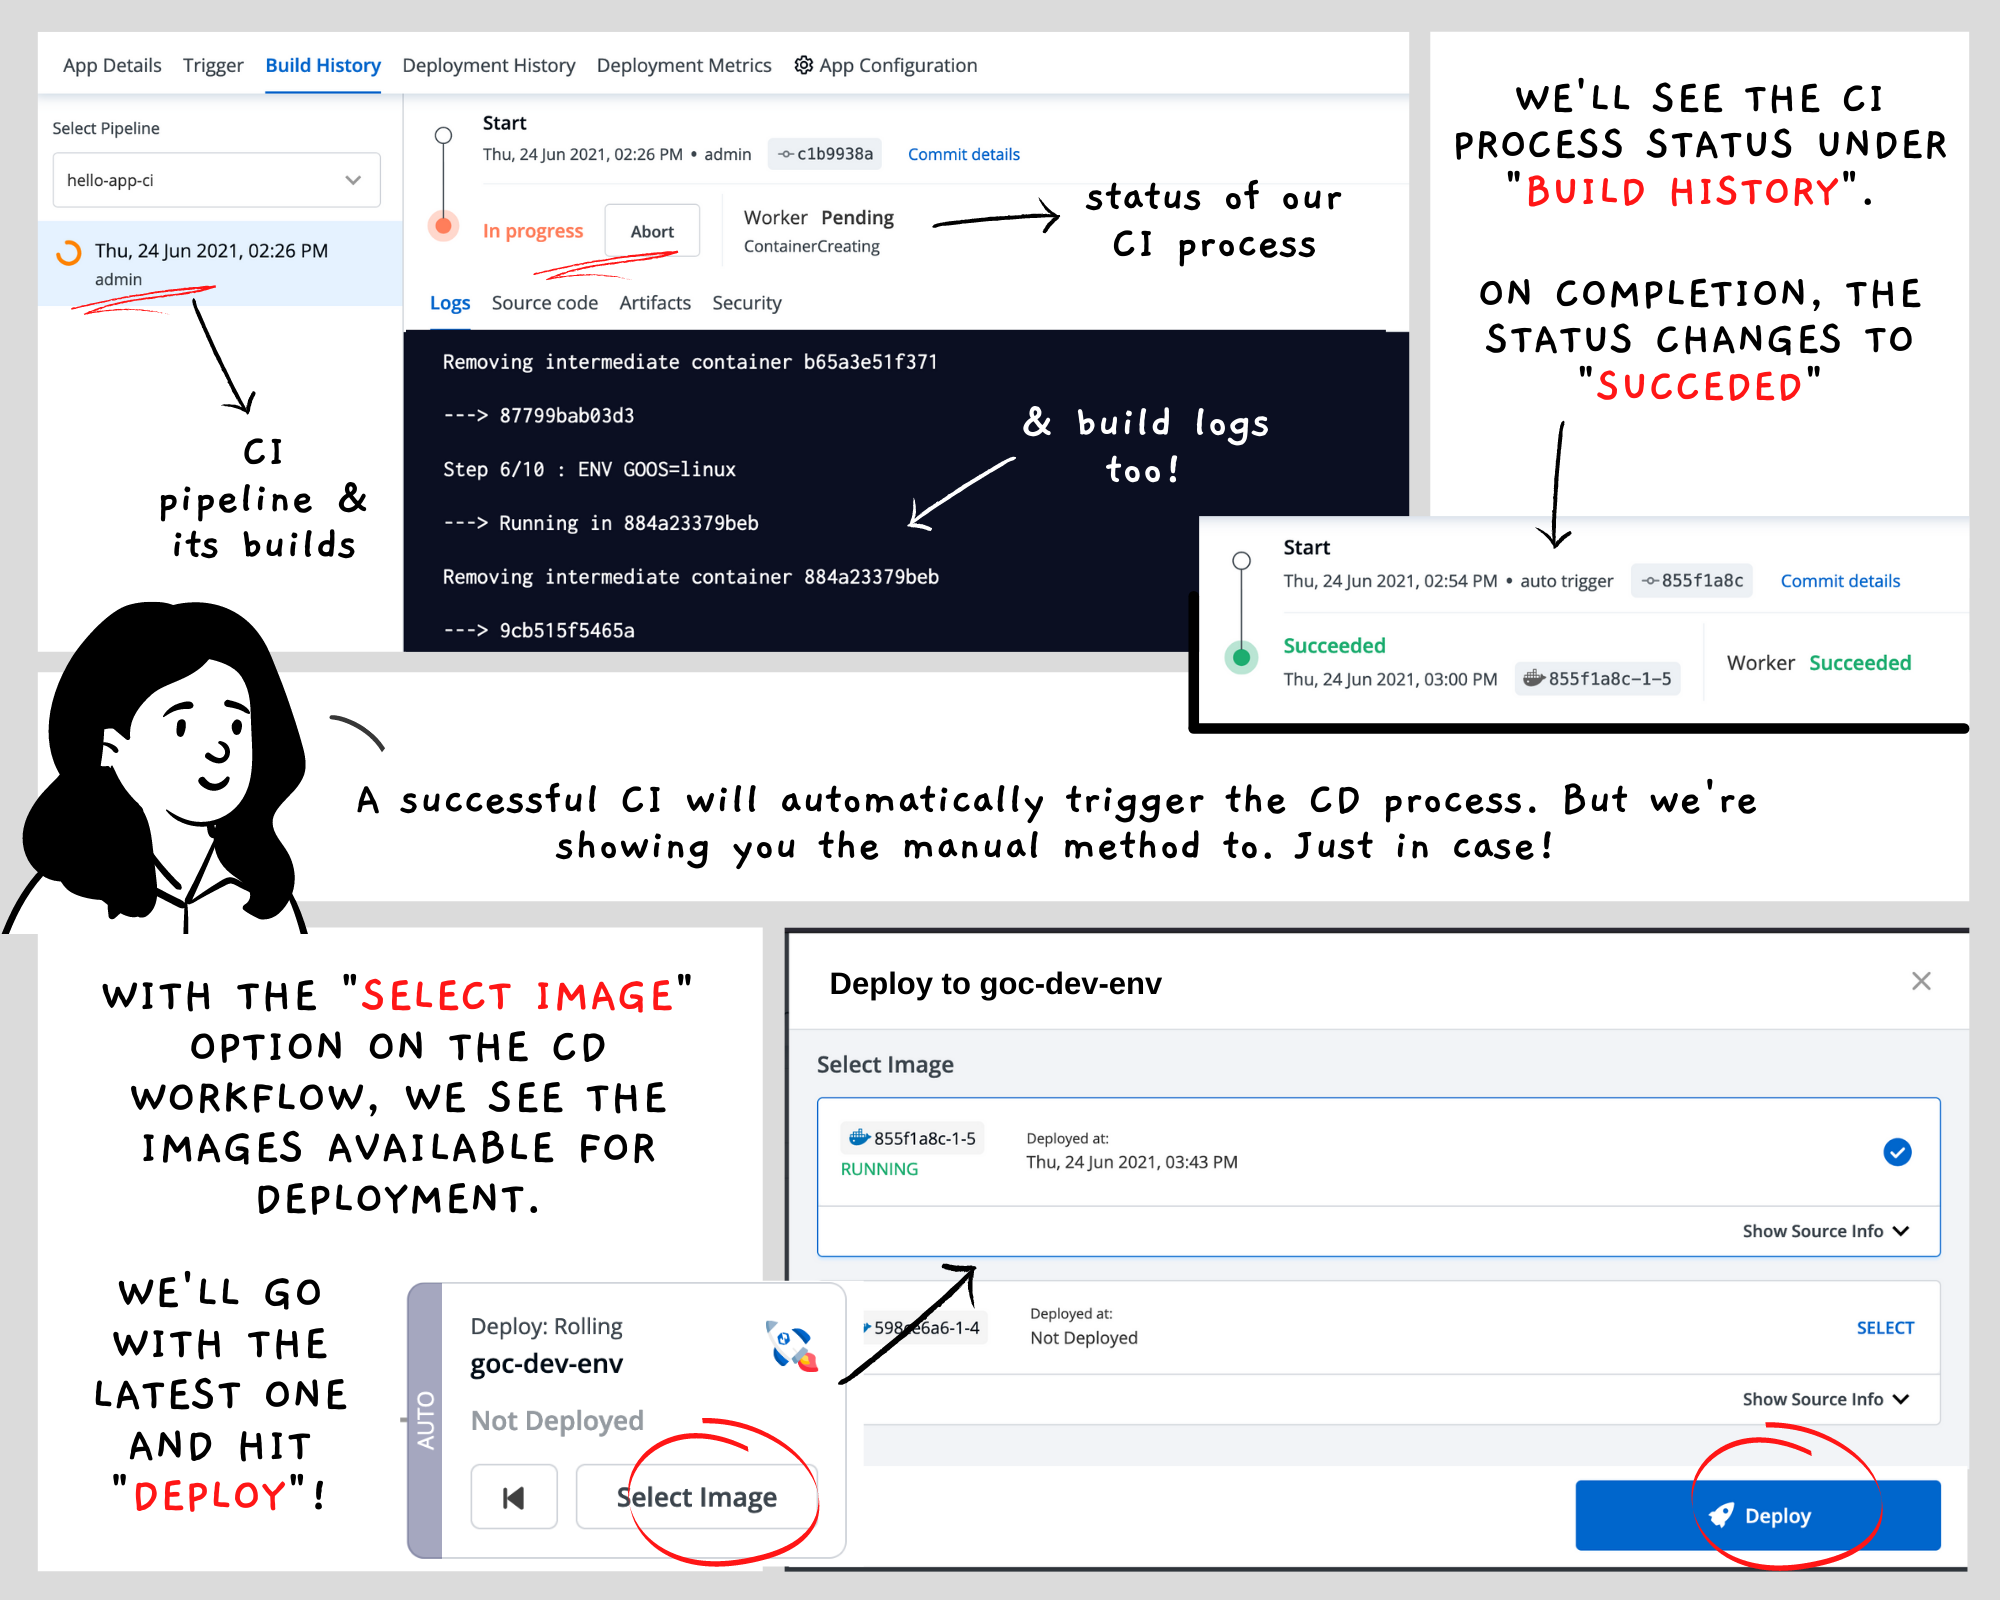
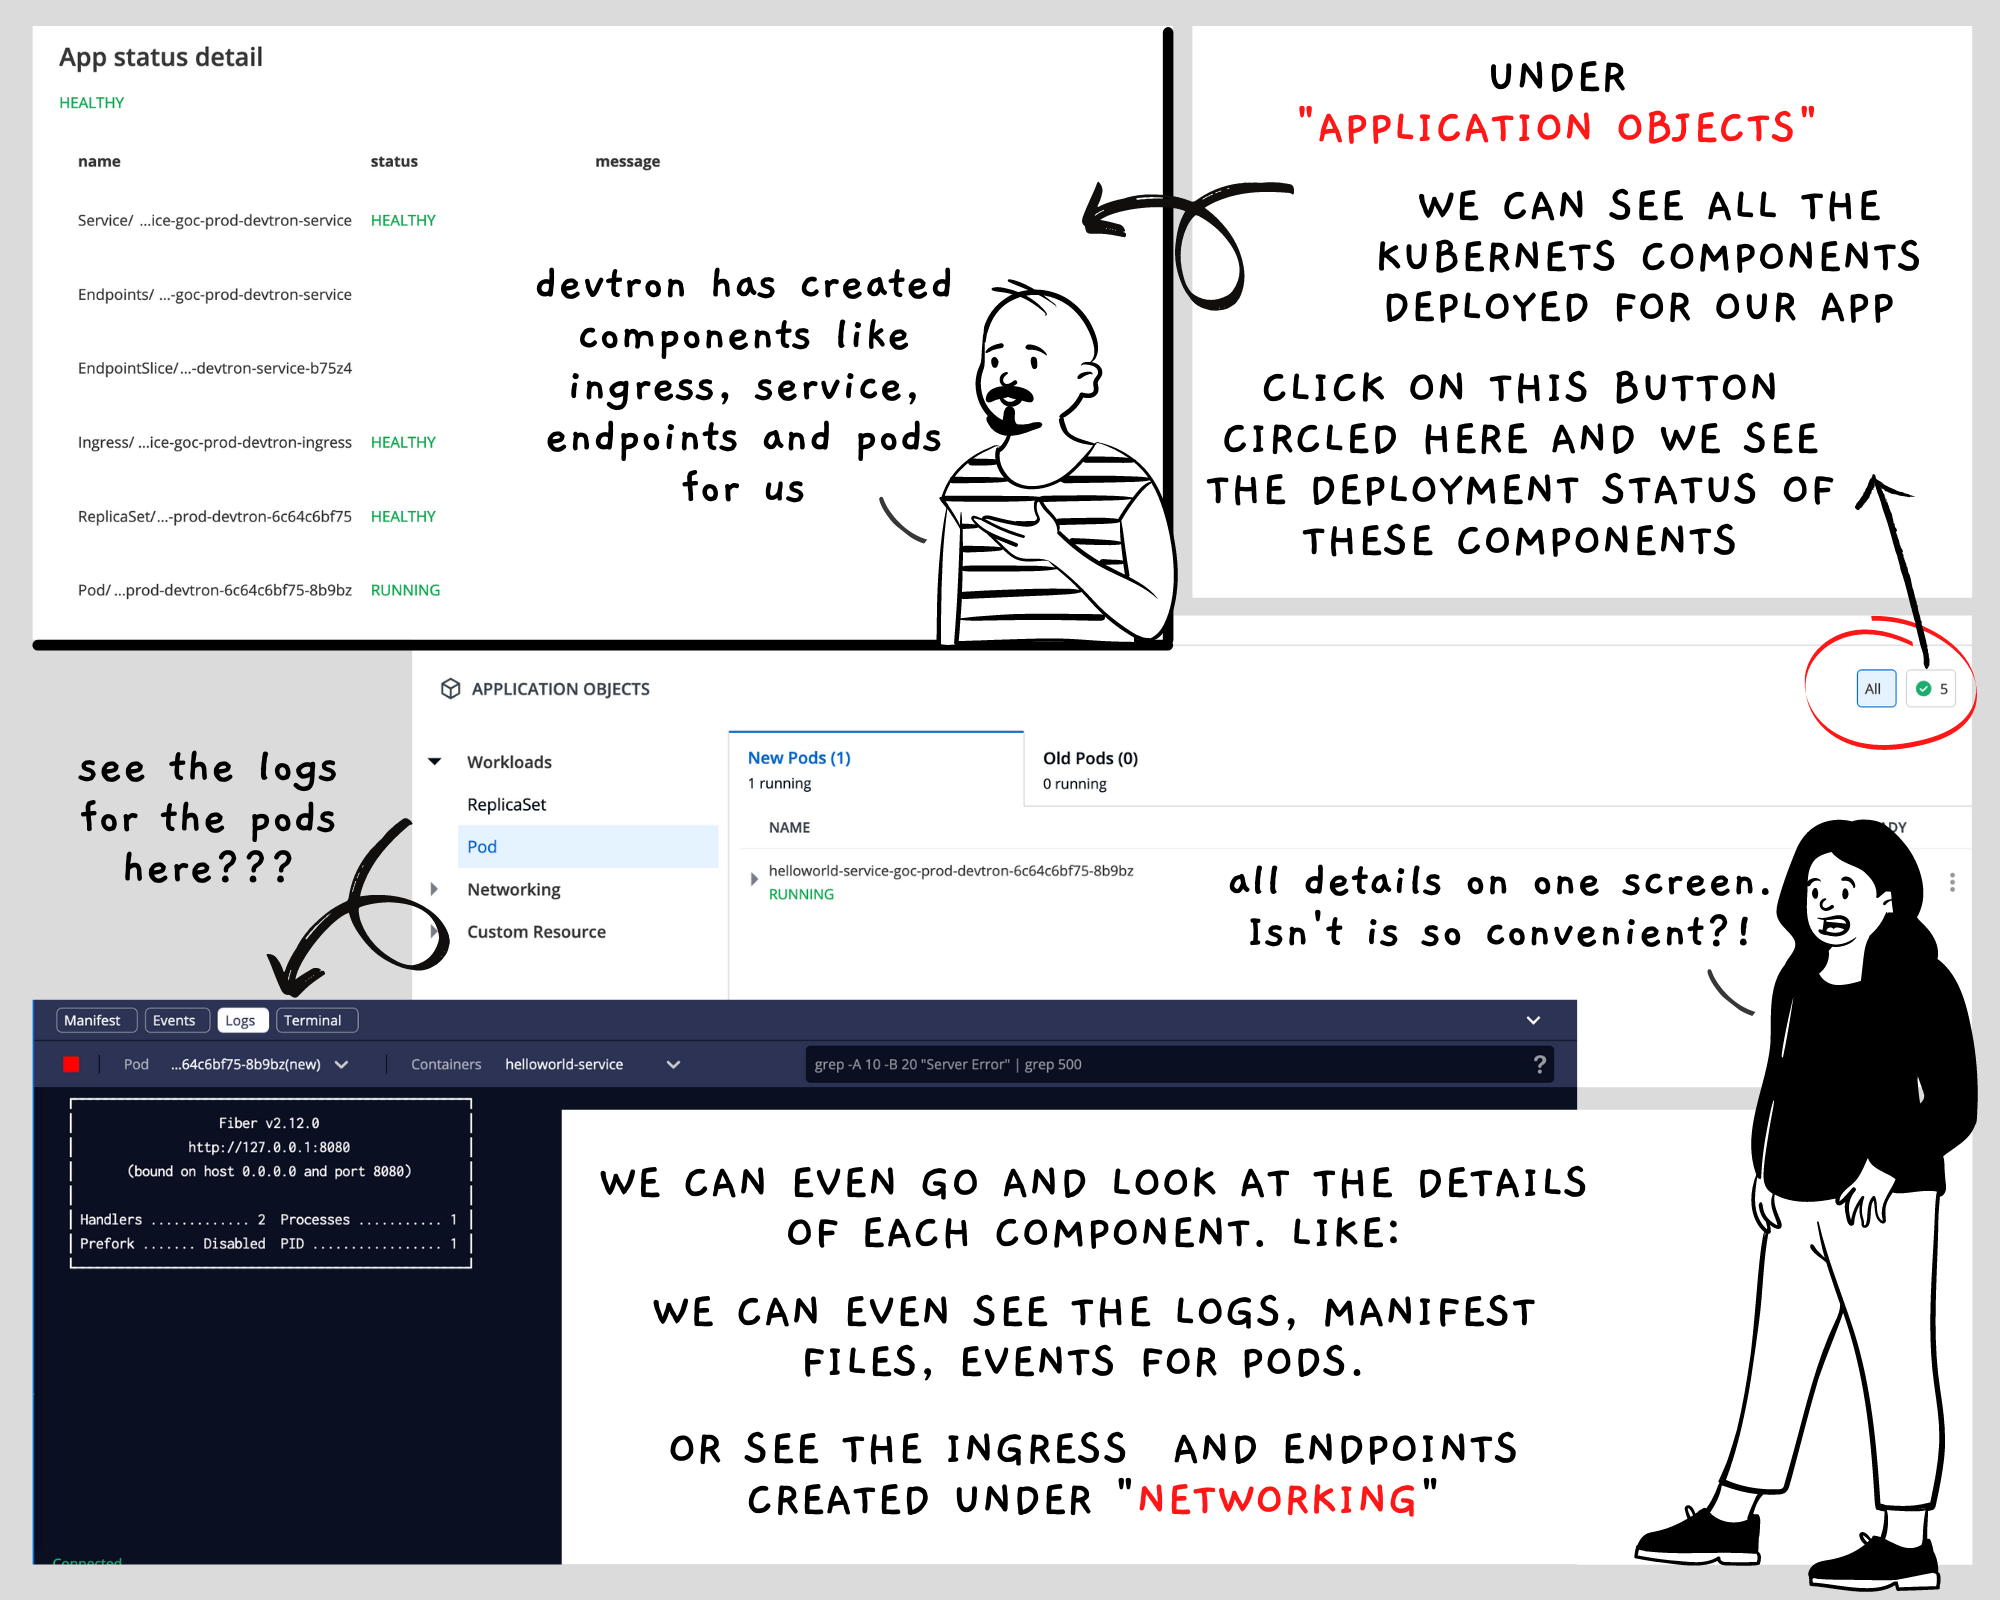
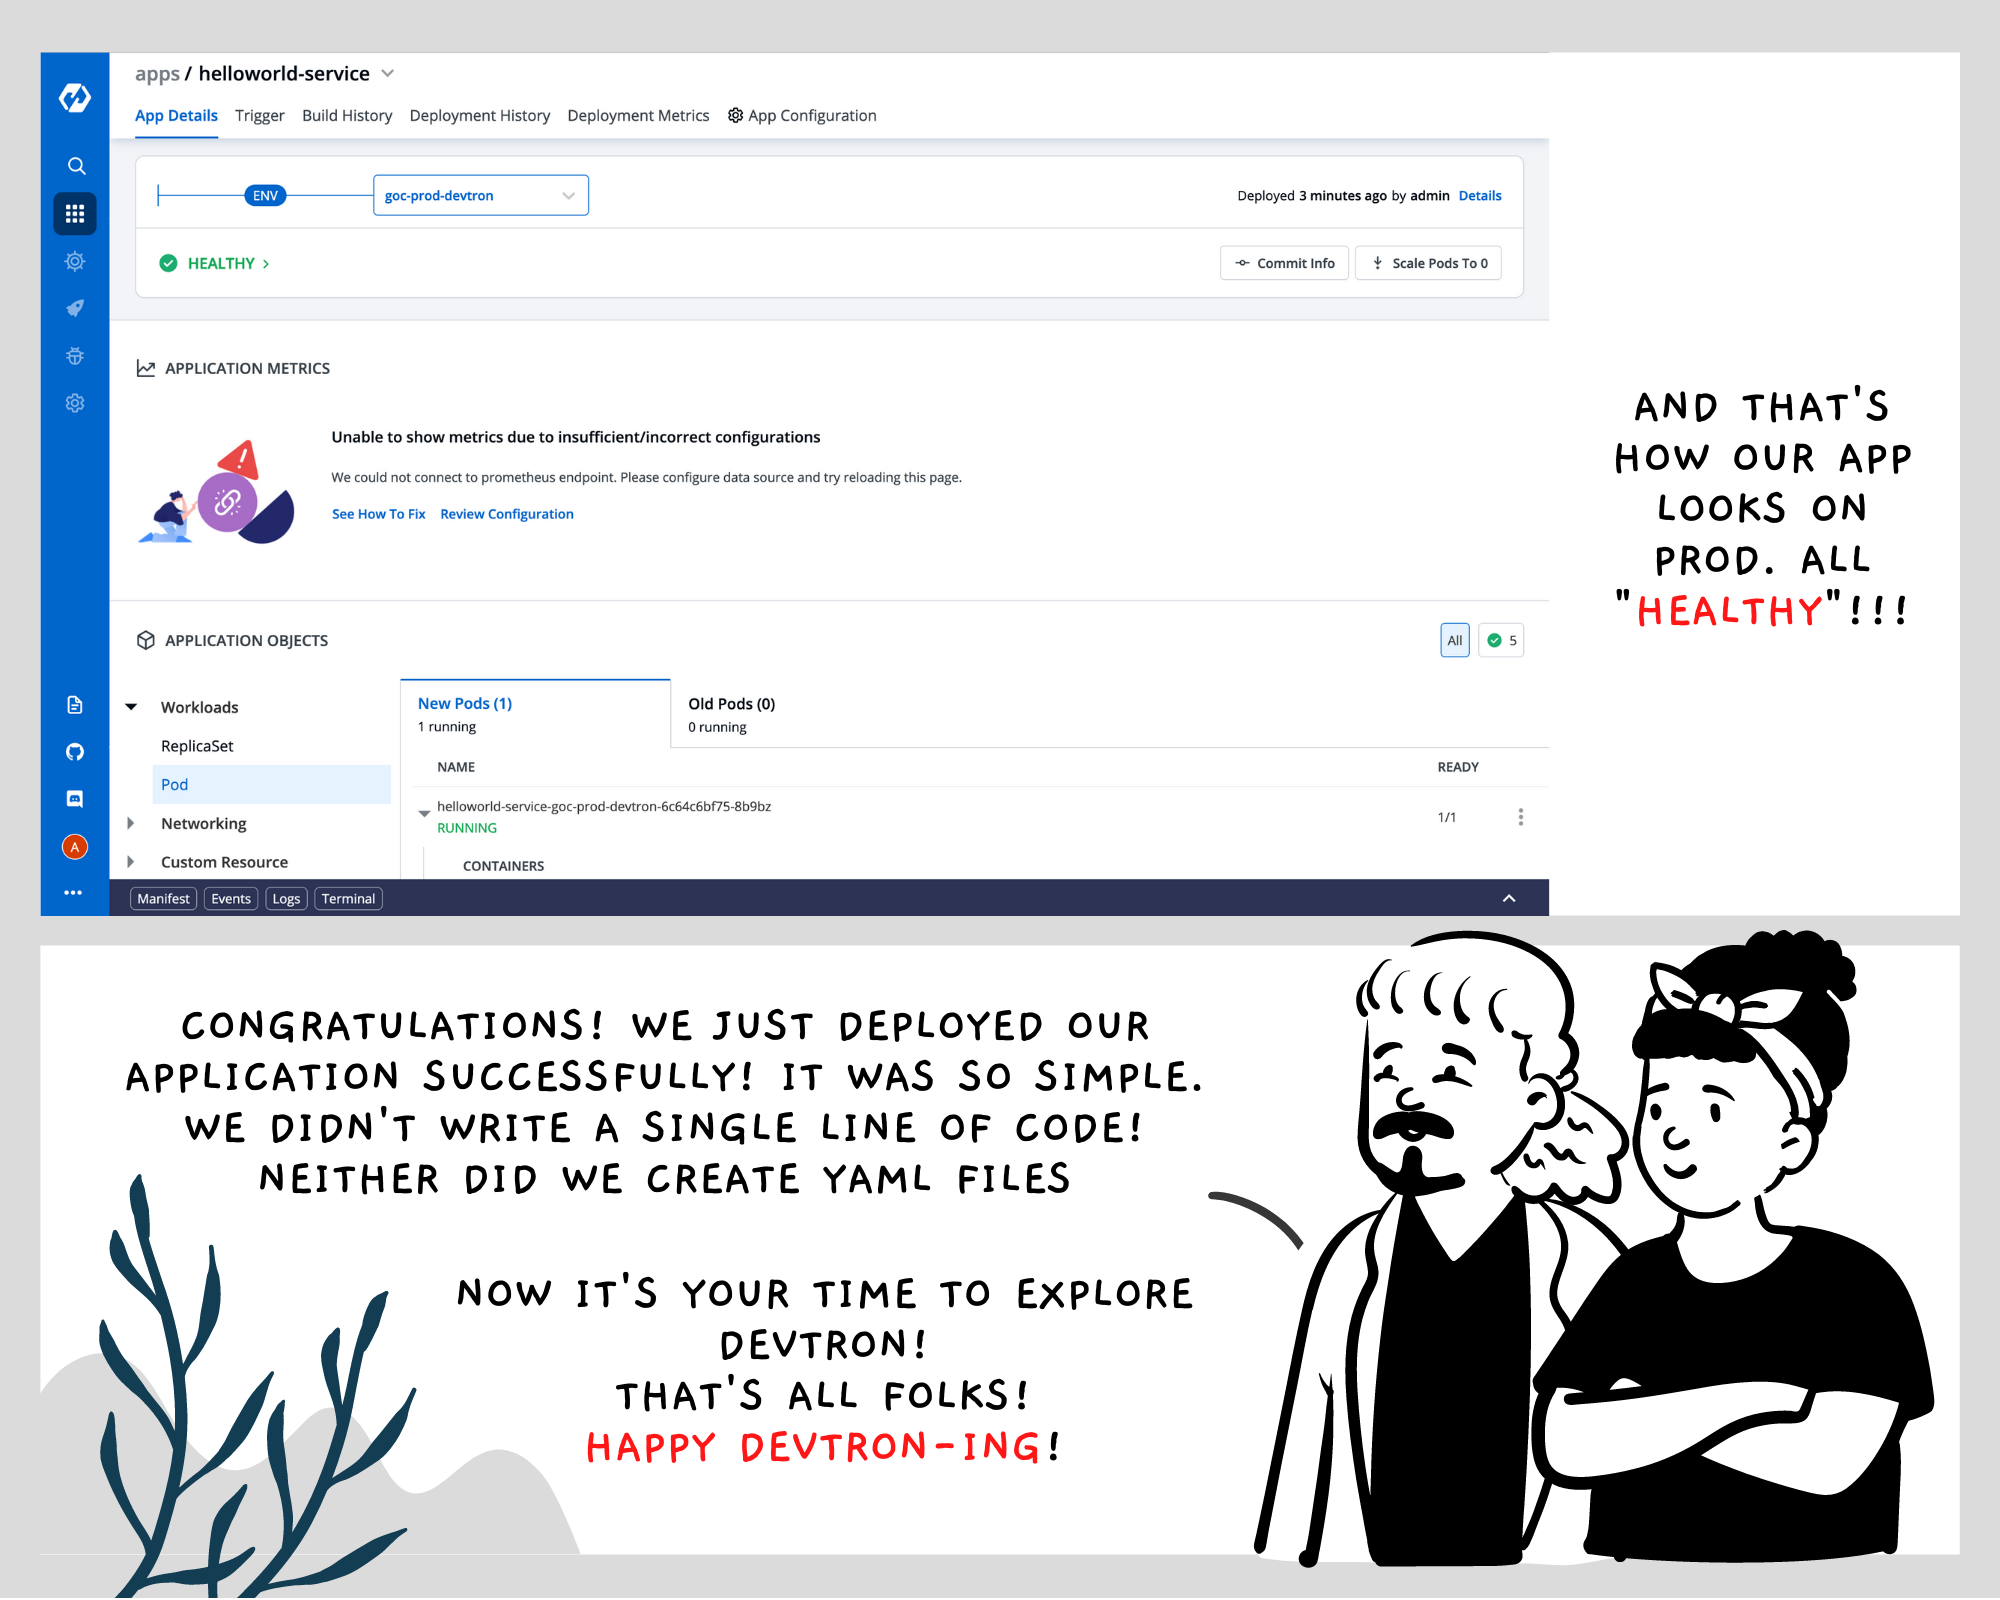
"Healthy". That's the status we should see once a deployment is successful. And see, we are successful in deploying our app to the dev environment!
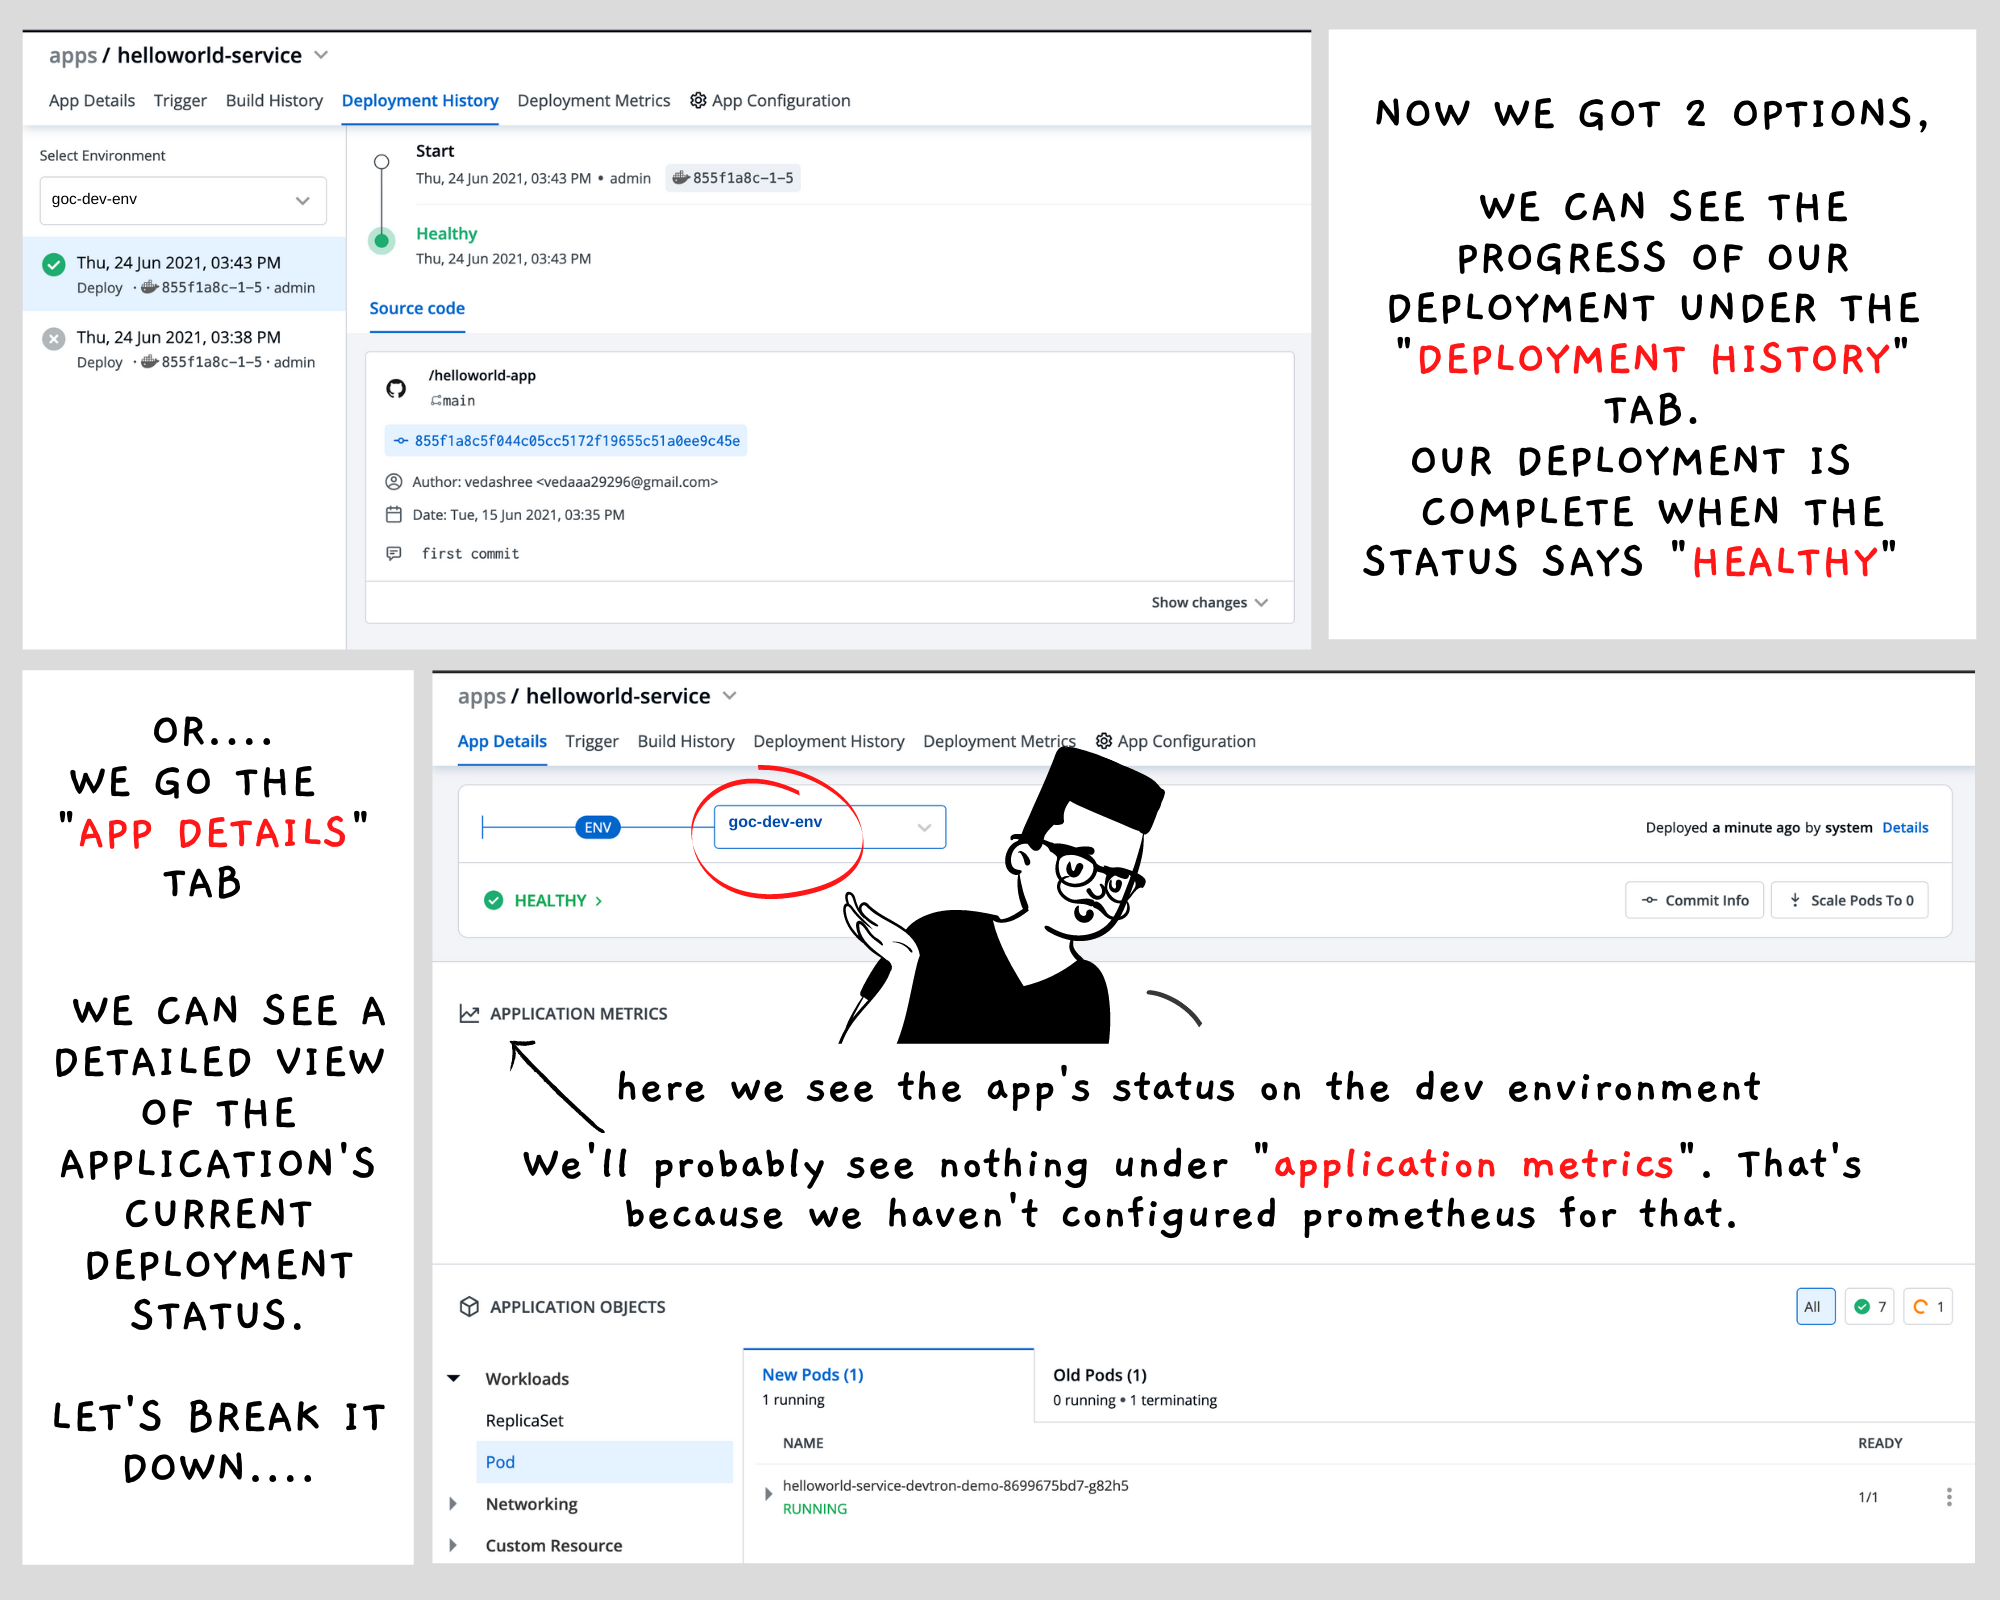
The "App Details" page is pretty informative, eh?
Deployment looks fine. But how do we test out the service? Simple. Run this command:
kubectl get svc -n helloworldBy the way, "helloworld" is the namespace that we're deploying our application to. We'll see the output in this format (This one's empty because we're just should you the format)

The value under the "External IP" section will the URL for our service. For example, we got the IP value as 34.138.199.202. All we had to do was:

Our API works! We're one major deployment down! Next stop. Production!
Prod Deployment
We're good with the dev environment. But remember there's prod too. Ah but you see our dev cluster has Devtron running on it. But prod doesn't have that. So do we install Devtron again on prod? Well no. The good news is, Devtron can easily deploy to external clusters!
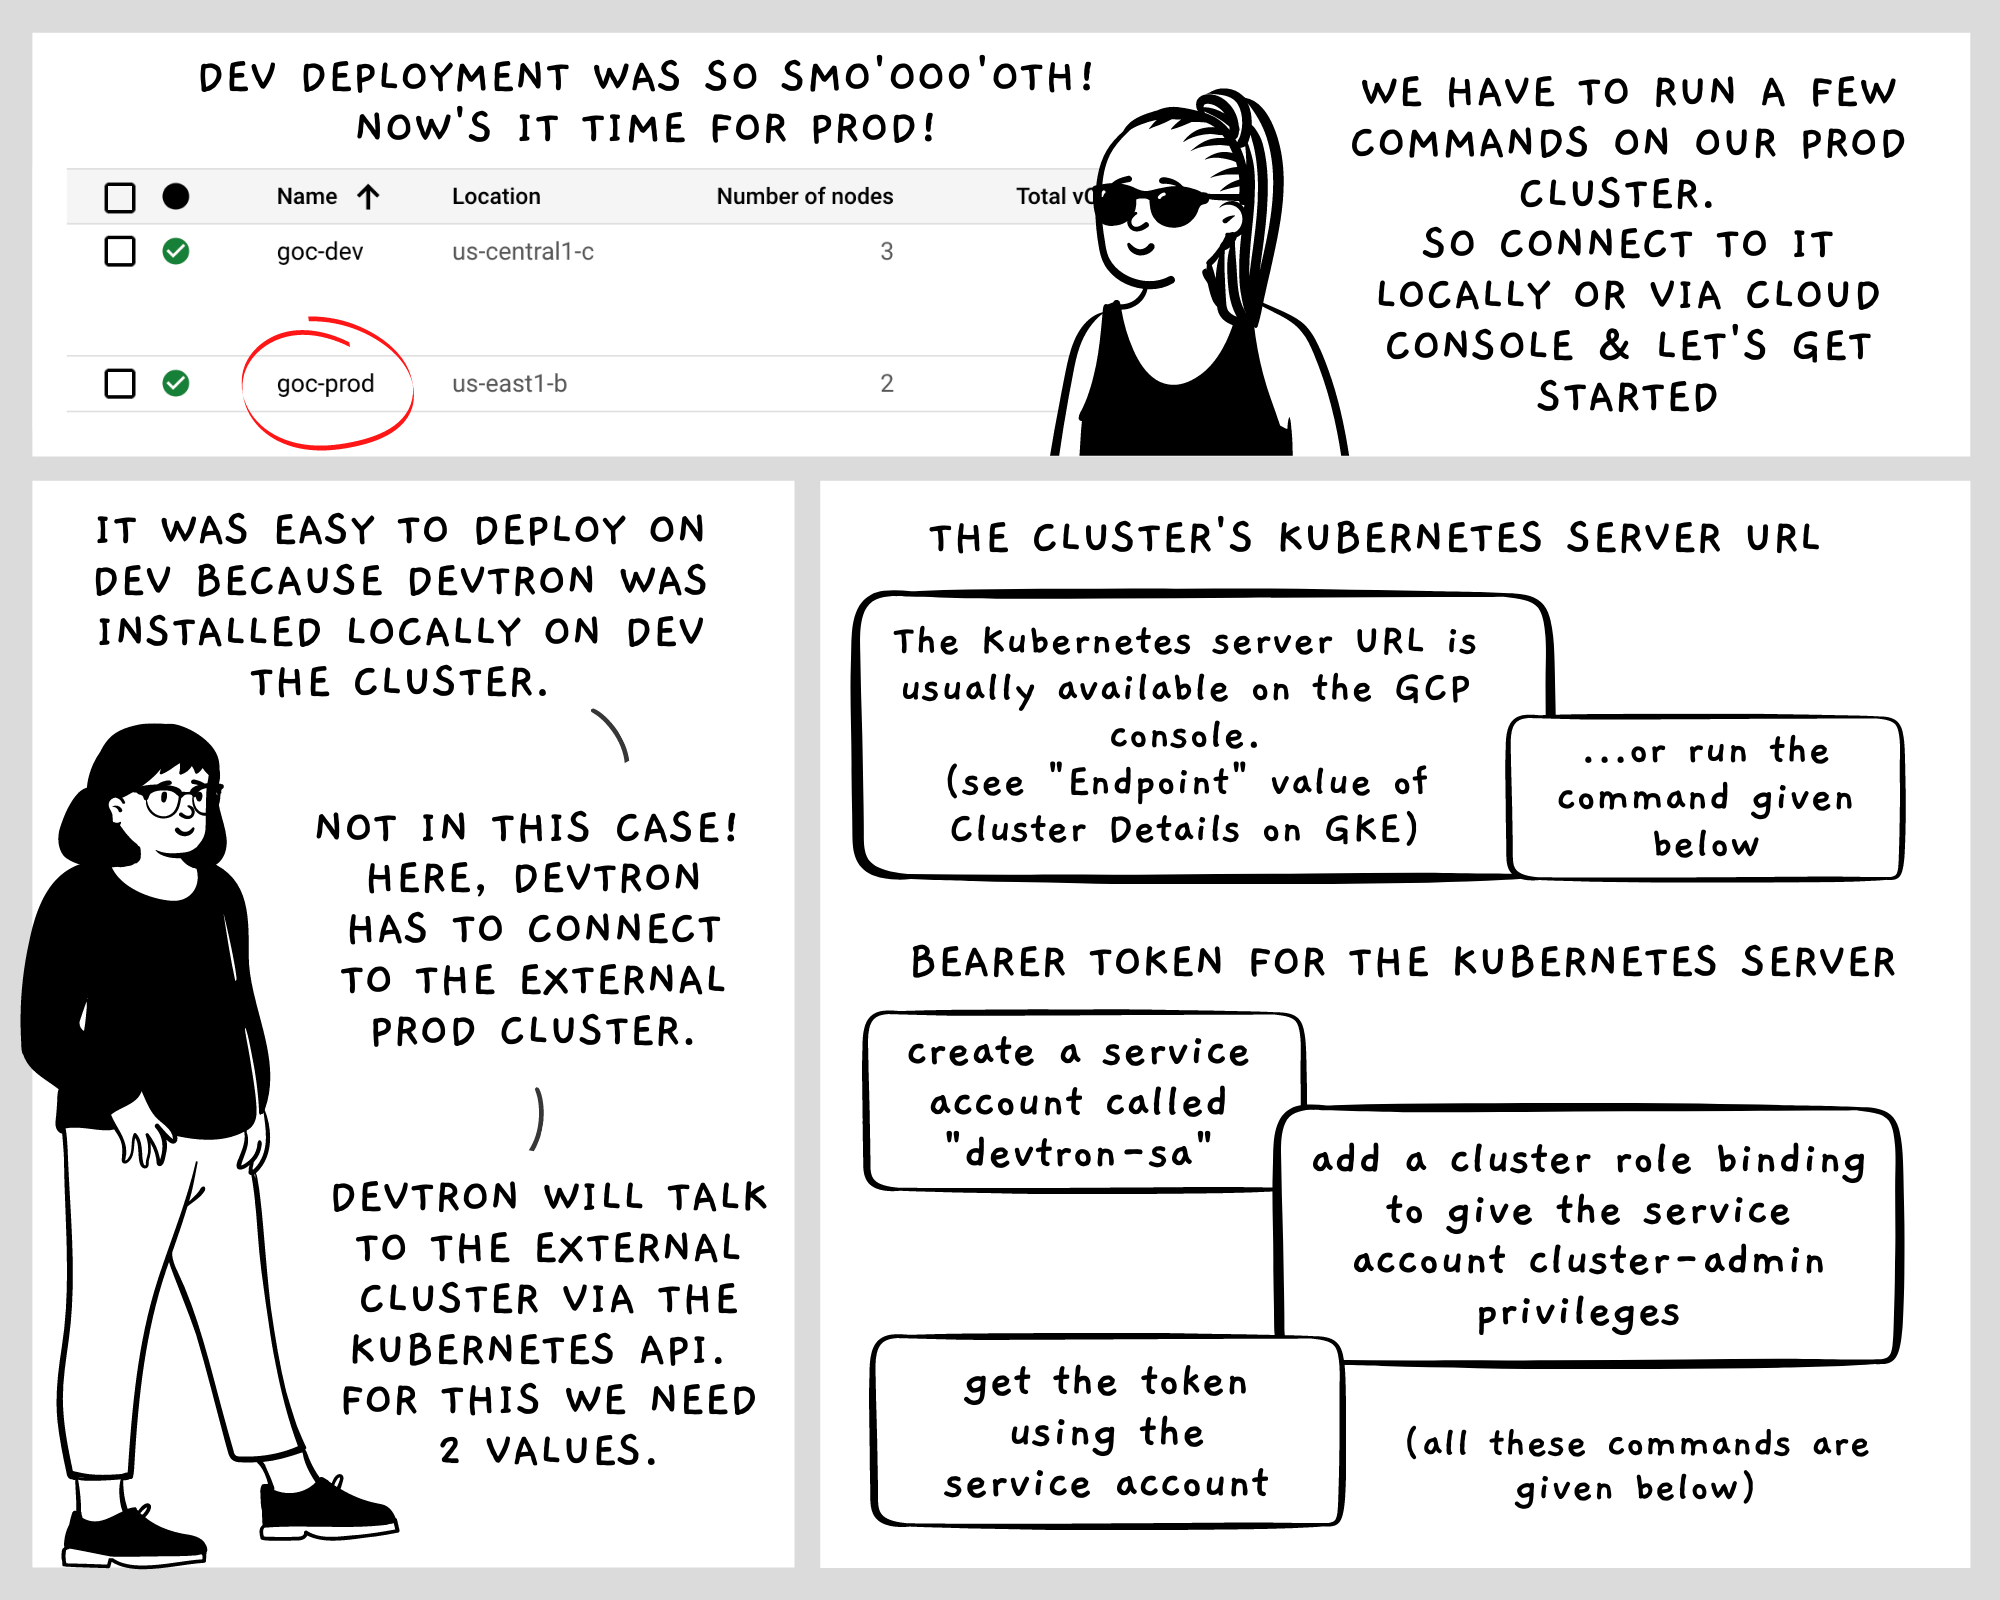
Don't worry, we're giving you the precious commands here:
Get the Kubernetes Server URL:
kubectl config view -o jsonpath='{"Cluster name\tServer\n"}{range .clusters[*]}{.name}{"\t"}{.cluster.server}{"\n"}{end}'Get the Bearer Token
# CREATE A NEW SERVICE ACCOUNT

kubectl create serviceaccount devtron-sa

# CREATE A CLUSTERROLEBINDING FOR THE SERVICE ACCOUNT
kubectl create devtron-binding --clusterrole=cluster-admin --serviceaccount=default:devtron-sa

# GET THE TOKEN FOR THE SERVICE ACCOUNT

TOKEN=$(kubectl get secrets -o jsonpath="{.items[?(@.metadata.annotations['kubernetes\.io/service-account\.name']=='devtron-sa')].data.token}"|base64 --decode)
echo $TOKEN
Once we have the Kubernetes server URL and the Beare token, we can connect to the prod cluster from Devtron.
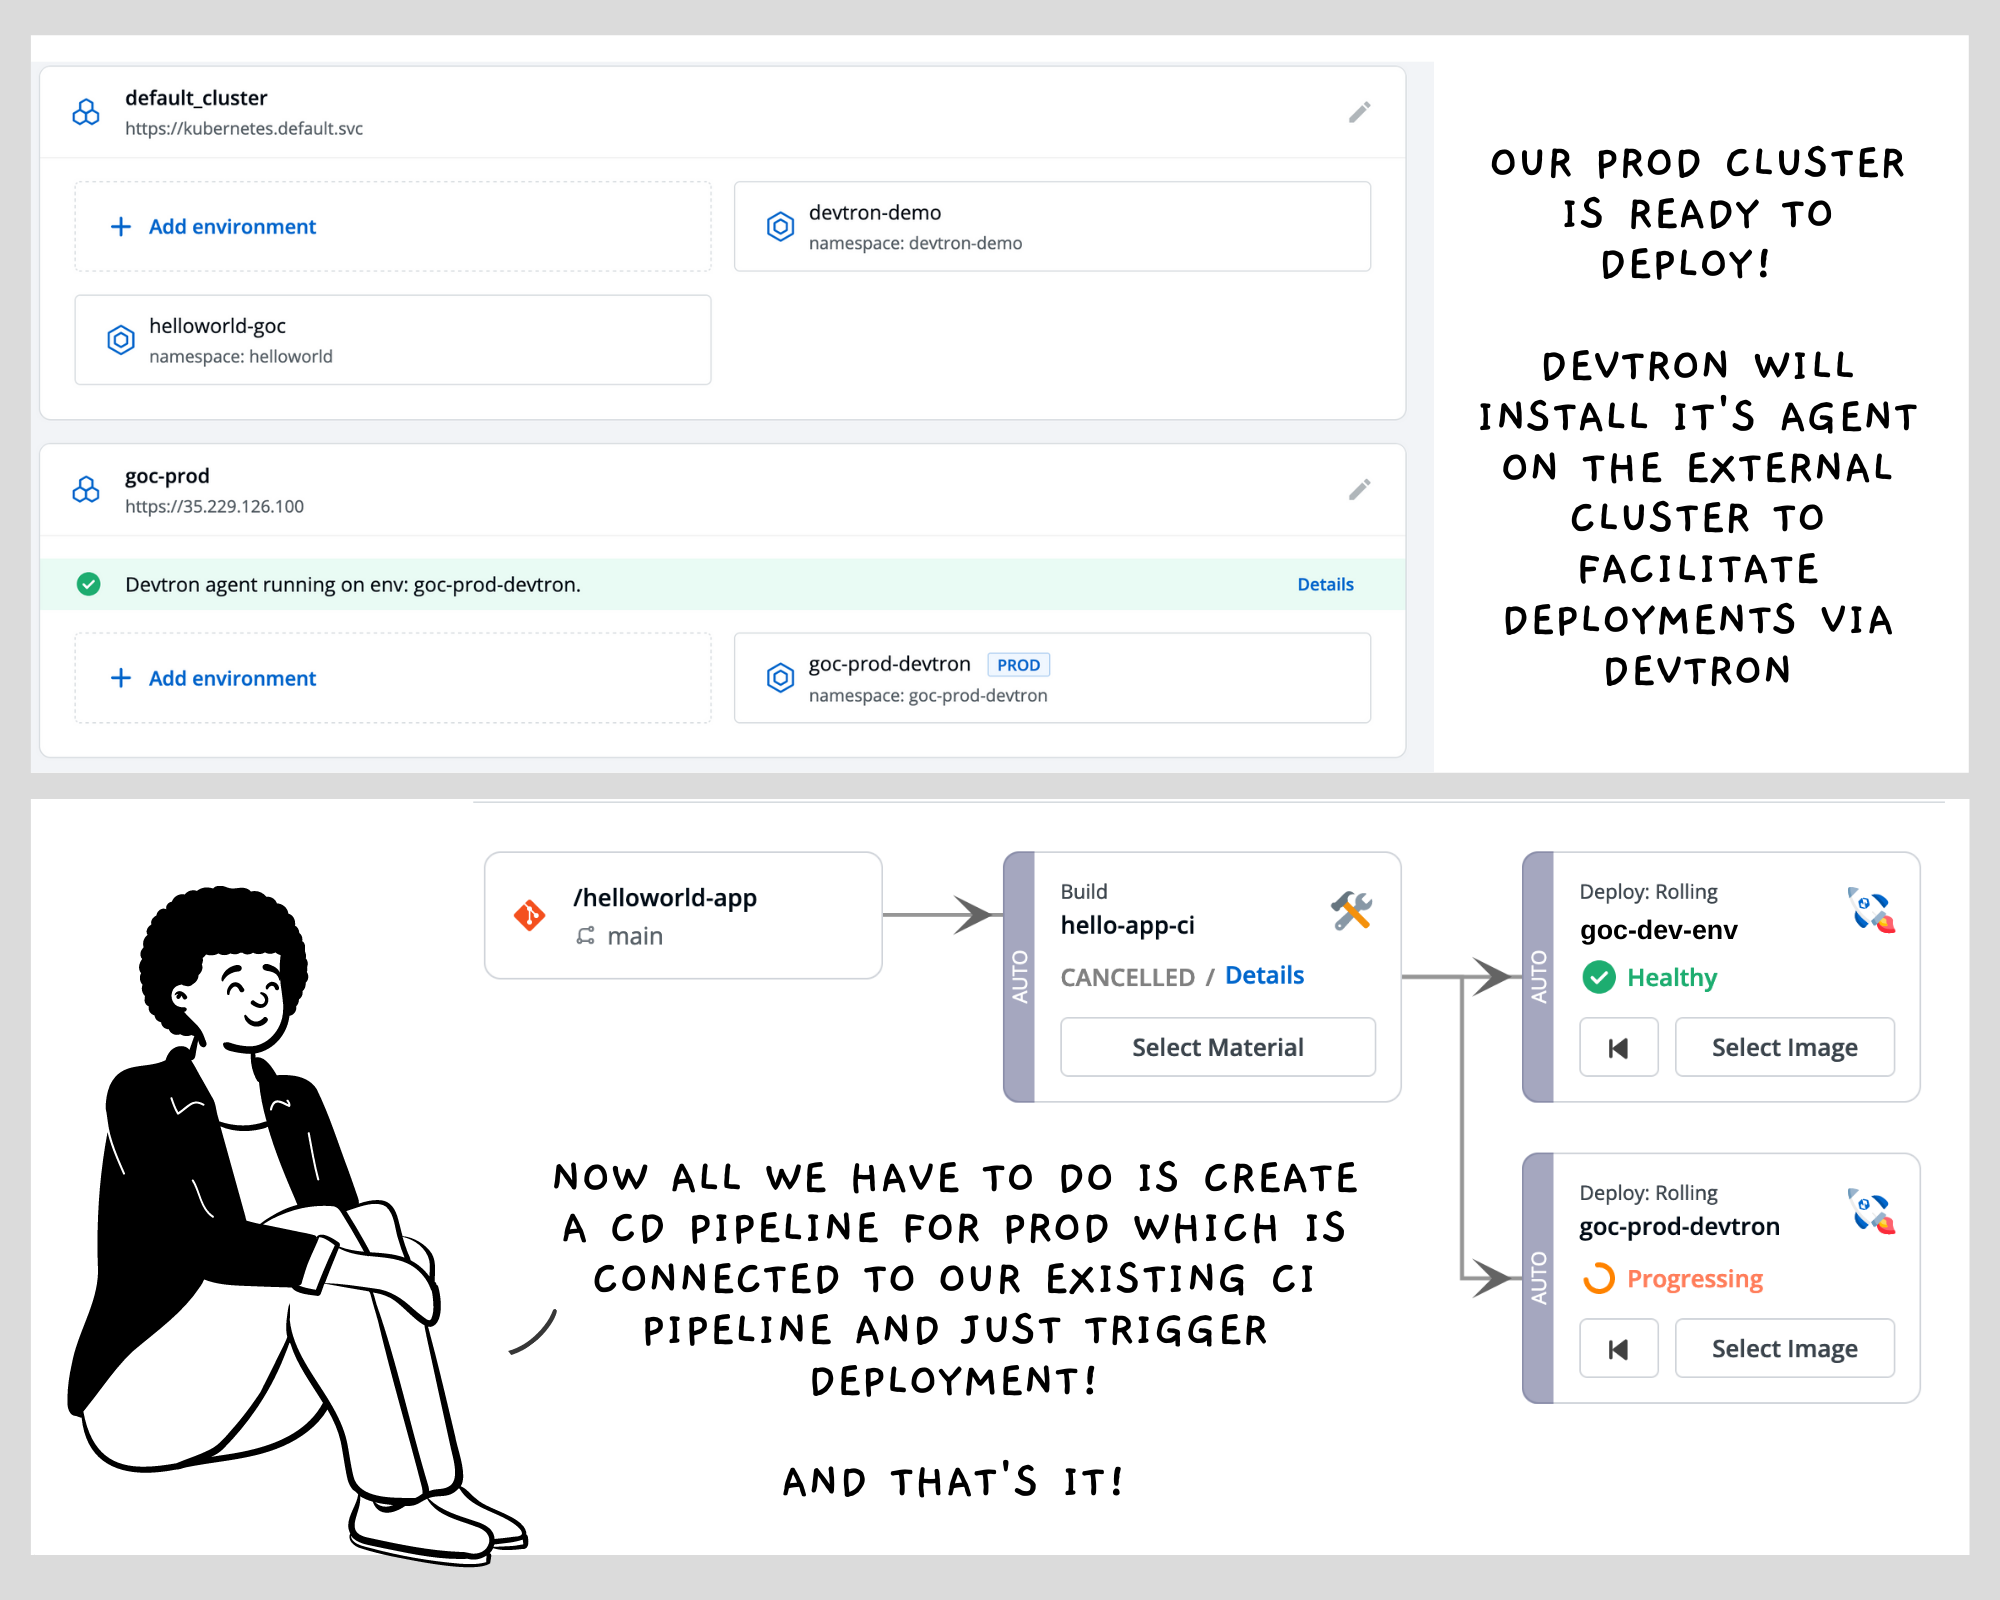
Once the cluster is set up, the remaining steps are pretty much the same. We create a new CD pipeline for the prod environment and just trigger a deployment to our cluster. The same way we did for the dev environment. And viola, the application is up on prod too! (Test it out the same way as dev using kubectl get svc -n <namespace> ).
In Summary


Join the conversation